Debugging Webhooks locally
In this guide, we will show you how to debug Webhook Self-Service Actions that are sent from Port locally.
This example contains the initial steps to set up a standard Self-Service Action use case, following it shows how to locally debug the payload sent by Port through the webhook invocation method.
Prerequisites
- A Port API
CLIENT_IDandCLIENT_SECRET; - Python & PIP installed
- Nodejs
In this example, interaction with Port will be primarily conducted using the API, but can also be done using the web UI.
Scenario
You want to provision new VMs using Port's CREATE Self-Service Actions.
In this example you will:
- Create a new
VMBlueprint - Add a
CREATEaction to the Blueprint - Use a local web-server to debug the webhook requests that Port sends every time a developer asks for a new VM.
Creating the VM blueprint
Let’s configure a VM Blueprint, its base structure is:
{
  "identifier": "vm",
  "title": "VM",
  "icon": "Server",
  "schema": {
    "properties": {
      "region": {
        "title": "Region",
        "type": "string",
        "description": "Region of the VM"
      },
      "cpu_cores": {
        "title": "CPU Cores",
        "type": "number",
        "description": "Number of allocated CPU cores"
      },
      "memory_size": {
        "title": "Memory Size ",
        "type": "number",
        "description": "Amount of allocated memory (GB)"
      },
      "storage_size": {
        "title": "Storage Size",
        "type": "number",
        "description": "Amount of allocated storage (GB)"
      },
      "free_storage": {
        "title": "Free Storage",
        "type": "number",
        "description": "Amount of free storage (GB)"
      },
      "deployed": {
        "title": "Deploy Status",
        "type": "string",
        "description": "The deployment status of this VM"
      }
    },
    "required": []
  },
  "calculationProperties": {}
}
Below you can see the python code to create this Blueprint (remember to insert your CLIENT_ID and CLIENT_SECRET in order to get an access token)
Click here to see the code
import requests

CLIENT_ID = 'YOUR_CLIENT_ID'
CLIENT_SECRET = 'YOUR_CLIENT_SECRET'

API_URL = 'https://api.getport.io/v1'

credentials = {'clientId': CLIENT_ID, 'clientSecret': CLIENT_SECRET}

token_response = requests.post(f'{API_URL}/auth/access_token', json=credentials)

access_token = token_response.json()['accessToken']

headers = {
    'Authorization': f'Bearer {access_token}'
}

blueprint = {
    "identifier": "vm",
    "title": "VM",
    "icon": "Server",
    "schema": {
        "properties": {
            "region": {
                "title": "Region",
                "type": "string",
                "description": "Region of the VM"
            },
            "cpu_cores": {
                "title": "CPU Cores",
                "type": "number",
                "description": "Number of allocated CPU cores"
            },
            "memory_size": {
                "title": "Memory Size ",
                "type": "number",
                "description": "Amount of allocated memory (GB)"
            },
            "storage_size": {
                "title": "Storage Size",
                "type": "number",
                "description": "Amount of allocated storage (GB)"
            },
            "free_storage": {
                "title": "Free Storage",
                "type": "number",
                "description": "Amount of free storage"
            },
            "deployed": {
                "title": "Deploy Status",
                "type": "string",
                "description": "The deployment status of this VM"
            }
        },
        "required": []
    },
    "calculationProperties": {},

}

response = requests.post(f'{API_URL}/blueprints', json=blueprint, headers=headers)

print(response.json())
Creating the VM CREATE action
In order to debug your action payload locally, you need to forward it to your local machine, meaning the webhook target needs to be your localhost. In order to forward the requests directed at your webhook to the localhost, we will use smee.io.
All you have to do is click on Start new channel and copy the provided Webhook Proxy URL, it should look similar to this: https://smee.io/b1iO4C4ZGNYmiVL5
Now let’s configure a Self-Service Action. You will add a CREATE action that will be triggered every time a developer creates a new VM entity, the Self-Service Action will trigger a small web-server running on your local machine.
You will configure the web-server a bit later in this guide.
Here is the action JSON:
{
  "identifier": "create_vm",
  "title": "Create VM",
  "icon": "Server",
  "description": "Create a new VM in cloud provider infrastructure",
  "trigger": "CREATE",
  "invocationMethod": { "type": "WEBHOOK", "url": "YOUR SMEE URL" },
  "userInputs": {
    "properties": {
      "title": {
        "type": "string",
        "title": "Title of the new VM"
      },
      "cpu": {
        "type": "number",
        "title": "Number of CPU cores"
      },
      "memory": {
        "type": "number",
        "title": "Size of memory"
      },
      "storage": {
        "type": "number",
        "title": "Size of storage"
      },
      "region": {
        "type": "string",
        "title": "Deployment region",
        "enum": ["eu-west-1", "eu-west-2", "us-west-1", "us-east-1"]
      }
    },
    "required": ["cpu", "memory", "storage", "region"]
  }
}
Below you can see the python code to create this action.
- Remember to insert your
CLIENT_IDandCLIENT_SECRETin order to get an access token. - Remember to insert the proxy URL you got from
smeein order to redirect the webhook messages to your localhost.
Note how the vm Blueprint identifier is used to add the action to the new Blueprint
Click here to see code
import requests

CLIENT_ID = 'YOUR_CLIENT_ID'
CLIENT_SECRET = 'YOUR_CLIENT_SECRET'

API_URL = 'https://api.getport.io/v1'

credentials = {'clientId': CLIENT_ID, 'clientSecret': CLIENT_SECRET}

token_response = requests.post(f'{API_URL}/auth/access_token', json=credentials)

access_token = token_response.json()['accessToken']

headers = {
    'Authorization': f'Bearer {access_token}'
}

blueprint_identifier = 'vm'

action = {
    'identifier': 'create_vm',
    'title': 'Create VM',
    'icon': 'Server',
    'description': 'Create a new VM in cloud provider infrastructure',
    'trigger': 'CREATE',
    "invocationMethod": { 'type': 'WEBHOOK', 'url': 'YOUR SMEE URL' },
    'userInputs': {
        'properties': {
            'title': {
                'type': 'string',
                'title': 'Title of the new VM'
            },
            'cpu': {
                'type': 'number',
                'title': 'Number of CPU cores'
            },
            'memory': {
                'type': 'number',
                'title': 'Size of memory'
            },
            'storage': {
                'type': 'number',
                'title': 'Size of storage'
            },
            'region': {
                'type': 'string',
                'title': 'Deployment region',
                'enum': ['eu-west-1', 'eu-west-2', 'us-west-1', 'us-east-1']
            }
        },
        'required': [
            'cpu', 'memory', 'storage', 'region'
        ]
    }
}

response = requests.post(f'{API_URL}/blueprints/{blueprint_identifier}/actions', json=action, headers=headers)

print(response.json())
Forwarding events to localhost
Now install the Smee client to forward the events to your localhost, you will use pysmee to achieve that:
pip install pysmee
Now use it to forward the event, for example:
pysmee forward https://smee.io/b1iO4C4ZGNYmiVL5 http://localhost:3000/webhooks
You should see a log line output like this:
[2022-09-15 13:59:39,462 MainThread] INFO: Forwarding https://smee.io/b1iO4C4ZGNYmiVL5 to http://localhost:3000/webhooks
Creating a small example server in Nodejs
Now because you are forwarding events to your localhost, all you need to do is create a small server that will listen to POST requests that are being sent to the /webhooks route.
Create a folder and run the following in it
npm init -y
npm install express
Inside this folder create an index.js file and paste the following:
const { createHmac } = require("crypto");
const express = require("express");
const app = express();
const port = 3000;

app.post("/webhooks", (request, response) => {
  // This part is used to verify that the webhook message was sent by Port
  const signed = createHmac("sha256", "<CLIENT_SECRET>")
    .update(
      `${request.headers["x-port-timestamp"]}.${JSON.stringify(request.body)}`
    )
    .digest("base64");

  if (signed !== request.headers["x-port-signature"].split(",")[1]) {
    throw new Error("Invalid singature");
  }

  // You can put any custom logic here
  console.log("Success!");

  response.send("Hello World!");
});

app.listen(port, () => {
  console.log(`Example app listening on port ${port}`);
});
Now run the server:
node index.js
Triggering the action
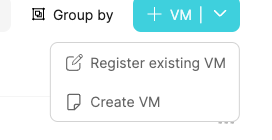
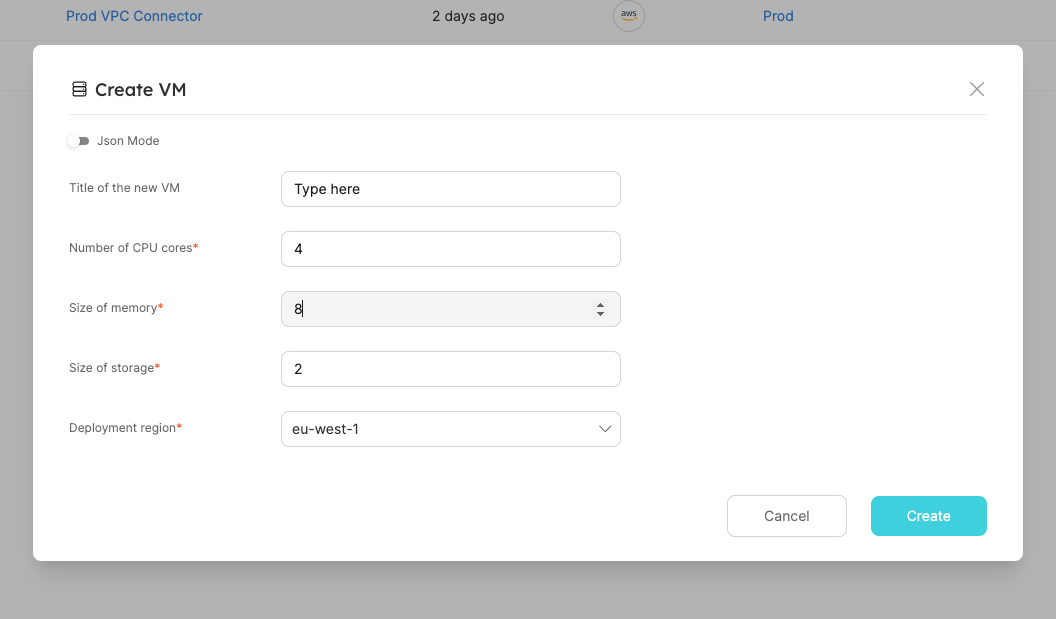
Login to port and go to the VM page and trigger the action via the Create VM action button:
Fill the wanted details and click on Create
And that's it, the Success! output shows that your local server really did receive your webhook payload:
![]()
Now that webhook requests are forwarded to your local machine, you can use your IDE to place breakpoints, examine the structure of the webhook request and iterate on your custom handler logic.