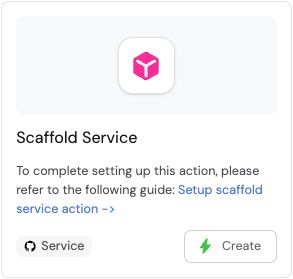
Scaffold a new service
This guide takes 7 minutes to complete, and aims to demonstrate the power of self-service actions in Port.
- This guide assumes you have a Port account and that you have finished the onboarding process. We will use the
Serviceblueprint that was created during the onboarding process. - You will need a Git repository (GitHub, GitLab, Bitbucket or Azure DevOps) in which you can place a workflow/pipeline that we will use in this guide. If you don't have one, we recommend creating a new repository named
Port-actions.
The goal of this guide
In this guide we will create an action that initializes a new Git repository. In reality, such an action can be used by developers to scaffold new services.
After completing it, you will get a sense of how it can benefit different personas in your organization:
- Developers will be able to scaffold new services easily.
- R&D managers will be able to get an overview of new services - how many were created and by whom.
- Platform engineers will be able to control permissions to ensure only the relevant people can create new services.
Setup the action's frontend
- GitHub, GitLab, Bitbucket
- Azure DevOps
-
Head to the Self-service page of your portal.
-
Click on the
+ Actionbutton in the top-right corner:
-
Fill the basic form with the Title and Description and select
CreateandServicefor the Operation and Blueprint respectively.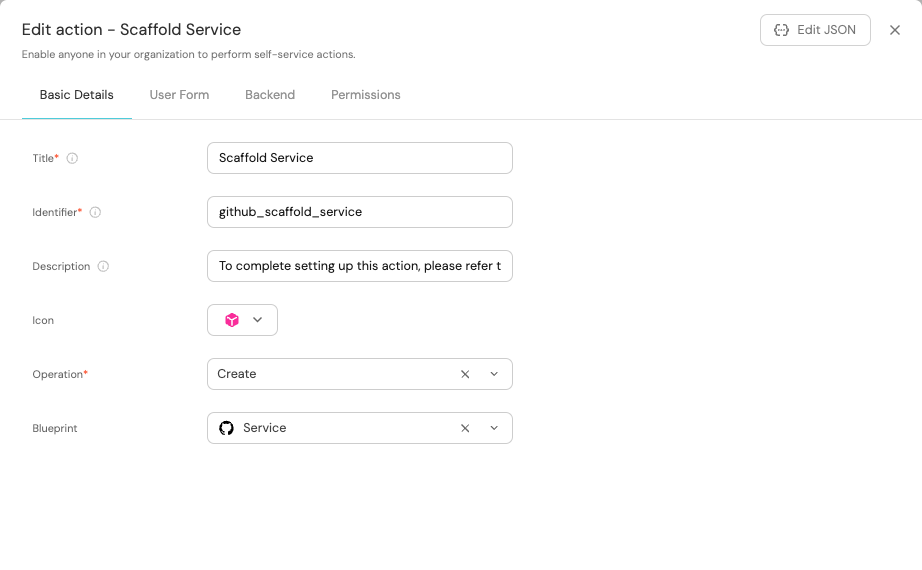
-
Click on the
Nextto proceed to theUser Formtab and click on+ Input. -
Enter
Service nameas the Title, selectTextfor the Type, set Required toTrue, and click on theCreatebutton.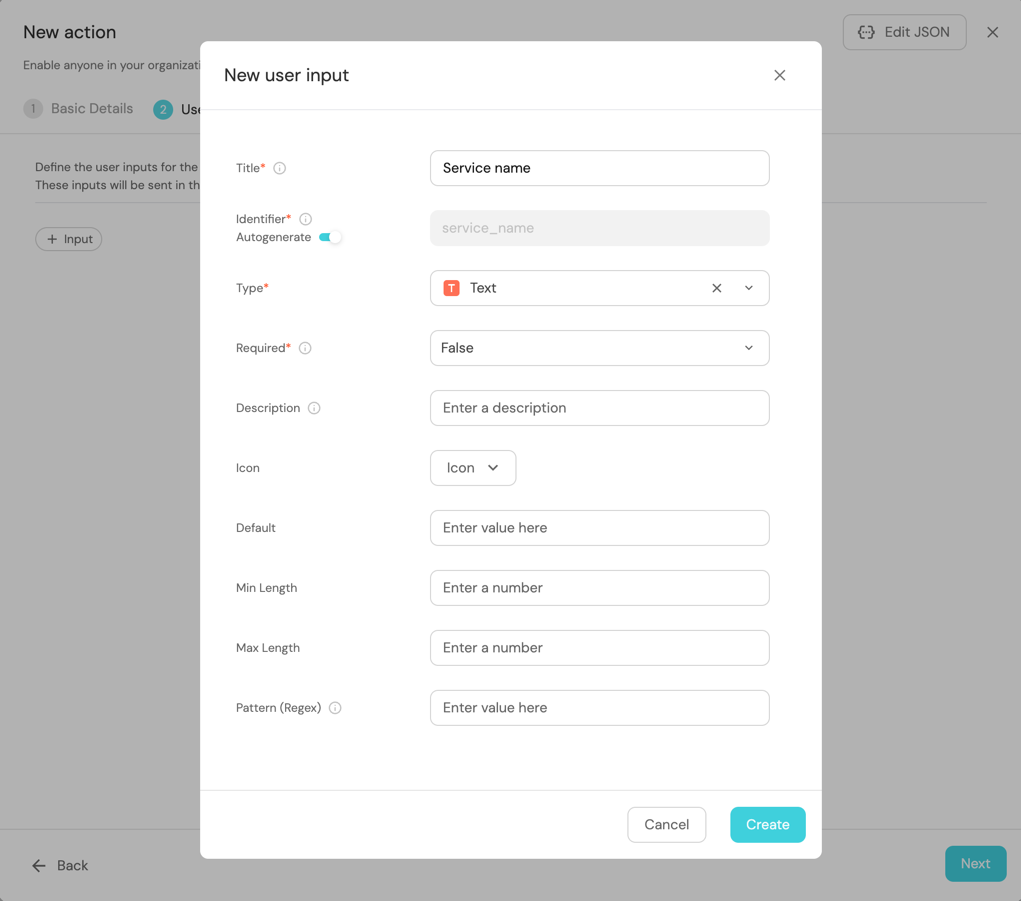
-
Click on the
Nextto configure the Backend.
-
Head to the Self-service page of your portal.
-
Click on the
+ Actionbutton in the top-right corner:
-
Fill the basic form with the Title and Description and select
CreateandServicefor the Operation and Blueprint respectively.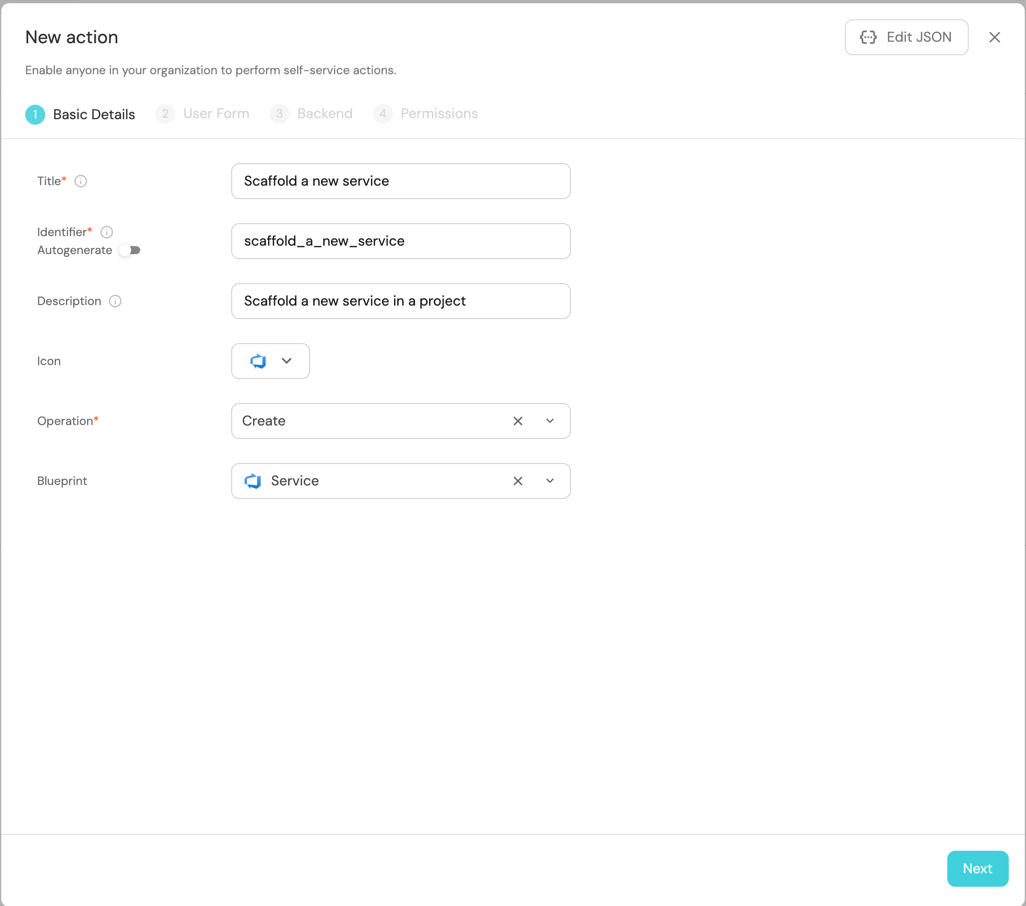
-
Click on
Next, and add the following inputs:Service Name,Azure Organization,Azure Project, andDescription.To create each input field:
- Click on
+ Input. - Enter the Title (e.g.,
Service Name). - Select the appropriate Type.
- Set Required to
Trueif the input is mandatory. - Click on the
Createbutton.
Input Details:
Input Name Type Required Additional Information Service Name Text Yes Azure Organization String Yes Azure Project Entity Selection Yes Select Projectas the blueprintDescription String No Data type and required fields- Ensure that the
Azure OrganizationandDescriptioninputs are of type String. - For the
Azure Projectinput, select Entity Selection as the type and chooseProjectas the blueprint. - Make sure the
Service Name,Azure Organization, andAzure Projectinputs are marked as required.
- Click on
-
Click on
Nextto configure the Backend.
Define backend type
Now we'll define the backend of the action. Port supports multiple invocation types, depending on the Git provider you are using.
- GitHub
- GitLab
- Bitbucket (Jenkins)
- Azure DevOps
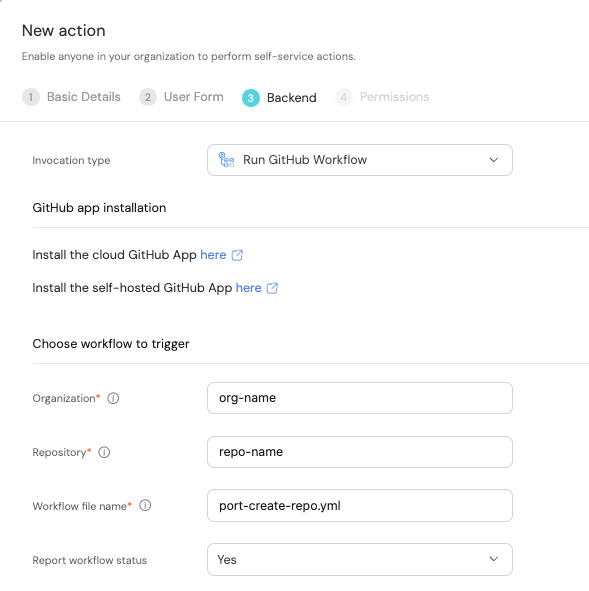
Fill out the form with your values:
-
Replace the
OrganizationandRepositoryvalues with your values (this is where the workflow will reside and run). -
Name the workflow
port-create-repo.yml. -
Fill out your workflow details:
-
Scroll down to the
Configure the invocation payloadsection.
This is where you can define which data will be sent to your backend each time the action is executed.For this example, we will send two details that our backend needs to know - the service name, and the id of the action run.
Copy the following JSON snippet and paste it in the payload code box:{
"port_context": {
"runId": "{{ .run.id }}"
},
"service_name": "{{ .inputs.service_name }}"
}
You will need a few parameters for this part that are generated in the setup the action's backend section, it is recommended to complete the steps there and then follow the instructions here with all of the required information in hand.
First, choose Trigger Webhook URL as the invocation type, then fill out the form:
-
For the
Endpoint URLyou need to add a URL in the following format:https://gitlab.com/api/v4/projects/{GITLAB_PROJECT_ID}/ref/main/trigger/pipeline?token={GITLAB_TRIGGER_TOKEN}- The value for
{GITLAB_PROJECT_ID}is the ID of the GitLab group that you create in the setup the action's backend section which stores the.gitlab-ci.ymlpipeline file.- To find the project ID, browse to the GitLab page of the group you created, at the top right corner of the page, click on the vertical 3 dots button (next to
Fork) and selectCopy project ID
- To find the project ID, browse to the GitLab page of the group you created, at the top right corner of the page, click on the vertical 3 dots button (next to
- The value for
{GITLAB_TRIGGER_TOKEN}is the trigger token you create in the setup the action's backend section.
- The value for
-
Set
HTTP methodtoPOST. -
Set
Request typetoAsync. -
Set
Use self-hosted agenttoNo.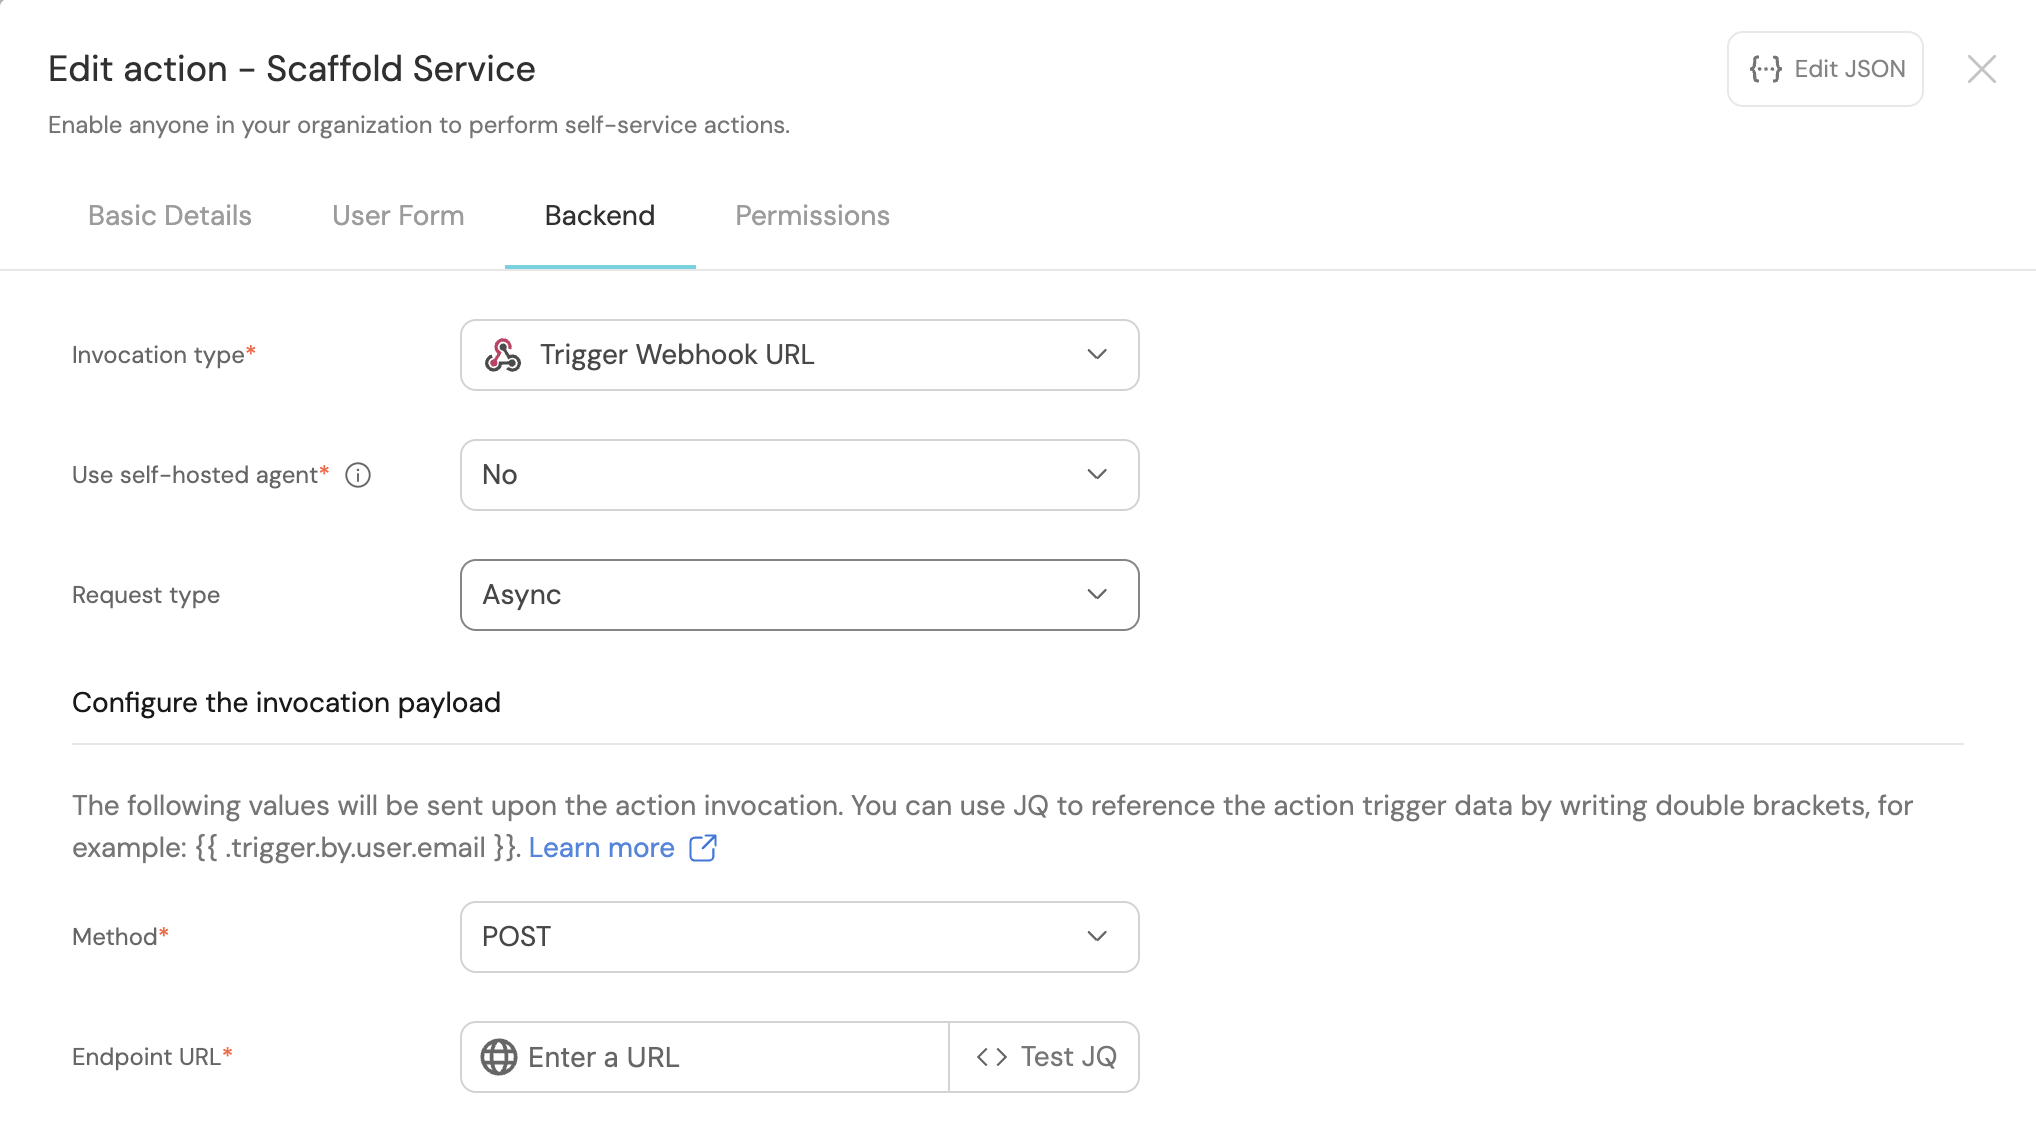
-
Scroll down to the
Configure the invocation payloadsection.
This is where you can define which data will be sent to your backend each time the action is executed.For this example, we will send some details that our backend needs to know, including the service name and the id of the action run.
Copy the following JSON snippet and paste it in the "Body" code box:{
"port_context": {
"runId": "{{ .run.id }}",
"blueprint": "{{ .action.blueprint }}",
"user": {
"firstName": "{{ .trigger.by.user.firstName }}",
"lastName": "{{ .trigger.by.user.lastName }}",
"email": "{{ .trigger.by.user.email }}",
}
},
"service_name": "{{ .inputs.service_name }}",
}
First, choose Jenkins as the invocation type.
- Follow the instructions under
Define a webhook to trigger a Jenkins jobto obtain your webhook URL.
Then, fill out your workflow details:
-
Replace the
Webhook URLwith your value (this is where the pipeline will reside and run). -
Leave the
Use self-hosted agentoption set toNo.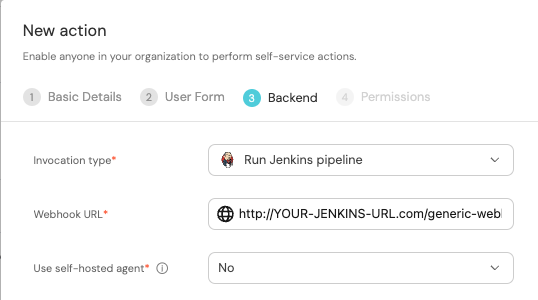
-
Scroll down to the
Configure the invocation payloadsection.
This is where you can define which data will be sent to your backend each time the action is executed.For this example, we will send some details that our backend needs to know - the user inputs, and the id of the action run.
Copy the following JSON snippet and paste it in the payload code box:{
"port_context": {
"runId": "{{ .run.id }}",
},
"service_name": "{{ .inputs.service_name }}",
"bitbucket_workspace_name": "{{ .inputs.bitbucket_workspace_name }}",
"bitbucket_project_key": "{{ .inputs.bitbucket_project_key }}",
}
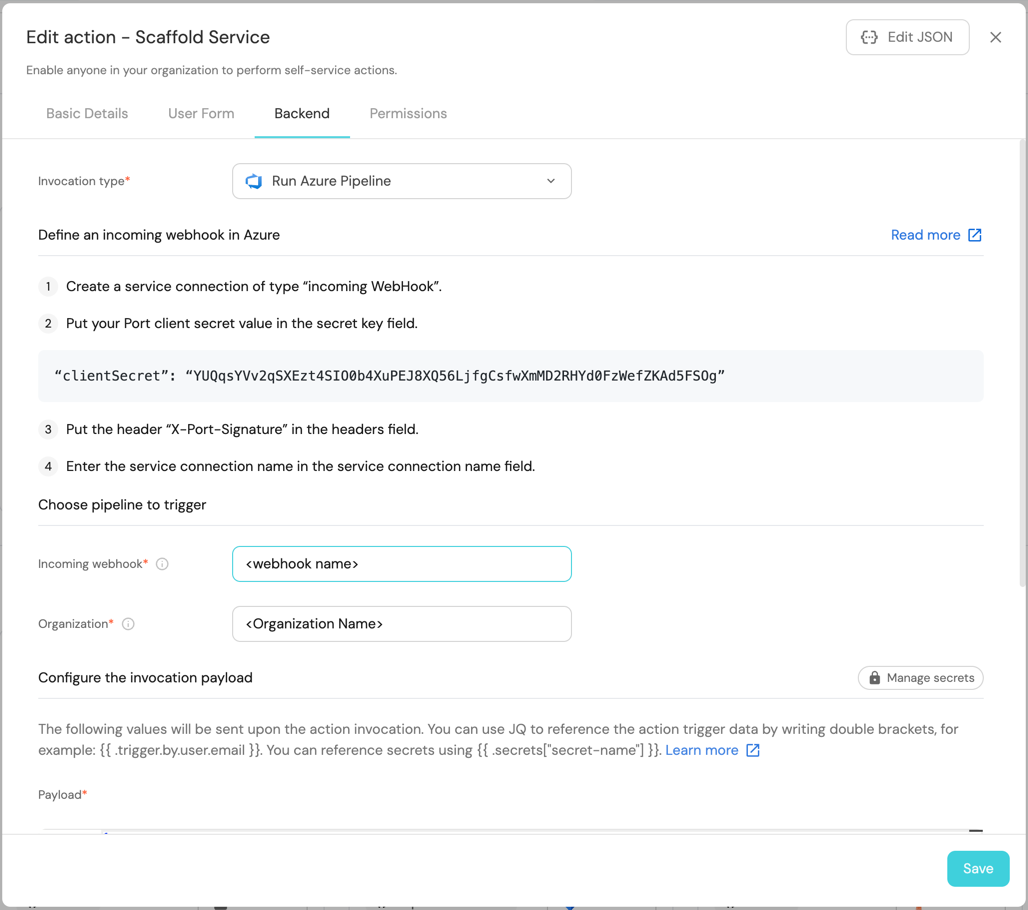
First, choose Run Azure Pipeline as the invocation type. Then fill out the form:
- Replace
Incoming Webhookwith the name of your webhook trigger. - Replace
Organizationwith your Azure DevOps organization name. - Under
Payload, we will define the data sent to the backend. Copy the following JSON snippet and paste it in thePayloadcode box:
{
    "properties": {
        "service_name": "{{.inputs.\"service_name\"}}",
        "azure_organization": "{{.inputs.\"azure_organization\"}}",
        "description": "{{.inputs.\"description\"}}",
        "azure_project": "{{.inputs.\"azure_project\"}}"
    },
    "port_context": {
        "blueprint": "{{.action.blueprint}}",
        "runId": "{{.run.id}}",
        "trigger": "{{ .trigger }}"
    }
}
The last step is customizing the action's permissions. For simplicity's sake, we will use the default settings. For more information, see the permissions page. Click Save.
The action's frontend is now ready 🥳
Setup the action's backend
Now we want to write the logic that our action will trigger.
- GitHub
- GitLab
- Bitbucket (Jenkins)
- Azure DevOps
If the GitHub organization which will house your workflow is not the same as the one you'll create the new repository in, install Port's Github app in the other organization as well.
- First, let's create the necessary token and secrets:
-
Go to your GitHub tokens page, create a personal access token (classic) with
repo,admin:repo_hookandadmin:orgscope, and copy it (this token is needed to create a repo from our workflow).
If your organization uses SAML SSO, you will need to authorize your token. Follow these instructions and then continue this guide.
- Go to your Port application, click on the
...in the top right corner, then clickCredentials. Copy yourClient IDandClient secret.
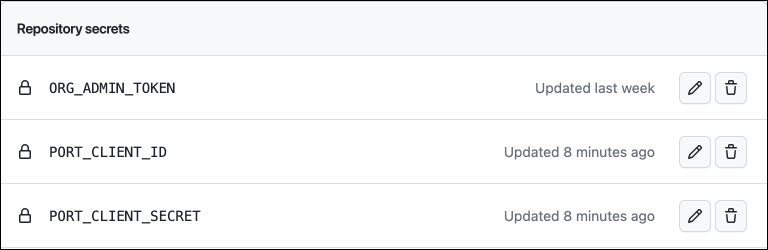
- In the repository where your workflow will reside, create 3 new secrets under
Settings->Secrets and variables->Actions:
ORG_ADMIN_TOKEN- the personal access token you created in the previous step.PORT_CLIENT_ID- the client ID you copied from your Port app.PORT_CLIENT_SECRET- the client secret you copied from your Port app.
- Now let's create the workflow file that contains our logic.
First, ensure that you have a.github/workflowsdirectory, then create a new file namedport-create-repo.ymland use the following snippet as its content (remember to change<YOUR-ORG-NAME>on line 15 to your GitHub organization name):
The GitHub workflow example below assumes that you will use the cookiecutter template specified in line 27.
If you would instead prefer to use a template from a private repository, replace the line in the template below with the following, ensuring to specify the GitHub org and repo name where instructed:
cookiecutterTemplate: https://oauth2:$ORG_ADMIN_TOKEN@github.com/$<GITHUB-ORG-NAME>/$<TEMPLATE-REPO>.git.
If the template GitHub repo is not within the same organization where this repo will be placed, please ensure you replace the ORG_ADMIN_TOKEN parameter with a token containing the same parameters used when you created the token in the previous step.
Github workflow (click to expand)
name: Scaffold a new service
on:
  workflow_dispatch:
    inputs:
      port_context:
        required: true
        description: Includes the action's run id
      service_name:
        required: true
        description: The name of the new service
        type: string
jobs:
  scaffold-service:
    env:
      ORG_NAME: <YOUR-ORG-NAME>
    runs-on: ubuntu-latest
    steps:
      - uses: port-labs/cookiecutter-gha@v1.1.1
        id: scaff
        with:
          portClientId: ${{ secrets.PORT_CLIENT_ID }}
          portClientSecret: ${{ secrets.PORT_CLIENT_SECRET }}
          token: ${{ secrets.ORG_ADMIN_TOKEN }}
          portRunId: ${{ fromJson(inputs.port_context).runId }}
          repositoryName: ${{ inputs.service_name }}
          portUserInputs: '{"cookiecutter_app_name": "${{ inputs.service_name }}" }'
          cookiecutterTemplate: https://github.com/lacion/cookiecutter-golang
          blueprintIdentifier: "service"
          organizationName: ${{ env.ORG_NAME }}
This workflow uses Port's cookiecutter Github action to scaffold the new repository.
First, let's create a GitLab project that will store our new scaffolder pipeline - Go to your GitLab account and create a new project.
Next, let's create the necessary token and secrets:
-
Go to your Port application, click on the
...in the top right corner, then clickCredentials. Copy yourClient IDandClient secret. -
Go to your root group, and follow the steps here to create a new group access token with the following permission scopes:
api, read_api, read_repository, write_repository, then save its value as it will be required in the next step.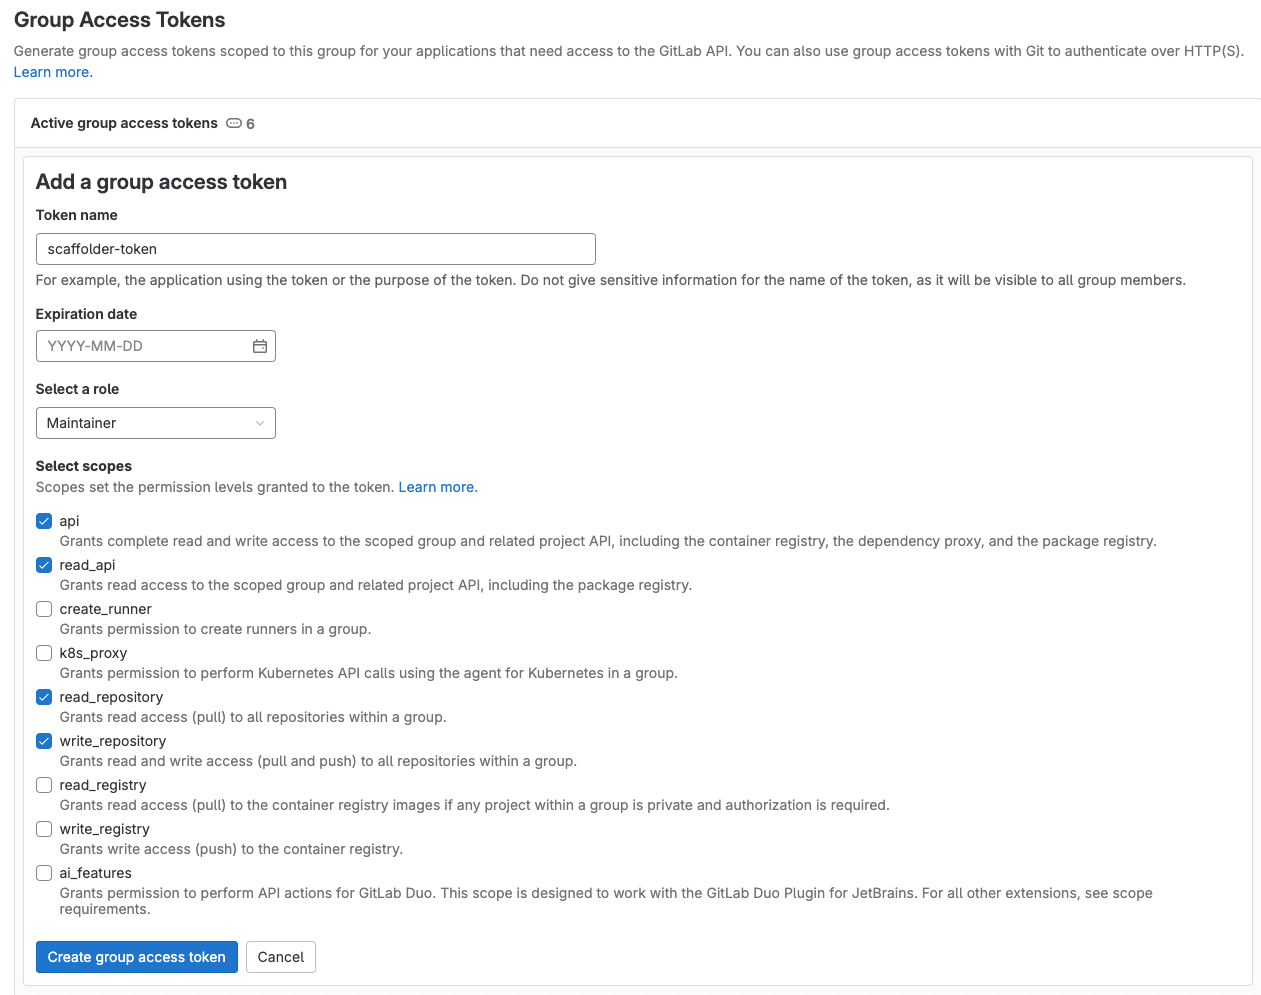
-
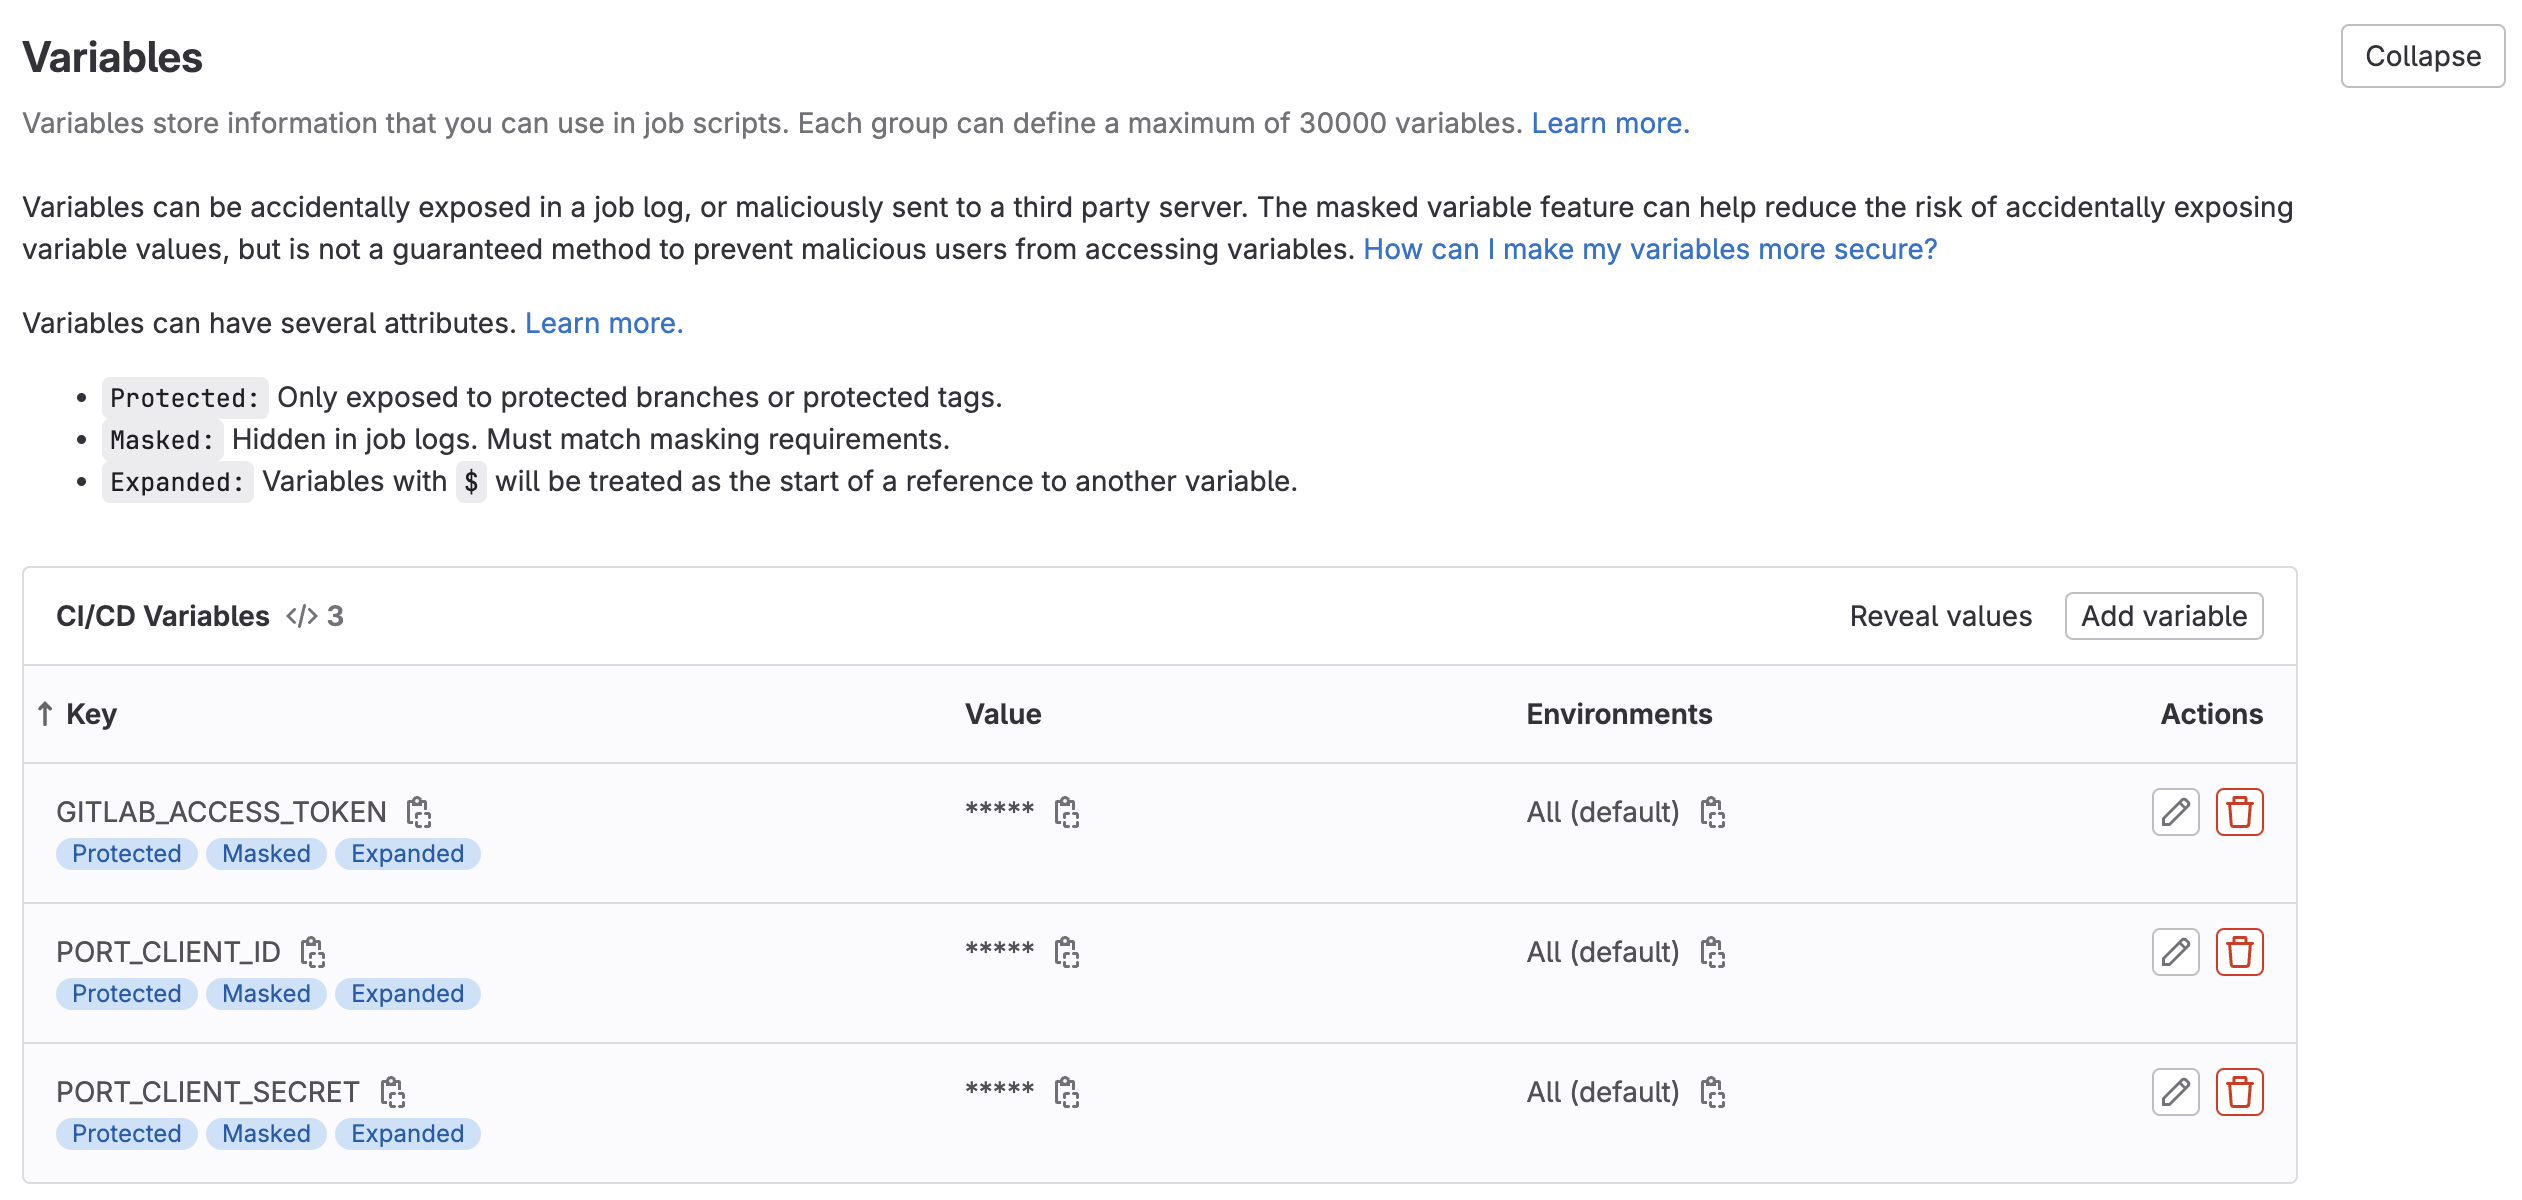
Go to the new GitLab project you created, from the
Settingsmenu in the sidebar on the left, selectCI/CD. -
Expand the
Variablessection and save the following secrets:PORT_CLIENT_ID- Your Port client ID.PORT_CLIENT_SECRET- Your Port client secret.GITLAB_ACCESS_TOKEN- The GitLab group access token you created in the previous step.
-
Expand the
Pipeline trigger tokenssection and add a new token, give it a meaningful description such asScaffolder tokenand save its value-
This is the
{GITLAB_TRIGGER_TOKEN}that you need for the define backend type section.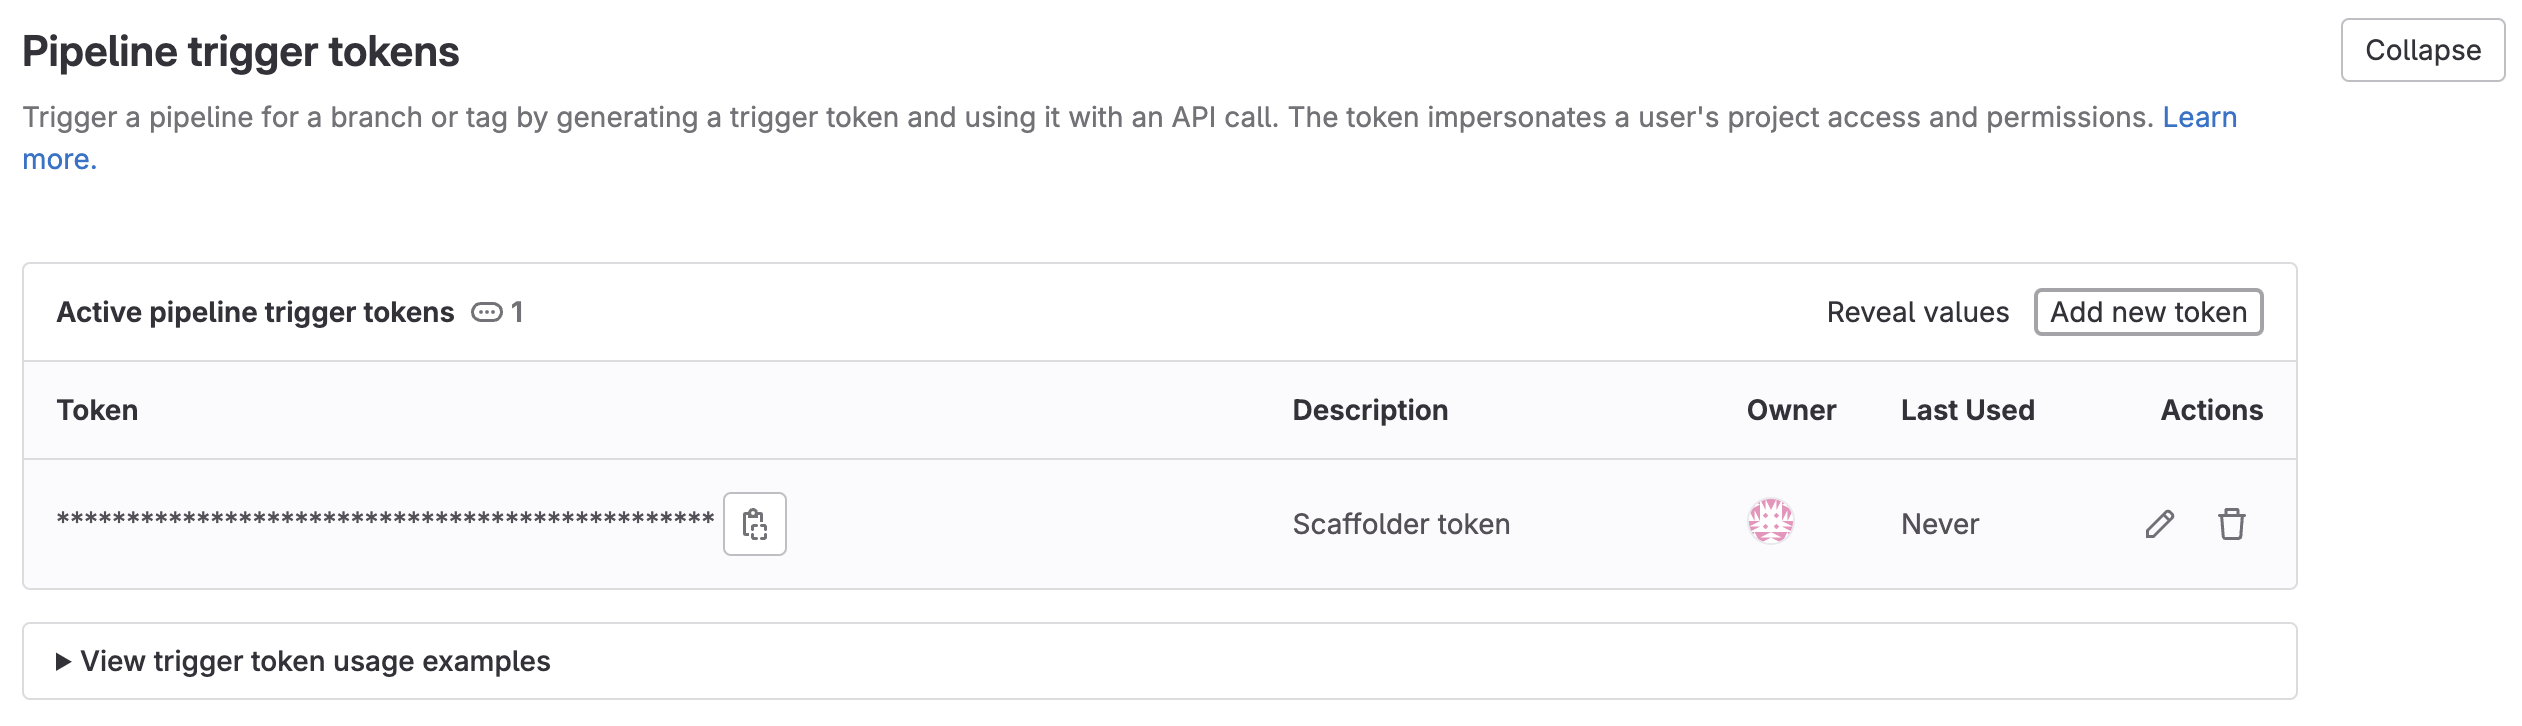
-
Now that you have both the new GitLab project and its respective trigger token, you can go to the define backend type section and complete the action configuration in Port.
Now let's create the pipeline file that contains our logic.
In the root of your new GitLab project, create a new file named .gitlab-ci.yml and use the following snippet as its content:
GitLab pipeline (click to expand)
image: python:3.10.0-alpine
variables:
# This is an example, you can replace it with any other cookiecutter template
COOKIECUTTER_TEMPLATE_URL: "https://gitlab.com/AdriaanRol/cookiecutter-pypackage-gitlab"
stages: # List of stages for jobs, and their order of execution
- fetch-port-access-token
- scaffold
- create-entity
- update-run-status
fetch-port-access-token: # Example - get the Port API access token and RunId
stage: fetch-port-access-token
except:
- pushes
before_script:
- apk update
- apk add jq curl -q
script:
- |
echo "Getting access token from Port API"
# this step uses the Port API to generate a token to update the executor of the action in the action run
accessToken=$(curl -X POST \
-H 'Content-Type: application/json' \
-d '{"clientId": "'"$PORT_CLIENT_ID"'", "clientSecret": "'"$PORT_CLIENT_SECRET"'"}' \
-s 'https://api.getport.io/v1/auth/access_token' | jq -r '.accessToken')
# this step saves the token that was just created to data.env as a variable called ACCESS_TOKEN
echo "ACCESS_TOKEN=$accessToken" >> data.env
runId=$(cat $TRIGGER_PAYLOAD | jq -r '.port_context.runId')
echo "RUN_ID=$runId" >> data.env
# given the Port payload information above, this step provides updates to the executor of the action...
curl -X POST \
-H 'Content-Type: application/json' \
-H "Authorization: Bearer $accessToken" \
-d '{"message":"🏃♂️ Starting new GitLab project scaffold"}' \
"https://api.getport.io/v1/actions/runs/$runId/logs"
# ...and provides a CI pipeline URL to the user for more information
curl -X PATCH \
-H 'Content-Type: application/json' \
-H "Authorization: Bearer $accessToken" \
-d '{"link":"'"$CI_PIPELINE_URL"'"}' \
"https://api.getport.io/v1/actions/runs/$runId"
artifacts:
reports:
dotenv: data.env
scaffold:
before_script: |
apk update
apk add jq curl git -q
pip3 install cookiecutter==2.3.0 -q
stage: scaffold
except:
- pushes
script:
- |
# this step informs the user that a new GitLab repo is about to be created
echo "Creating new GitLab repository"
curl -X POST \
-H 'Content-Type: application/json' \
-H "Authorization: Bearer $ACCESS_TOKEN" \
-d '{"message":"⚙️ Creating new GitLab repository"}' \
"https://api.getport.io/v1/actions/runs/$RUN_ID/logs"
# this step creates an empty repo with the service_name provided by the executor of the action...
service_name=$(cat $TRIGGER_PAYLOAD | jq -r '.service_name')
CREATE_REPO_RESPONSE=$(curl -X POST -s "$CI_API_V4_URL/projects" --header "Private-Token: $GITLAB_ACCESS_TOKEN" --form "name=$service_name" --form "namespace_id=$CI_PROJECT_NAMESPACE_ID")
PROJECT_URL=$(echo $CREATE_REPO_RESPONSE | jq -r .http_url_to_repo)
# ...and ensures that this step was successful
echo "Checking if the repository creation was successful"
if [[ -z "$PROJECT_URL" ]]; then
echo "Failed to create GitLab repository."
exit 1
fi
echo "Repository created"
# this step updates the user that a new, empty GitLab repo was created
curl -X POST \
-H 'Content-Type: application/json' \
-H "Authorization: Bearer $ACCESS_TOKEN" \
-d '{"message":"✅ Repository created"}' \
"https://api.getport.io/v1/actions/runs/$RUN_ID/logs"
# this step creates necessary variables that will be used to add to the new repo
FIRST_NAME=$(cat $TRIGGER_PAYLOAD | jq -r '.port_context.user.firstName')
LAST_NAME=$(cat $TRIGGER_PAYLOAD | jq -r '.port_context.user.lastName')
EMAIL=$(cat $TRIGGER_PAYLOAD | jq -r '.port_context.user.email')
BLUEPRINT_ID=$(cat $TRIGGER_PAYLOAD | jq -r '.port_context.blueprint')
echo "PROJECT_URL=$PROJECT_URL" >> data.env
echo "BLUEPRINT_ID=$BLUEPRINT_ID" >> data.env
echo "SERVICE_NAME=$service_name" >> data.env
# this step updates the executor of the action that a new cookiecutter project is being created
curl -X POST \
-H 'Content-Type: application/json' \
-H "Authorization: Bearer $ACCESS_TOKEN" \
-d '{"message":"🏗️ Generating new project template from Cookiecutter"}' \
"https://api.getport.io/v1/actions/runs/$RUN_ID/logs"
# Generate cookiecutter.yaml file
cat <<EOF > cookiecutter.yaml
default_context:
full_name: "${FIRST_NAME} ${LAST_NAME}"
email: "${EMAIL}"
project_short_description: "Project scaffolded by Port"
gitlab_username: "${gitlab_username}"
project_name: "${service_name}"
EOF
cookiecutter $COOKIECUTTER_TEMPLATE_URL --no-input --config-file cookiecutter.yaml --output-dir scaffold_out
# this step sets git configs to modify the new repo
echo "Initializing new repository..."
git config --global user.email "scaffolder@email.com"
git config --global user.name "Mighty Scaffolder"
git config --global init.defaultBranch "main"
# this step updates the executor of the action that the repo template is being uploaded
curl -X POST \
-H 'Content-Type: application/json' \
-H "Authorization: Bearer $ACCESS_TOKEN" \
-d '{"message":"📡 Uploading repository template"}' \
"https://api.getport.io/v1/actions/runs/$RUN_ID/logs"
# this step copies the cookiecutter template
# and adds it to the empty repo with the parameters provided by the user
modified_service_name=$(echo "$service_name" | sed 's/[[:space:]-]/_/g')
cd scaffold_out/$modified_service_name
git init
git add .
git commit -m "Initial commit"
GITLAB_HOSTNAME=$(echo "$CI_API_V4_URL" | cut -d'/' -f3)
git remote add origin https://:$GITLAB_ACCESS_TOKEN@$GITLAB_HOSTNAME/${CI_PROJECT_NAMESPACE}/${service_name}.git
git push -u origin main
# this step informs the executor of the action that the repo has been updated
curl -X POST \
-H 'Content-Type: application/json' \
-H "Authorization: Bearer $ACCESS_TOKEN" \
-d '{"message":"👍 Repository updated"}' \
"https://api.getport.io/v1/actions/runs/$RUN_ID/logs"
artifacts:
reports:
dotenv: data.env
create-entity:
stage: create-entity
except:
- pushes
before_script:
- apk update
- apk add jq curl -q
script:
- |
# this step adds a new Port entity for the new repository
echo "Creating Port entity to match new repository"
curl -X POST \
-H 'Content-Type: application/json' \
-H "Authorization: Bearer $ACCESS_TOKEN" \
-d '{"message":"🚀 Creating new '"$BLUEPRINT_ID"' entity: '"$SERVICE_NAME"'"}' \
"https://api.getport.io/v1/actions/runs/$RUN_ID/logs"
curl --location --request POST "https://api.getport.io/v1/blueprints/$BLUEPRINT_ID/entities?upsert=true&run_id=$RUN_ID&create_missing_related_entities=true" \
--header "Authorization: Bearer $ACCESS_TOKEN" \
--header "Content-Type: application/json" \
-d '{"identifier": "'"$SERVICE_NAME"'","title": "'"$SERVICE_NAME"'","properties": {"url": "'"$PROJECT_URL"'"}, "relations": {}}'
update-run-status:
stage: update-run-status
except:
- pushes
image: curlimages/curl:latest
script:
- |
# these steps provide the executor of the action the URL of the project
echo "Updating Port action run status and final logs"
curl -X POST \
-H 'Content-Type: application/json' \
-H "Authorization: Bearer $ACCESS_TOKEN" \
-d '{"message":"✅ Scaffold '"$SERVICE_NAME"' finished successfully!"}' \
"https://api.getport.io/v1/actions/runs/$RUN_ID/logs"
curl -X POST \
-H 'Content-Type: application/json' \
-H "Authorization: Bearer $ACCESS_TOKEN" \
-d '{"message":"🔗 Project URL: '"$PROJECT_URL"'"}' \
"https://api.getport.io/v1/actions/runs/$RUN_ID/logs"
curl -X PATCH \
-H 'Content-Type: application/json' \
-H "Authorization: Bearer $ACCESS_TOKEN" \
-d '{"status":"SUCCESS", "message": {"run_status": "Scaffold '"$SERVICE_NAME"' finished successfully! Project URL: '"$PROJECT_URL"'"}}' \
"https://api.getport.io/v1/actions/runs/$RUN_ID"
First, let's create the necessary tokens and secrets:
-
Go to your Port application, click on the
...in the top right corner, then clickCredentials. Copy yourClient IDandClient secret. -
Configure the following as Jenkins credentials:
BITBUCKET_USERNAME- a user with access to the Bitbucket workspace and project.BITBUCKET_APP_PASSWORD- an App Password with theRepositories:ReadandRepositories:Writepermissions permissions.PORT_CLIENT_ID- Your Port client ID.PORT_CLIENT_SECRET- Your Port client secret.

Next, create a Jenkins pipeline with the following configuration:
-
Define the value of the
tokenfield, the token you specify will be used to trigger the scaffold pipeline specifically. For example, you can usescaffolder-token. -
Define variables for the pipeline: define the
SERVICE_NAME,BITBUCKET_WORKSPACE_NAME,BITBUCKET_PROJECT_KEY, andRUN_IDvariables. Scroll down to thePost content parametersand for each variable add configuration like so (look at the table below for the full variable list):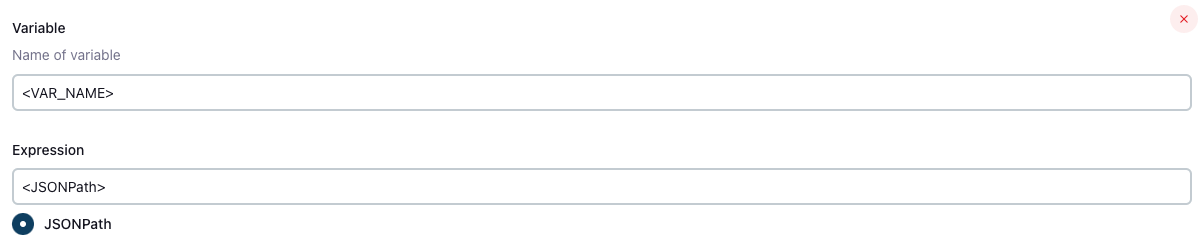
Create the following variables and their related JSONPath expression:
| Variable Name | JSONPath Expression |
|---|---|
| SERVICE_NAME | $.service_name |
| BITBUCKET_WORKSPACE_NAME | $.bitbucket_workspace_name |
| BITBUCKET_PROJECT_KEY | $.bitbucket_project_key |
| RUN_ID | $.port_context.runId |
Add the following content to the new Jenkins pipeline:
Jenkins pipeline (click to expand)
import groovy.json.JsonSlurper

pipeline {
    agent any

    environment {
        COOKIECUTTER_TEMPLATE = 'https://github.com/lacion/cookiecutter-golang'
        SERVICE_NAME = "${SERVICE_NAME}"
        BITBUCKET_WORKSPACE_NAME = "${BITBUCKET_WORKSPACE_NAME}"
        BITBUCKET_PROJECT_KEY = "${BITBUCKET_PROJECT_KEY}"
        SCAFFOLD_DIR = "scaffold_${SERVICE_NAME}"
        PORT_ACCESS_TOKEN = ""
        PORT_BLUEPRINT_ID = "microservice"
        PORT_RUN_ID = "${RUN_ID}"
    }

    stages {
        stage('Get access token') {
            steps {
                script {
                    withCredentials([
                        string(credentialsId: 'PORT_CLIENT_ID', variable: 'PORT_CLIENT_ID'),
                        string(credentialsId: 'PORT_CLIENT_SECRET', variable: 'PORT_CLIENT_SECRET')
                    ]) {
                        // Execute the curl command and capture the output
                        def result = sh(returnStdout: true, script: """
                            accessTokenPayload=\$(curl -X POST \
                                -H "Content-Type: application/json" \
                                -d '{"clientId": "${PORT_CLIENT_ID}", "clientSecret": "${PORT_CLIENT_SECRET}"}' \
                                -s "https://api.getport.io/v1/auth/access_token")
                            echo \$accessTokenPayload
                        """)

                        // Parse the JSON response using JsonSlurper
                        def jsonSlurper = new JsonSlurper()
                        def payloadJson = jsonSlurper.parseText(result.trim())

                        // Access the desired data from the payload
                        PORT_ACCESS_TOKEN = payloadJson.accessToken
                    }

                }
            }
        } // end of stage Get access token

        stage('Create BitBucket Repository') {
            steps {
                script {
                    def logs_report_response = sh(script: """
                        curl -X POST \
                          -H "Content-Type: application/json" \
                          -H "Authorization: Bearer ${PORT_ACCESS_TOKEN}" \
                          -d '{"message": "Creating BitBucket repository: ${SERVICE_NAME} in Workspace: ${BITBUCKET_WORKSPACE_NAME}, Project: ${BITBUCKET_PROJECT_KEY}..."}' \
                             "https://api.getport.io/v1/actions/runs/${PORT_RUN_ID}/logs"
                    """, returnStdout: true)

                    println(logs_report_response)
                }
                script {
                    withCredentials([
                        string(credentialsId: 'BITBUCKET_USERNAME', variable: 'BITBUCKET_USERNAME'),
                        string(credentialsId: 'BITBUCKET_APP_PASSWORD', variable: 'BITBUCKET_APP_PASSWORD')
                    ]) {
                        sh """
                            curl -i -u ${BITBUCKET_USERNAME}:${BITBUCKET_APP_PASSWORD} \\
                            -d '{"is_private": true, "scm": "git", "project": {"key": "${BITBUCKET_PROJECT_KEY}"}}' \\
                            https://api.bitbucket.org/2.0/repositories/${BITBUCKET_WORKSPACE_NAME}/${SERVICE_NAME}
                        """
                    }
                }
            }
        } // end of stage Create BitBucket Repository

        stage('Scaffold Cookiecutter Template') {
            steps {
                script {
                    def logs_report_response = sh(script: """
                        curl -X POST \
                          -H "Content-Type: application/json" \
                          -H "Authorization: Bearer ${PORT_ACCESS_TOKEN}" \
                          -d '{"message": "Scaffolding ${SERVICE_NAME}..."}' \
                             "https://api.getport.io/v1/actions/runs/${PORT_RUN_ID}/logs"
                    """, returnStdout: true)

                    println(logs_report_response)
                }
                script {
                    withCredentials([
                        string(credentialsId: 'BITBUCKET_USERNAME', variable: 'BITBUCKET_USERNAME'),
                        string(credentialsId: 'BITBUCKET_APP_PASSWORD', variable: 'BITBUCKET_APP_PASSWORD')
                    ]) {
                        def yamlContent = """
default_context:
  full_name: "Full Name"
  github_username: "bitbucketuser"
  app_name: "${SERVICE_NAME}"
  project_short_description": "A Golang project."
  docker_hub_username: "dockerhubuser"
  docker_image: "dockerhubuser/alpine-base-image:latest"
  docker_build_image: "dockerhubuser/alpine-golang-buildimage"
"""
                    // Write the YAML content to a file
                    writeFile(file: 'cookiecutter.yaml', text: yamlContent)

                        sh("""
                            rm -rf ${SCAFFOLD_DIR} ${SERVICE_NAME}
                            git clone https://${BITBUCKET_USERNAME}:${BITBUCKET_APP_PASSWORD}@bitbucket.org/${BITBUCKET_WORKSPACE_NAME}/${SERVICE_NAME}.git

                            cookiecutter ${COOKIECUTTER_TEMPLATE} --output-dir ${SCAFFOLD_DIR} --no-input --config-file cookiecutter.yaml -f

                            rm -rf ${SCAFFOLD_DIR}/${SERVICE_NAME}/.git*
                            cp -r ${SCAFFOLD_DIR}/${SERVICE_NAME}/* "${SERVICE_NAME}/"

                            cd ${SERVICE_NAME}
                            git config user.name "Jenkins Pipeline Bot"
                            git config user.email "jenkins-pipeline[bot]@users.noreply.jenkins.com"
                            git add .
                            git commit -m "Scaffolded project ${SERVICE_NAME}"
                            git push -u origin master
                            cd ..

                            rm -rf ${SCAFFOLD_DIR} ${SERVICE_NAME}
                        """)
                    }

                }
            }
        } // end of stage Clone Cookiecutter Template

        stage('CREATE Microservice entity') {
            steps {
                script {
                    def logs_report_response = sh(script: """
                        curl -X POST \
                          -H "Content-Type: application/json" \
                          -H "Authorization: Bearer ${PORT_ACCESS_TOKEN}" \
                          -d '{"message": "Creating ${SERVICE_NAME} Microservice Port entity..."}' \
                             "https://api.getport.io/v1/actions/runs/${PORT_RUN_ID}/logs"
                    """, returnStdout: true)

                    println(logs_report_response)
                }
                script {
                    def status_report_response = sh(script: """
						curl --location --request POST "https://api.getport.io/v1/blueprints/$PORT_BLUEPRINT_ID/entities?upsert=true&run_id=$PORT_RUN_ID&create_missing_related_entities=true" \
        --header "Authorization: Bearer $PORT_ACCESS_TOKEN" \
        --header "Content-Type: application/json" \
        --data-raw '{
				"identifier": "${SERVICE_NAME}",
				"title": "${SERVICE_NAME}",
				"properties": {"description":"${SERVICE_NAME} golang project","url":"https://bitbucket.org/${BITBUCKET_WORKSPACE_NAME}/${SERVICE_NAME}/src"},
				"relations": {}
			}'

                    """, returnStdout: true)

                    println(status_report_response)
                }
            }
        } // end of stage CREATE Microservice entity

        stage('Update Port Run Status') {
            steps {
                script {
                    def status_report_response = sh(script: """
                        curl -X PATCH \
                          -H "Content-Type: application/json" \
                          -H "Authorization: Bearer ${PORT_ACCESS_TOKEN}" \
                          -d '{"status":"SUCCESS", "message": {"run_status": "Scaffold Jenkins Pipeline completed successfully!"}}' \
                             "https://api.getport.io/v1/actions/runs/${PORT_RUN_ID}"
                    """, returnStdout: true)

                    println(status_report_response)
                }
            }
        } // end of stage Update Port Run Status
    }

    post {

        failure {
            // Update Port Run failed.
            script {
                def status_report_response = sh(script: """
                    curl -X PATCH \
                        -H "Content-Type: application/json" \
                        -H "Authorization: Bearer ${PORT_ACCESS_TOKEN}" \
                        -d '{"status":"FAILURE", "message": {"run_status": "Failed to Scaffold ${SERVICE_NAME}"}}' \
                            "https://api.getport.io/v1/actions/runs/${PORT_RUN_ID}"
                """, returnStdout: true)

                println(status_report_response)
            }
        }

        // Clean after build
        always {
            cleanWs(cleanWhenNotBuilt: false,
                    deleteDirs: true,
                    disableDeferredWipeout: false,
                    notFailBuild: true,
                    patterns: [[pattern: '.gitignore', type: 'INCLUDE'],
                               [pattern: '.propsfile', type: 'EXCLUDE']])
        }
    }
}
- Create an Azure DevOps repository called
Port-actionsin your Azure DevOps Organization/Project. - Configure Service Connection and Webhook:
- Go to your Azure DevOps project.
- Navigate to
Project Settings>Service connections. - Click on
New service connection. - Select
Incoming Webhook. - Use the same name for both
Webhook NameandService connection name.
- Create Azure Pipeline in
Port-actionsRepository
In your Port-actions Azure DevOps repository, create an Azure Pipeline file named azure-pipelines.yml in the root of the repo's main branch with the following content:
Azure DevOps Pipeline Script
trigger: none

pool:
  vmImage: "ubuntu-latest"

variables:
  RUN_ID: "${{ parameters.SERVICE_CONNECTION_NAME.port_context.runId }}"
  BLUEPRINT_ID: "${{ parameters.SERVICE_CONNECTION_NAME.port_context.blueprint }}"
  SERVICE_NAME: "${{ parameters.SERVICE_CONNECTION_NAME.properties.service_name }}"
  DESCRIPTION: "${{ parameters.SERVICE_CONNECTION_NAME.properties.description }}"
  AZURE_ORGANIZATION: "${{ parameters.SERVICE_CONNECTION_NAME.properties.azure_organization }}"
  AZURE_PROJECT: "${{ parameters.SERVICE_CONNECTION_NAME.properties.azure_project.title }}"
  PROJECT_ID: "${{ parameters.SERVICE_CONNECTION_NAME.properties.azure_project.identifier }}"
  # Ensure that PERSONAL_ACCESS_TOKEN is set as a secret variable in your pipeline settings

resources:
  webhooks:
    - webhook: WEBHOOK_NAME
      connection: SERVICE_CONNECTION_NAME

stages:
  - stage: fetch_port_access_token
    jobs:
      - job: fetch_port_access_token
        steps:
          - script: |
              sudo apt-get update
              sudo apt-get install -y jq
          - script: |
              accessToken=$(curl -X POST \
                    -H 'Content-Type: application/json' \
                    -d '{"clientId": "$(PORT_CLIENT_ID)", "clientSecret": "$(PORT_CLIENT_SECRET)"}' \
                    -s 'https://api.getport.io/v1/auth/access_token' | jq -r '.accessToken')
              echo "##vso[task.setvariable variable=accessToken;isOutput=true]$accessToken"
            displayName: Fetch Access Token and Run ID
            name: getToken


  - stage: scaffold
    dependsOn:
      - fetch_port_access_token
    jobs:
      - job: scaffold
        variables:
          COOKIECUTTER_TEMPLATE_URL: "https://github.com/brettcannon/python-azure-web-app-cookiecutter"
        steps:
          - script: |
              sudo apt-get update
              sudo apt-get install -y jq
              sudo pip install cookiecutter -q
          - script: |
              # Use shell variable syntax for accessing variables
              PAYLOAD="{\"name\":\"$SERVICE_NAME\",\"project\":{\"id\":\"$PROJECT_ID\"}}"

              echo "SERVICE_NAME: $SERVICE_NAME"
              echo "AZURE_ORGANIZATION: $AZURE_ORGANIZATION"
              echo "PROJECT_ID: $PROJECT_ID"
              echo "PAYLOAD: $PAYLOAD"

              if [[ -z \"$PERSONAL_ACCESS_TOKEN\" ]]; then
                echo "PERSONAL_ACCESS_TOKEN is not set or is empty."
                exit 1
              else
                echo "PERSONAL_ACCESS_TOKEN is set."
              fi

              # Create the repository
              CREATE_REPO_RESPONSE=$(curl -s -u :$PERSONAL_ACCESS_TOKEN \
                -X POST "https://dev.azure.com/$AZURE_ORGANIZATION/$PROJECT_ID/_apis/git/repositories?api-version=7.0" \
                -H "Content-Type: application/json" \
                -d "$PAYLOAD")

              # Output the response for debugging
              echo "CREATE_REPO_RESPONSE: $CREATE_REPO_RESPONSE"

              PROJECT_URL=$(echo $CREATE_REPO_RESPONSE | jq -r .webUrl)

              if [[ -z "$PROJECT_URL" ]] || [[ "$PROJECT_URL" == "null" ]]; then
                echo "Failed to create Azure DevOps repository."
                exit 1
              fi

              echo "##vso[task.setvariable variable=PROJECT_URL;isOutput=true]$PROJECT_URL"

              cat <<EOF > cookiecutter.yaml
              default_context:
                site_name: "$SERVICE_NAME"
                python_version: "3.6.0"
              EOF
              cookiecutter $COOKIECUTTER_TEMPLATE_URL --no-input --config-file cookiecutter.yaml --output-dir scaffold_out

              echo "Initializing new repository..."
              git config --global user.email "scaffolder@email.com"
              git config --global user.name "Mighty Scaffolder"
              git config --global init.defaultBranch "main"

              cd "scaffold_out/$SERVICE_NAME"
              git init
              git add .
              git commit -m "Initial commit"


              # Extract the remoteUrl from the response
              GIT_REPO_URL=$(echo $CREATE_REPO_RESPONSE | jq -r .remoteUrl)

              # Check if GIT_REPO_URL is valid
              if [[ -z "$GIT_REPO_URL" ]] || [[ "$GIT_REPO_URL" == "null" ]]; then
                echo "Failed to retrieve the remote URL from the repository creation response."
                exit 1
              fi

              # Configure Git to use the PAT for authentication
              git remote add origin "$GIT_REPO_URL"
              git config http.https://dev.azure.com/.extraheader "AUTHORIZATION: Basic $(echo -n :$PERSONAL_ACCESS_TOKEN | base64)"

              # Push code to the repository
              git push -u origin --all

            env:
              PERSONAL_ACCESS_TOKEN: $(PERSONAL_ACCESS_TOKEN)
            displayName: "Create Repository in Azure DevOps"
            name: scaffold

  - stage: upsert_entity
    dependsOn:
      - fetch_port_access_token
      - scaffold
    jobs:
      - job: upsert_entity
        variables:
          accessToken: $[ stageDependencies.fetch_port_access_token.fetch_port_access_token.outputs['getToken.accessToken'] ]
          PROJECT_URL: $[ stageDependencies.scaffold.scaffold.outputs['scaffold.PROJECT_URL'] ]
        steps:
          - script: |
              sudo apt-get update
              sudo apt-get install -y jq
          - script: |
              curl -X POST \
                -H 'Content-Type: application/json' \
                -H 'Authorization: Bearer $(accessToken)' \
                -d '{
                    "identifier": "${{ variables.SERVICE_NAME }}",
                    "title": "${{ variables.SERVICE_NAME }}",
                    "properties": {"description":"${{ variables.DESCRIPTION }}","url":"$(PROJECT_URL)" },
                    "relations": {
                      "project":"${{ variables.PROJECT_ID }}"
                    }
                  }' \
                "https://api.getport.io/v1/blueprints/${{ variables.BLUEPRINT_ID }}/entities?upsert=true&run_id=${{ variables.RUN_ID }}&create_missing_related_entities=true"


  - stage: update_run_status
    dependsOn:
      - upsert_entity
      - fetch_port_access_token
      - scaffold
    jobs:
      - job: update_run_status
        variables:
          accessToken: $[ stageDependencies.fetch_port_access_token.fetch_port_access_token.outputs['getToken.accessToken'] ]
          PROJECT_URL: $[ stageDependencies.scaffold.scaffold.outputs['scaffold.PROJECT_URL'] ]
        steps:
          - script: |
              sudo apt-get update
              sudo apt-get install -y jq
          - script: |
              curl -X PATCH \
                -H 'Content-Type: application/json' \
                -H 'Authorization: Bearer $(accessToken)' \
                -d '{"status":"SUCCESS", "message": {"run_status": "Scaffold ${{ variables.SERVICE_NAME }} finished successfully!\\n Project URL: $(PROJECT_URL)" }}' \
                "https://api.getport.io/v1/actions/runs/${{ variables.RUN_ID }}"

  - stage: update_run_status_failed
    dependsOn:
      - upsert_entity
      - fetch_port_access_token
      - scaffold
    condition: failed()
    jobs:
      - job: update_run_status_failed
        variables:
          accessToken: $[ stageDependencies.fetch_port_access_token.fetch_port_access_token.outputs['getToken.accessToken'] ]
        steps:
          - script: |
              curl -X PATCH \
                -H 'Content-Type: application/json' \
                -H "Authorization: Bearer $accessToken" \
                -d '{"status":"FAILURE", "message": {"run_status": "Scaffold '"$SERVICE_NAME"' failed" }}' \
                "https://api.getport.io/v1/actions/runs/$RUN_ID"
Replace <SERVICE_CONNECTION_NAME> with the name of the service connection you created in Azure DevOps
and <WEBHOOK NAME> with the name of the webhook you created in Azure DevOps which should be the same as the service connection name.
-
Configure the Pipeline:
- In your Azure DevOps project, navigate to
Pipelines>Create Pipeline. - Select
Azure Repos Gitand choose thePort-actionsrepository. - Click
Save(in the "Run" dropdown menu).
- In your Azure DevOps project, navigate to
-
Create the necessary tokens and secrets:
- Go to your Port application, click on the
...in the top right corner, then clickCredentials. Copy yourClient IDandClient secret.
- Go to your Port application, click on the
-
Configure the following as Variables for the
azure-pipelines.yml:- Go to pipelines and select the
Port-actionspipeline. - Click on
Editand thenVariables. - Add the following variables:
PORT_CLIENT_ID- Your Portclient ID.PORT_CLIENT_SECRET- Your Portclient secret.PERSONAL_ACCESS_TOKEN- Your Azure DevOps personal access token.
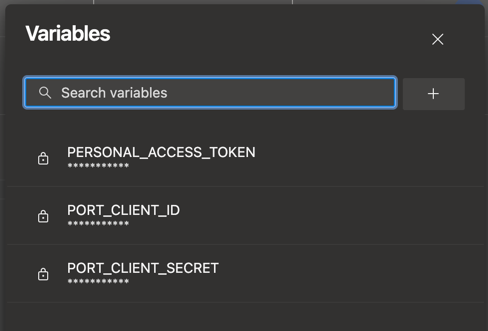
- Go to pipelines and select the
The cookiecutter templates provided in the workflows are just examples, you can replace them with any other cookiecutter template you want to use, by changing the value of the relevant template variable in the workflow.
All done! The action is ready to be used 🚀
Execute the action
Head back to the Self-service page of your Port application:
-
Click on
Createto begin executing the action. -
Enter a name for your new repository.
Repository name restrictionsSome Git providers (for example, GitHub) do not allow spaces in repository names.
We recommend using underscores or hyphens instead of spaces. -
For some of the available Git providers, additional inputs are required when executing the action.
- Bitbucket (Jenkins)
- Azure DevOps
When executing the Bitbucket scaffolder, you will need to provide two additional inputs:
Bitbucket Workspace Name- the name of the workspace to create the new repository in.Bitbucket Project Key- the key of the Bitbucket project to create the new repository in.- To find the Bitbucket project key, go to
https://bitbucket.org/YOUR_BITBUCKET_WORKSPACE/workspace/projects/, find the desired project in the list, and copy the value seen in theKeycolumn in the table.
- To find the Bitbucket project key, go to
When executing the Azure DevOps scaffolder, you will need to provide the following additional inputs:
Azure Organization- the name of the Azure DevOps organization.Azure Project- select the Azure DevOps project you want the repo to be created in.Description- a brief description of the repository. (Optional)
- Click
Execute. A small popup will appear, click onView details:

- This page provides details about the action run. As you can see, the backend returned
Successand the repo was successfully created (this can take a few moments):
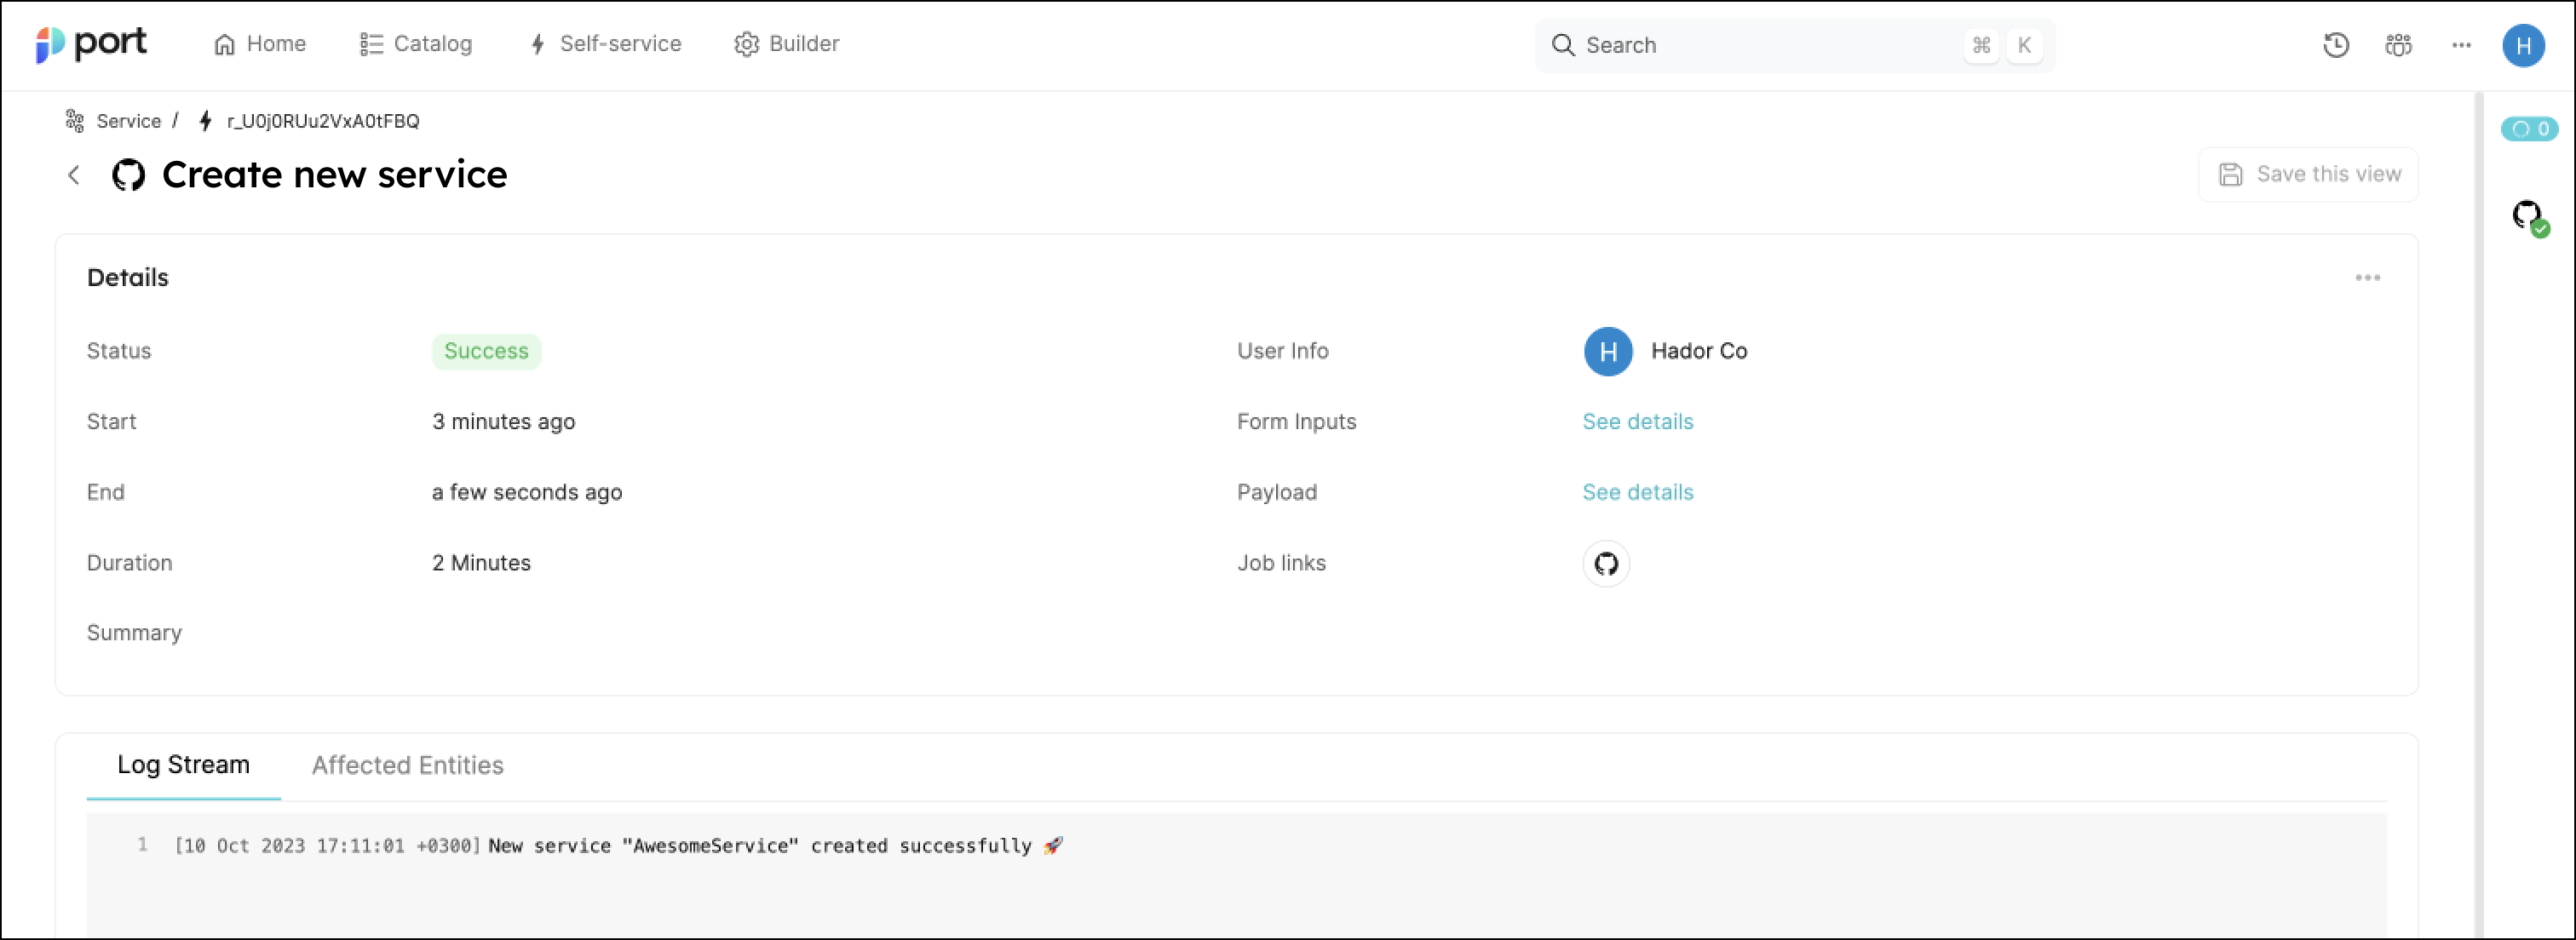
💡 Note the Log stream at the bottom, this can be used to report progress, results and errors. Click here to learn more.
Congratulations! You can now create services easily from Port 💪🏽
Possible daily routine integrations
- Send a slack message in the R&D channel to let everyone know that a new service was created.
- Send a weekly/monthly report for managers showing all the new services created in this timeframe and their owners.
Conclusion
Creating a service is not just a periodic task developers undertake, but a vital step that can occur on a monthly basis. However, it's crucial to recognize that this is only a fragment of the broader experience that we're striving to create for developers.
Our ultimate goal is to facilitate a seamless transition from ideation to production. In doing so, we aim to eliminate the need for developers to navigate through a plethora of tools, reducing friction and accelerating the time-to-production.
In essence, we're not just building a tool, but sculpting an ecosystem that empowers developers to bring new features to life with utmost efficiency.