Connect GitHub PR to SonarQube analysis
This guide aims to cover how to connect a GitHub pull request with a SonarQube analysis to understand the scan results of your PR.
- This guide assumes you have a Port account and that you have finished the onboarding process.
- Ensure you have SonarQube ocean integration installed and configured in your environment.
- Ensure you have a registered organization in Port and your Port user role is set to
Admin. - You will need an accessible k8s cluster. If you don't have one, here is how to quickly set-up a minikube cluster.
- Helm - required to install a relevant integration.
Integrate GitHub resources with Port
The goal of this section is to fill the software catalog with data directly from your GitHub organization. Port's GitHub app allows you to import repositories, pull requests, workflows, teams and other GitHub objects. For the purpose of this guide, we shall focus on pull requests (PR) object only. Follow the steps below to ingest your PR data to Port.
For the GitHub app installation you will need to have a registered organization in Port and your Port user role must be set to Admin (see prerequisites).
-
Go to your Builder
-
Create a GitHub pull request blueprint using this schema:
GitHub pull request blueprint (click to expand)
{
    "identifier": "githubPullRequest",
    "title": "Pull Request",
    "icon": "Github",
    "schema": {
        "properties": {
        "creator": {
            "title": "Creator",
            "type": "string"
        },
        "assignees": {
            "title": "Assignees",
            "type": "array"
        },
        "reviewers": {
            "title": "Reviewers",
            "type": "array"
        },
        "status": {
            "title": "Status",
            "type": "string",
            "enum": [
            "merged",
            "open",
            "closed"
            ],
            "enumColors": {
            "merged": "purple",
            "open": "green",
            "closed": "red"
            }
        },
        "closedAt": {
            "title": "Closed At",
            "type": "string",
            "format": "date-time"
        },
        "updatedAt": {
            "title": "Updated At",
            "type": "string",
            "format": "date-time"
        },
        "mergedAt": {
            "title": "Merged At",
            "type": "string",
            "format": "date-time"
        },
        "link": {
            "type": "string",
            "format": "url"
        }
        },
        "required": []
    },
    "mirrorProperties": {},
    "calculationProperties": {},
    "aggregationProperties": {},
    "relations": {}
} -
Install Port's GitHub app by following the installation guide
-
Now that the integration is installed successfully, we need to ingest
githubPullRequestdata from the GitHub organization into the software catalog. This can be done by adding some mapping logic. Go to your data sources page, and click on your GitHub integration: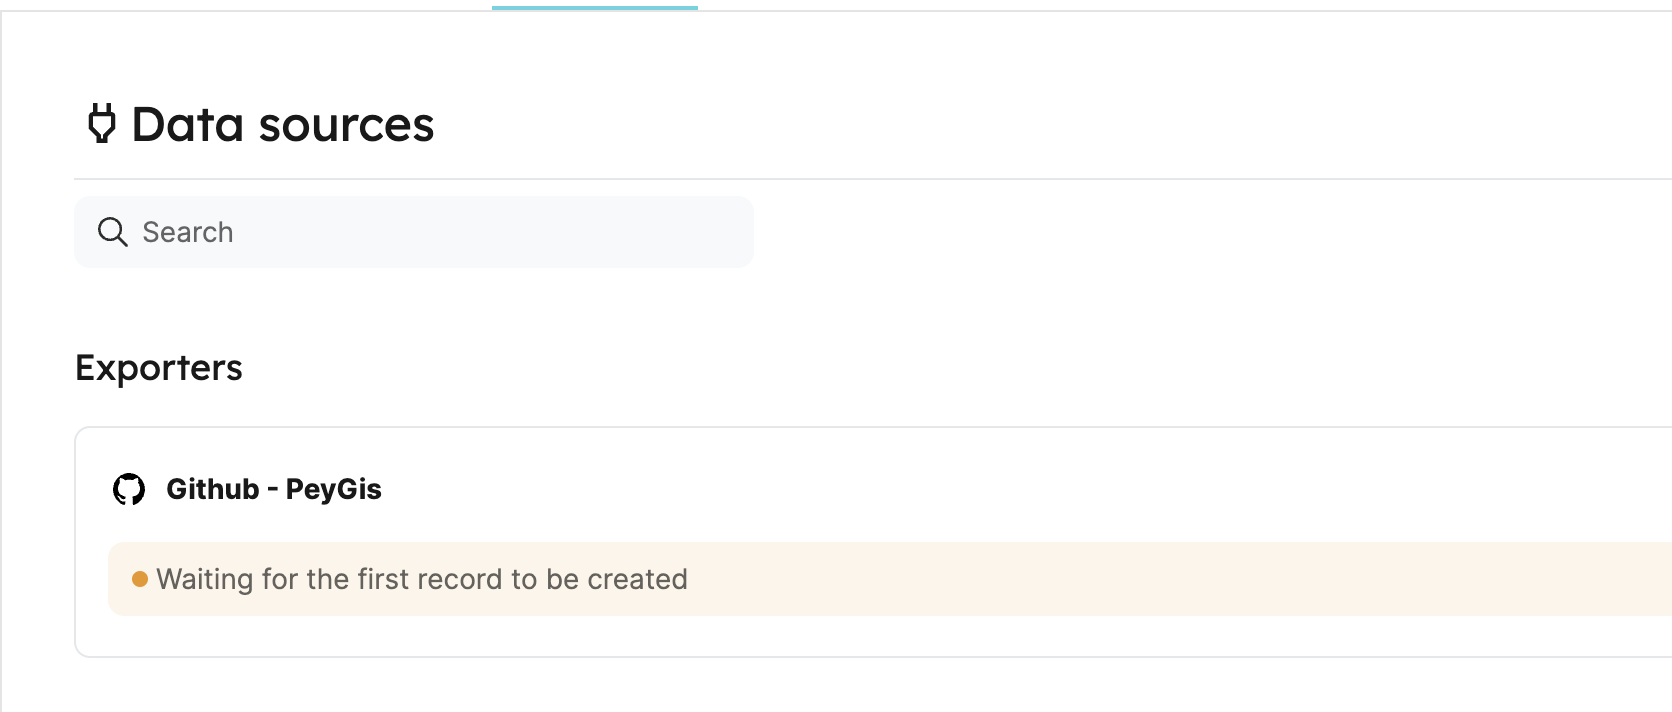
Add the following YAML block into the editor to ingest pull request data. Then click
Save & Resync:Relation mapping (click to expand)
resources:
  - kind: pull-request
    selector:
        query: "true"
    port:
        entity:
        mappings:
            identifier: ".head.repo.name + '-' + (.number|tostring)" # The Entity identifier will be the repository name + the pull request number
            title: ".title"
            blueprint: '"githubPullRequest"'
            properties:
                creator: ".user.login"
                assignees: "[.assignees[].login]"
                reviewers: "[.requested_reviewers[].login]"
                status: ".status"
                closedAt: ".closed_at"
                updatedAt: ".updated_at"
                mergedAt: ".merged_at"
                prNumber: ".id"
                link: ".html_url"
You should now be able to see your GitHub pull requests ingested successfully in the software catalog.
Integrate SonarQube into Port
The goal of this section is to bring our SonarQube analysis data into Port. Port's SonarQube integration (powered by Ocean) allows you to import projects, issues and analyses from your SonarQube account into Port. The integration automatically creates blueprints and entities for these resources.
For this installation you will need Helm and a running K8s cluster (see prerequisites).
-
Install Port's SonarQube integration using Helm, by running the command below in your terminal.
-
Replace
CLIENT_IDandCLIENT_SECRETwith your credentials (get them here). -
Replace
sonarApiTokenwith your SonarQube token. To obtain it, follow this documentation. -
Replace
sonarOrganizationIdwith your SonarQube organization ID. To obtain it, follow this documentation. Note that the SonarQube organization ID is not required when using on-prem sonarqube instance.
Installation command (click to expand)
helm repo add --force-update port-labs https://port-labs.github.io/helm-charts
helm upgrade --install my-sonarqube-integration port-labs/port-ocean \
	--set port.clientId="PORT_CLIENT_ID"  \  # REPLACE VALUE
	--set port.clientSecret="PORT_CLIENT_SECRET"  \  # REPLACE VALUE
	--set initializePortResources=true  \
	--set integration.identifier="my-sonarqube-integration"  \
	--set integration.type="sonarqube"  \
	--set integration.eventListener.type="POLLING"  \
	--set integration.secrets.sonarApiToken="MY_API_TOKEN"  \  # REPLACE VALUE
--set integration.config.sonarOrganizationId="MY_ORG_KEY" # REPLACE VALUE -
-
Great! Now that the integration is installed, we should see some new components in Port:
- Go to your Builder, you should now see three new blueprints created by the integration -
SonarQube Project,SonarQube IssueandSonarQube Analysis. - Go to your Software catalog, click on
SonarQube Analysisin the sidebar, you should now see new entities created for all your SonarQube analysis.
- Go to your Builder, you should now see three new blueprints created by the integration -
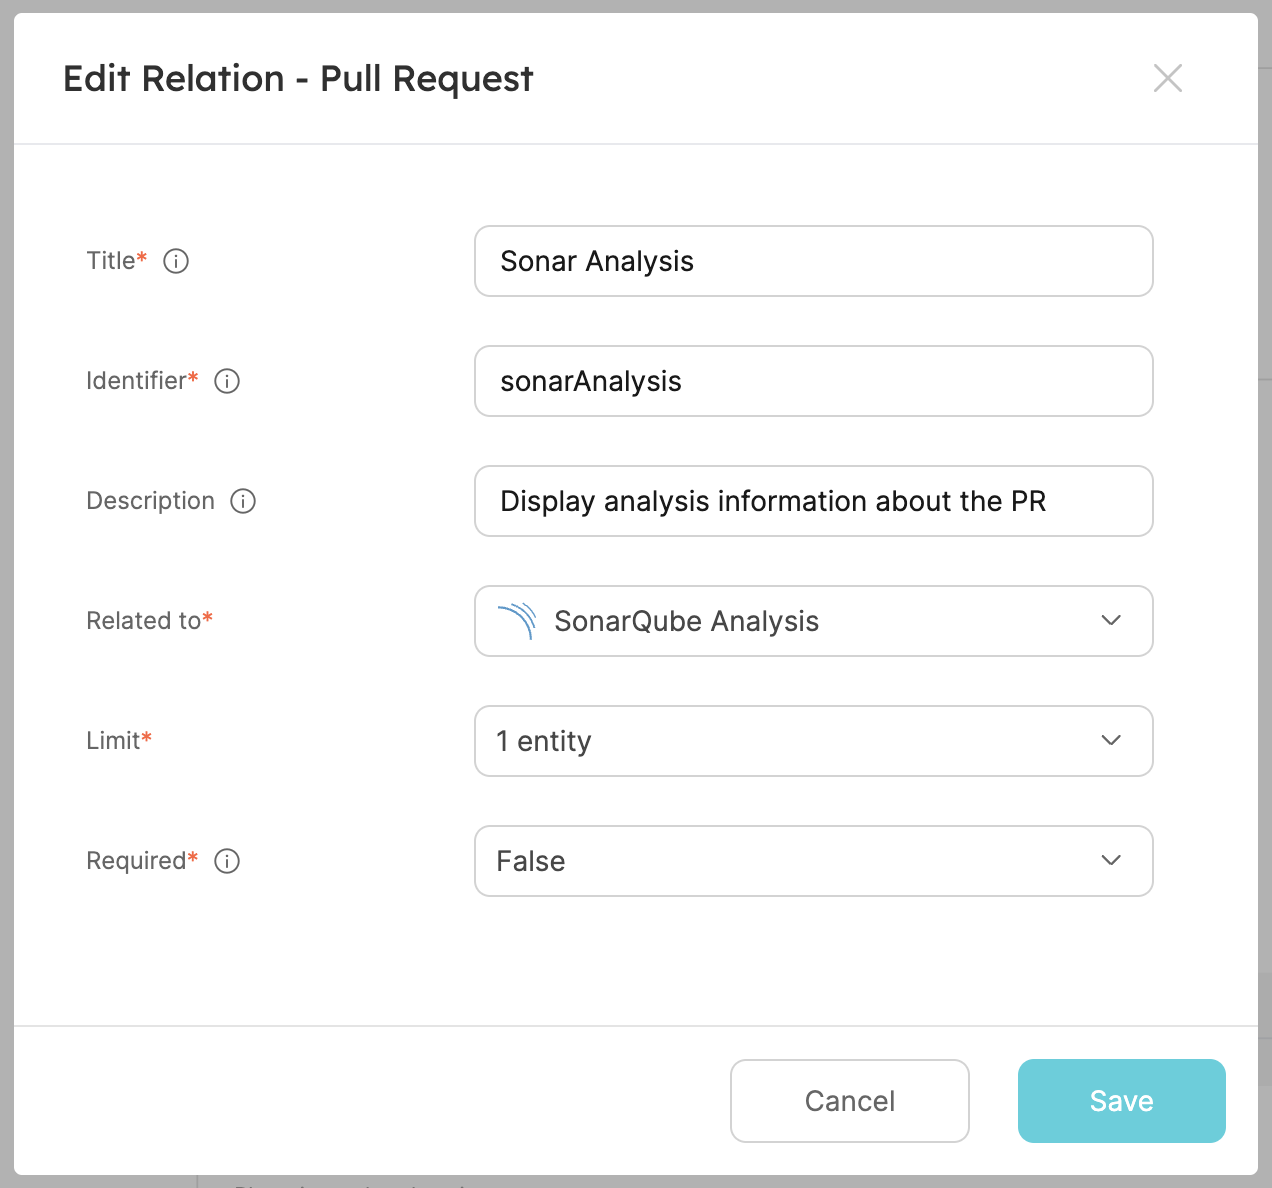
Create the Sonar analysis relation
Now that Port is synced with our SonarQube resources, let's map the SonarQube analysis to the pull requests to display the result of the sonar scan.
First, we will need to create a relation between our githubPullRequest and the corresponding sonarQubeAnalysis.
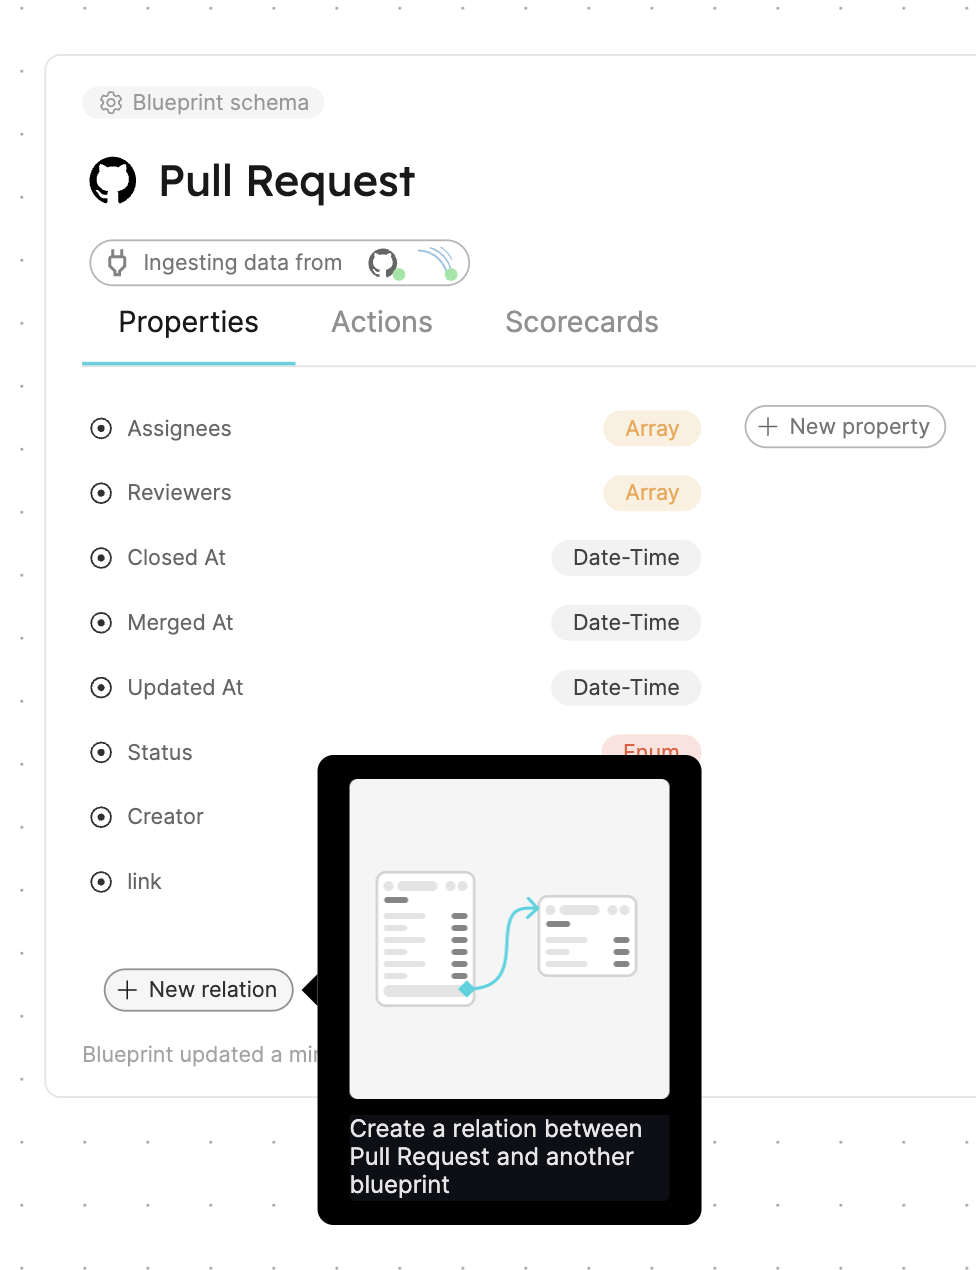
- Fill out the form like this, then click
Create:
Now that the blueprints are related, we need to assign the relevant SonarQube analysis to each of our pull requests. This can be done by adding some mapping logic. Go to your data sources page, and click on your GitHub Pull Request integration:

Relation Mapping
There are two ways
to establish the relationship between a GitHub pull-request entity and a SonarQube analysis entity:
Matching Common Pull Request Title and Branch
The first way is to use the title and branch properties:
-
Why use
titleandbranchproperties? Thetitleproperty is common to both GitHub pull requests and SonarQube analyses, making it a reliable identifier for matching related entities. Thebranchproperty gives information about the source and destination of the the code changes. Combining the title with the branch offers a robust mapping, ensuring that entities are correctly matched in situations where there are similar pull request titles but on different branches. -
Go to your data sources page and click on the GitHub exporter:

-
Replace the mapping YAML with this content:
resources:
   - kind: pull-request
     selector:
        query: 'true'
     port:
        entity:
           mappings:
              identifier: .head.repo.name + '-' + (.number|tostring)
              title: .title
              blueprint: '"githubPullRequest"'
              properties:
                 creator: .user.login
                 assignees: '[.assignees[].login]'
                 reviewers: '[.requested_reviewers[].login]'
                 status: .status
                 closedAt: .closed_at
                 updatedAt: .updated_at
                 mergedAt: .merged_at
                 prNumber: .id
                 link: .html_url
              relations:
                 sonarAnalysis:
                    combinator: '"and"'
                    rules:
                       - property: '"$title"'
                         operator: '"="'
                         value: .title
                       - property: '"branch"'
                         operator: '"="'
                         value: .head.ref
This configuration uses the title and branch properties to establish a relationship with SonarQube analysis based on matching properties.
Matching Pull Request Commit SHA
The second way is to use the commitSha property that is common to both the pull request and SonarQube analysis:
- Go to the data model page of your portal
- Go to the
SonarQubeblueprint. - Hover over it, click on the
...button on the right, and selectEdit JSON.
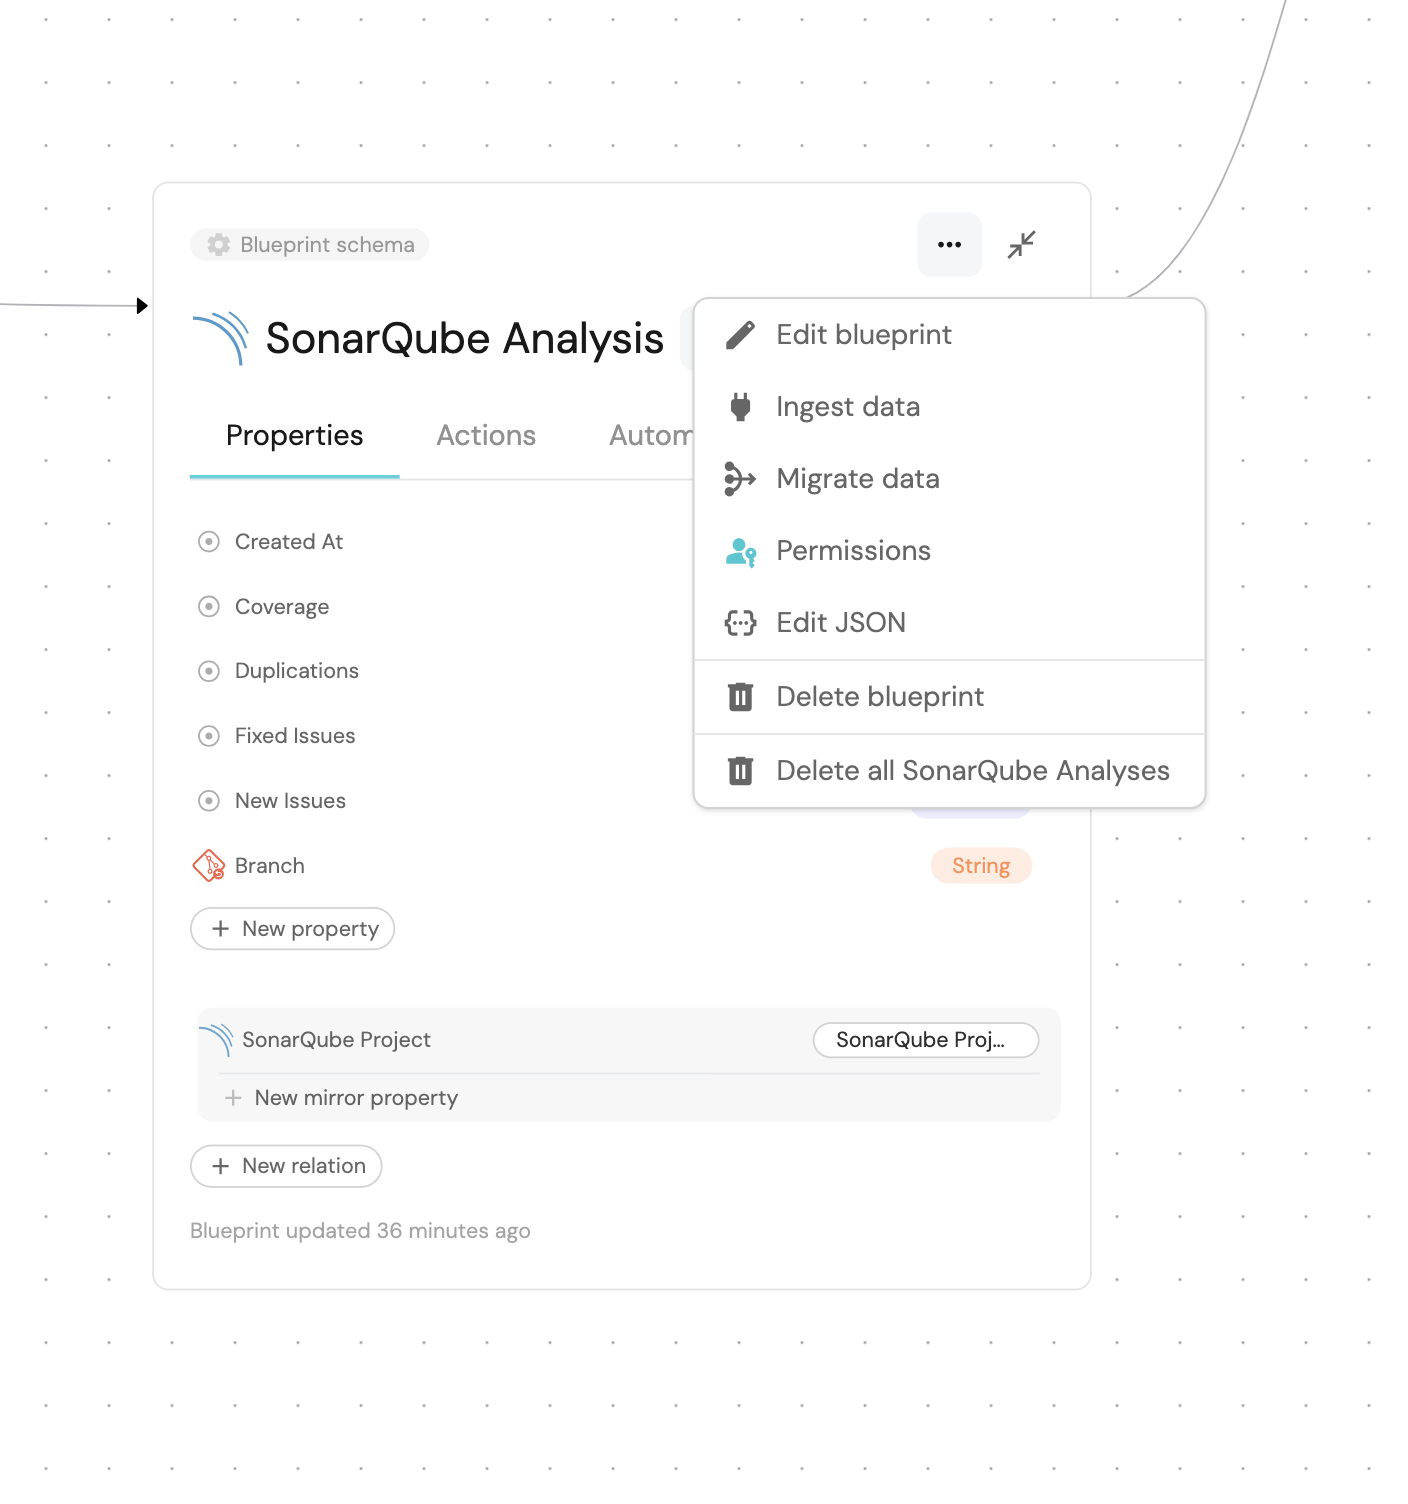
Add the commitSha property and Save:
-
Go to your data sources page and click on the GitHub exporter:
-
Replace the
pull-requestmapping YAML with this content:
  resources:
     - kind: pull-request
       selector:
          query: 'true'
       port:
          entity:
             mappings:
                identifier: .head.repo.name + '-' + (.number|tostring)
                title: .title
                blueprint: '"githubPullRequest"'
                properties:
                   creator: .user.login
                   assignees: '[.assignees[].login]'
                   reviewers: '[.requested_reviewers[].login]'
                   status: .status
                   closedAt: .closed_at
                   updatedAt: .updated_at
                   mergedAt: .merged_at
                   prNumber: .id
                   link: .html_url
                relations:
                   sonarAnalysis:
                      combinator: '"and"'
                      rules:
                         - property: '"commitSha"'
                           operator: '"="'
                           value: .head.sha
In this implementation,
we used search relation features
to map relationships between githubPullRequest entities and sonarAnalysis entities based on specific properties rather than direct identifiers.
By using properties like title, branch, and commitSha, we are able to establish a between the two entities.
Configure mirror properties on pull request
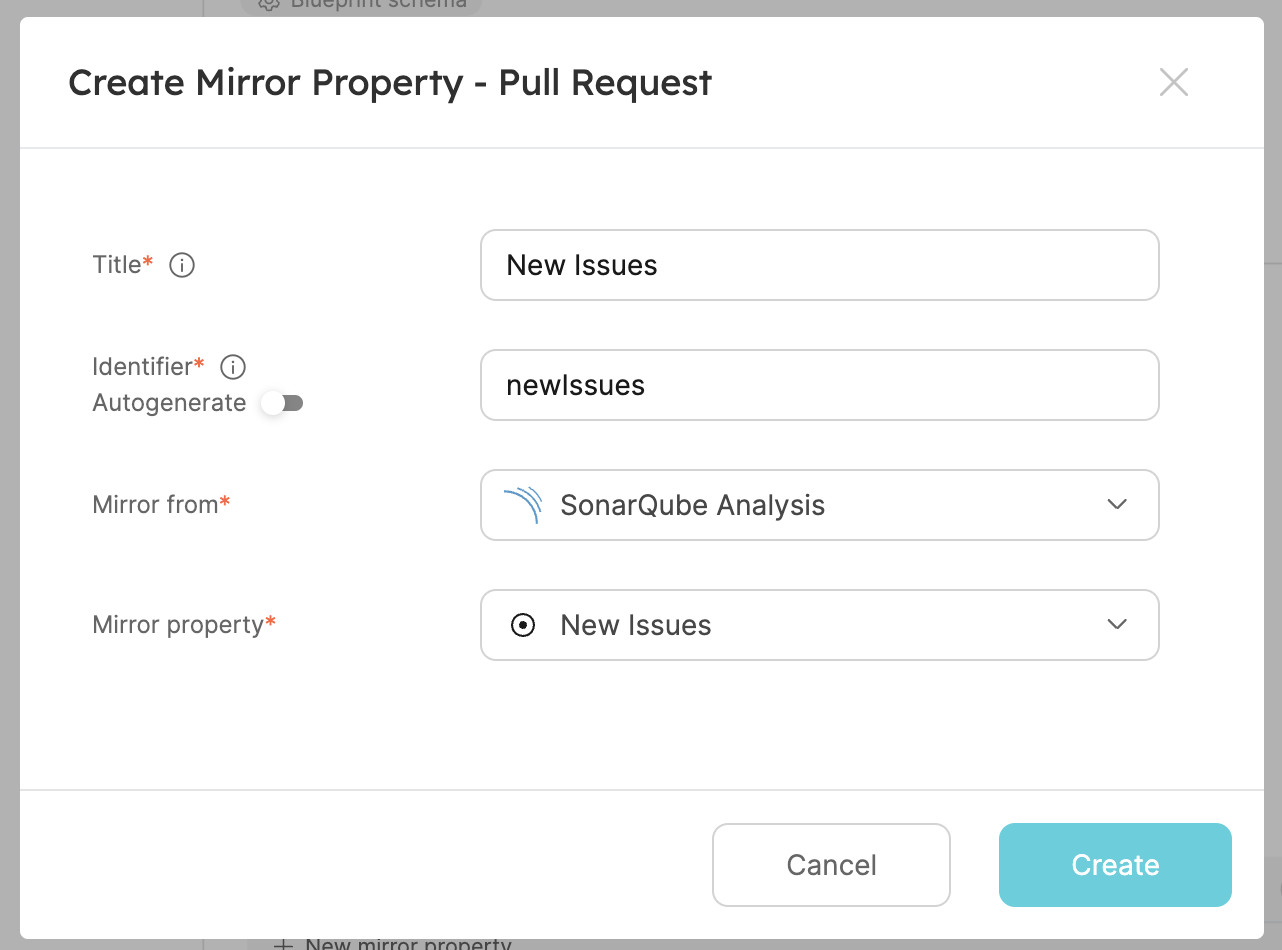
When looking at a Pull Request, some of its sonarAnalysis properties may be especially important to us, and we would like to see them directly in the Pull Request's context. This can be achieved using mirror properties, so let's create some:
- The first one will be the number of new issues added to the analysis. Under the relation we just created, click on
New mirror property:

- Fill the form out like this, then click
Create:
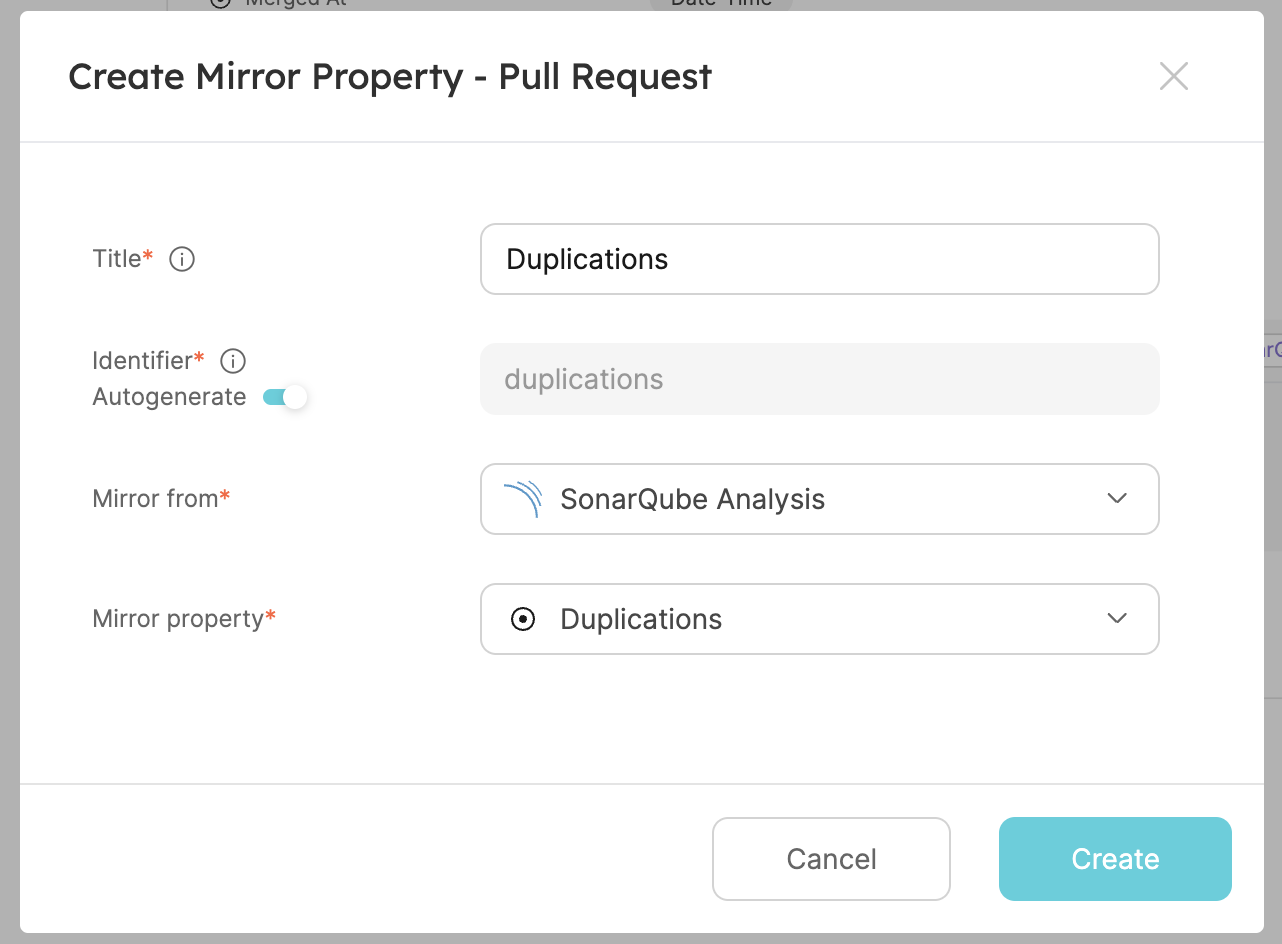
- The second one will be the analysis code duplication. Create another mirror property, fill the form out like this, then click
Create:
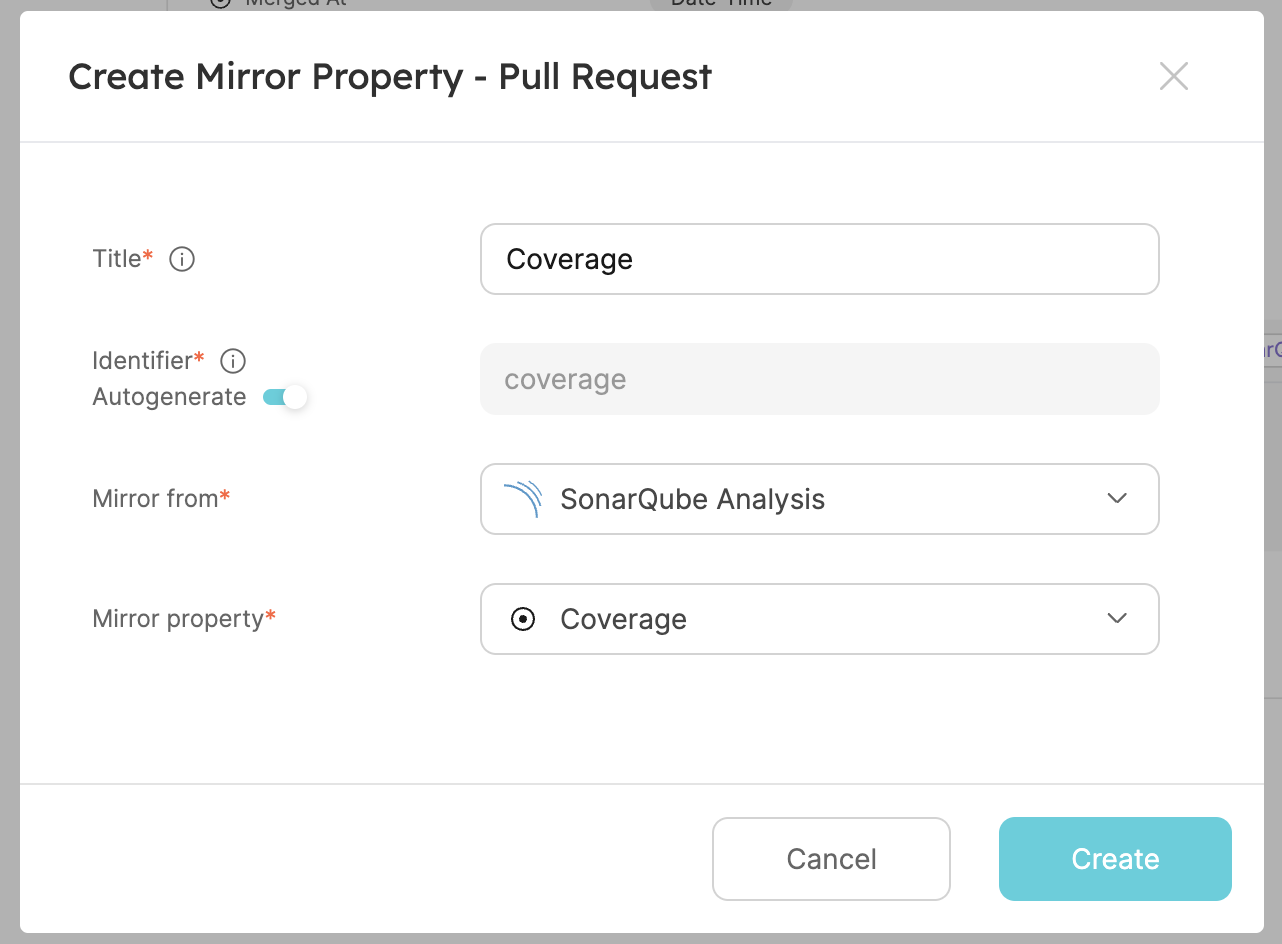
- The third one will be the analysis coverage. Create another mirror property, fill the form out like this, then click
Create:
- The third one will be the quality gate status of the analysis. Create another mirror property, fill the form out like this, then click
Create:
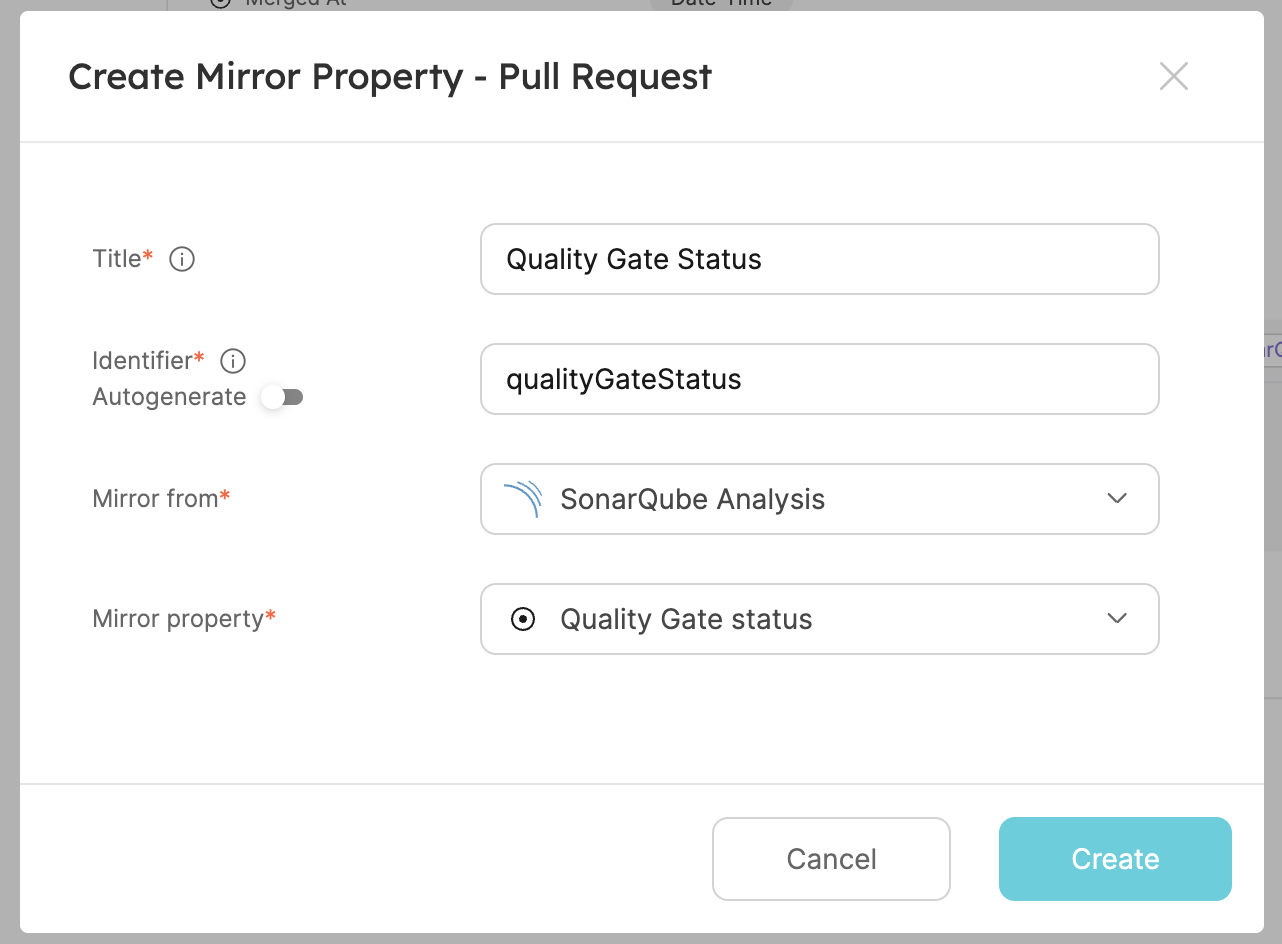
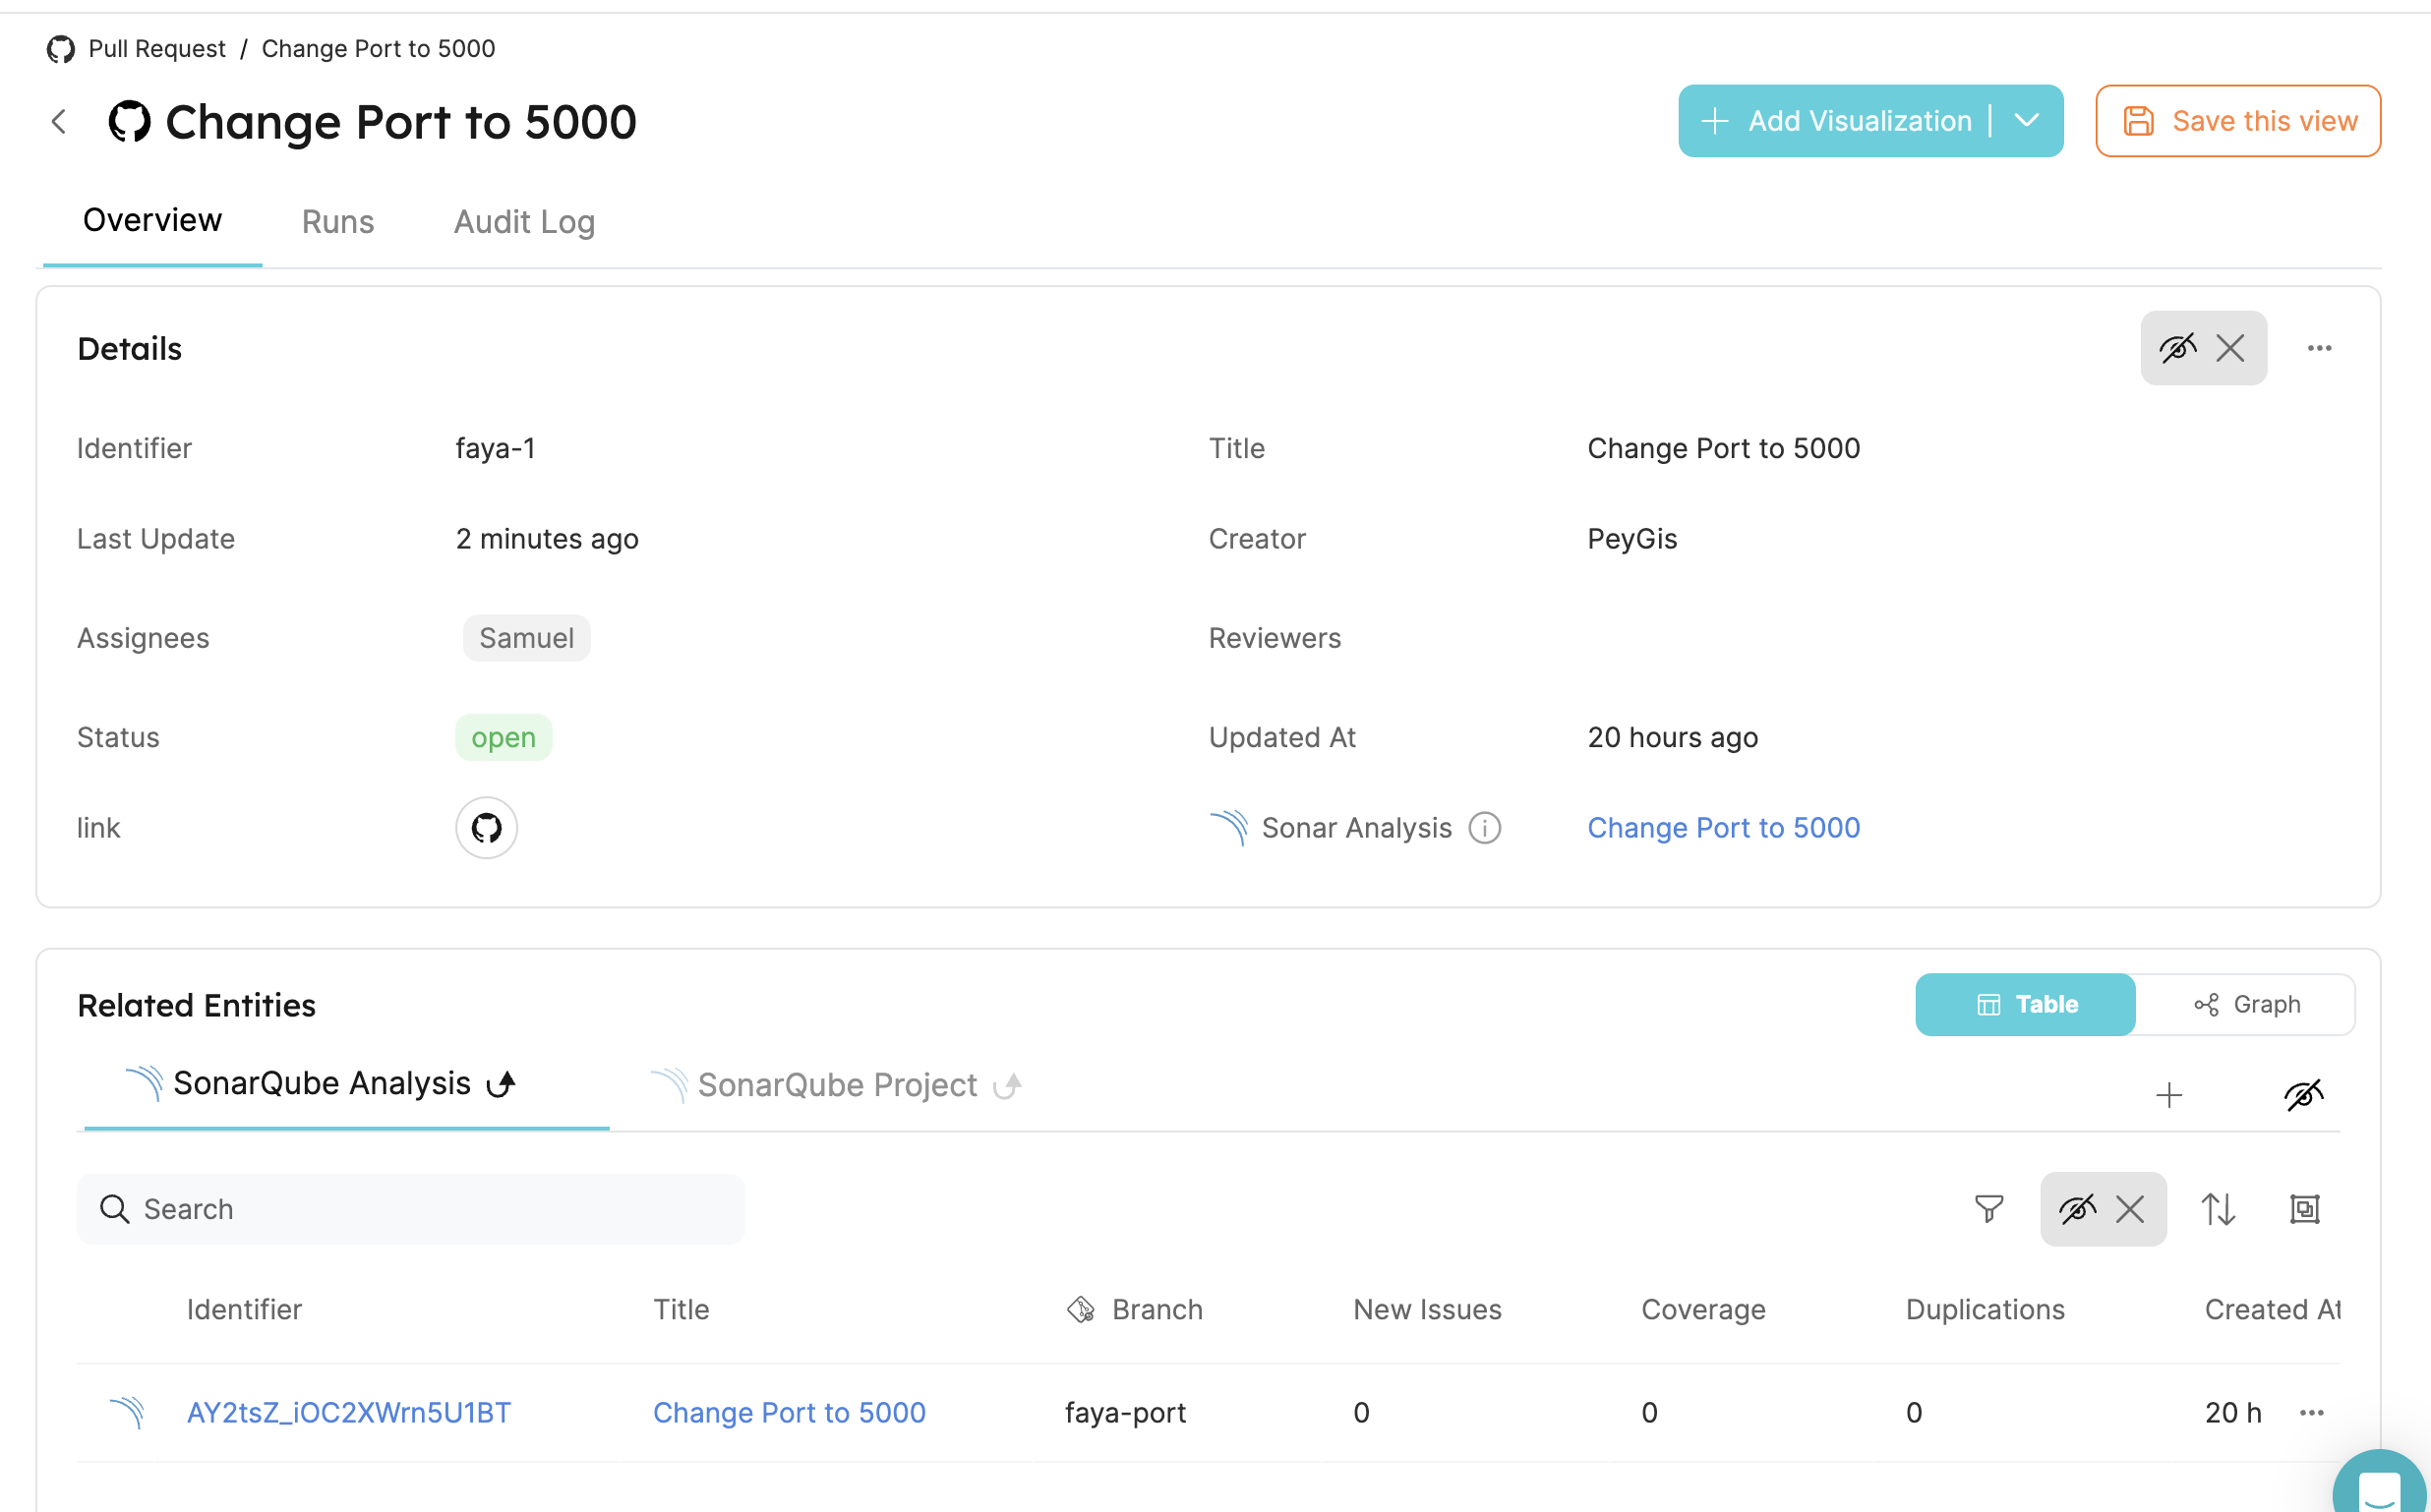
You should now be able to see these additional properties added to pull request entity in your software catalog.
Conclusion
By following these steps, you can seamlessly connect a GitHub pull request with a SonarQube analysis.
More relevant guides and examples: