Manage resources using Kubernetes CRDs
Introduction
Kubernetes provides a great way of extending its API via Custom Resource Definitions (CRDs). CRDs allow you to define your API objects and controllers to manage them. This is a powerful feature that allows you to extend Kubernetes to manage any kind of resource. This guide will show you how to integrate Kubernetes CRDs with Port and expose them in the Port UI for developers to use.
- A Port account.
- A running Kubernetes cluster.
- A K8S Operator that listens to CRD changes.
- A GitHub account.
The goal of this guide
- Developers will be able to use any CRDs directly in Port's UI.
- Platform engineers will be able to query the data and get insights about the usage of the CRDs and Kubernetes resources.
- Platform engineers will be able to serve any CRDs to developers in a self-service manner.
In this guide, we will deploy Port's Kubernetes Exporter to export Kubernetes CRDs to Port as blueprints and actions to create, update and delete those resources. Also, the K8S exporter will listen to changes in all of the custom resources and reflect them in Port's UI.

Next, we will connect a GitHub account using Port's GitHub integration to provision CRs directly into the Kubernetes cluster, or optionally with GitOps. After completing it, you will get a sense of how it can benefit different personas in your organization:

1. (Optional) Create a Crossplane XRD & Composition or use an existing CRD
If you already have a CRD that you want to expose in Port, you can skip this step.
If you don't have a CRD and you would like to create one, you can use Crossplane's XRD to create a CRD like we do in this guide or to install any operator that applies CRD into your cluster. You can follow the Crossplane XRD documentation to create a CRD. For this guide, we followed the AWS DynamoDB composition example
2. Install the Kubernetes Exporter with the crdsToDiscover flag
The Kubernetes Exporter can be installed with the crdsToDiscover flag which is a JQ pattern to discover and export CRDs to Port as blueprints and actions. In this example we will use Helm to install the Kubernetes Exporter, but for more installation options please visit the Kubernetes Exporter documentation
With the pattern below, the Kubernetes Exporter will discover CRDs that are managed by Crossplane's XRD and that are not namespaced scoped. This is just an example, and you can adjust the pattern to match your own CRDs - even if they are managed by a custom operator.
Here is a script that will help you install the Kubernetes Exporter without initializing default blueprints and mappings, if you would like to install it with the defaults remove the createDefaultResources=false variable from the script below.
helm repo add --force-update port-labs https://port-labs.github.io/helm-charts
helm upgrade --install my-port-k8s-exporter port-labs/port-k8s-exporter \
    --create-namespace --namespace port-k8s-exporter \
    --set secret.secrets.portClientId=YOUR_PORT_CLIENT_ID \
    --set secret.secrets.portClientSecret=YOUR_PORT_CLIENT_SECRET \
    --set portBaseUrl='https://api.getport.io' \
    --set stateKey="k8s-exporter"  \
    --set createDefaultResources=false \
    --set eventListener.type="POLLING"  \
    --set "extraEnv[0].name"="CLUSTER_NAME" \
    --set "extraEnv[0].value"=YOUR_PORT_CLUSTER_NAME
The baseUrl, port_region, port.baseUrl, portBaseUrl, port_base_url and OCEAN__PORT__BASE_URL parameters are used to select which instance or Port API will be used.
Port exposes two API instances, one for the EU region of Port, and one for the US region of Port.
- If you use the EU region of Port (https://app.getport.io), your API URL is
https://api.getport.io. - If you use the US region of Port (https://app.us.getport.io), your API URL is
https://api.us.getport.io.
After installing the k8s exporter update the crdsToDiscover configuration with the following value:
crdsToDiscover: ".metadata.ownerReferences[0].kind == \"CompositeResourceDefinition\" and .spec.scope != \"Namespaced\""
After this change, it should take no longer than 2 minutes to see the resources in Port.
If everything succeeded you should see the relevant CRDs as blueprints and actions, and any existing CRs as entities in Port's catalog.
3. Connect a GitHub workflow
Now, to execute the action we need to add some workflow to it for Port to trigger the action, the workflow that we will configure will do the operations in the Kubernetes cluster using the kubeconfig that we will provide as a secret in the GitHub repository.
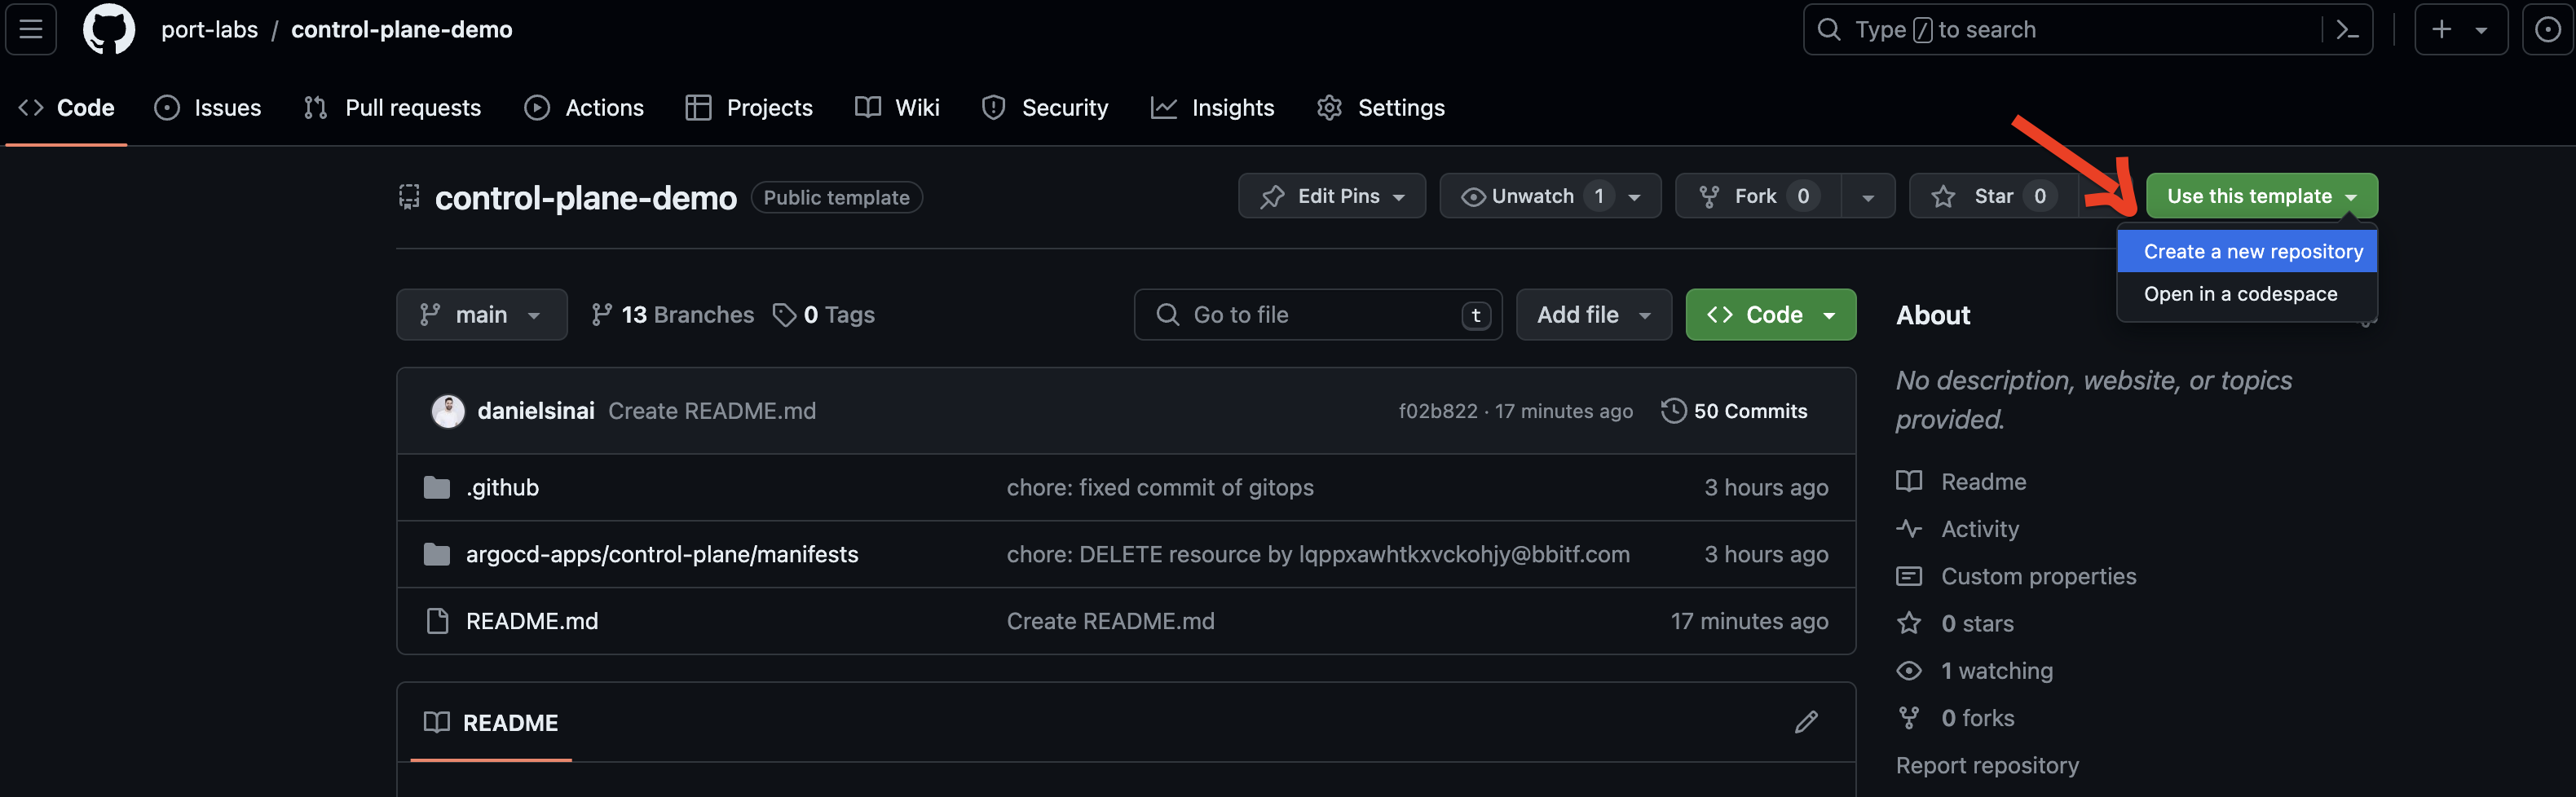
- Go to the GitHub control plane example repo and use it as a template to create your own repo by clicking on the
Use this templatebutton.
-
Install Port's GitHub app in the GitHub account where you cloned the template.
-
Add GitHub secrets the following secrets:
PORT_CLIENT_ID- Your Port Client ID.PORT_CLIENT_SECRET- Your Port Client Secret.KUBE_CONFIG- The base64kubeconfigof the Kubernetes cluster where the CRDs are deployed. You can get the kubeconfig by running the following command: Here is a snippet to encode yourkubeconfigand copy it to your clipboard:cat $HOME/.kube/config | base64 | pbcopy
-
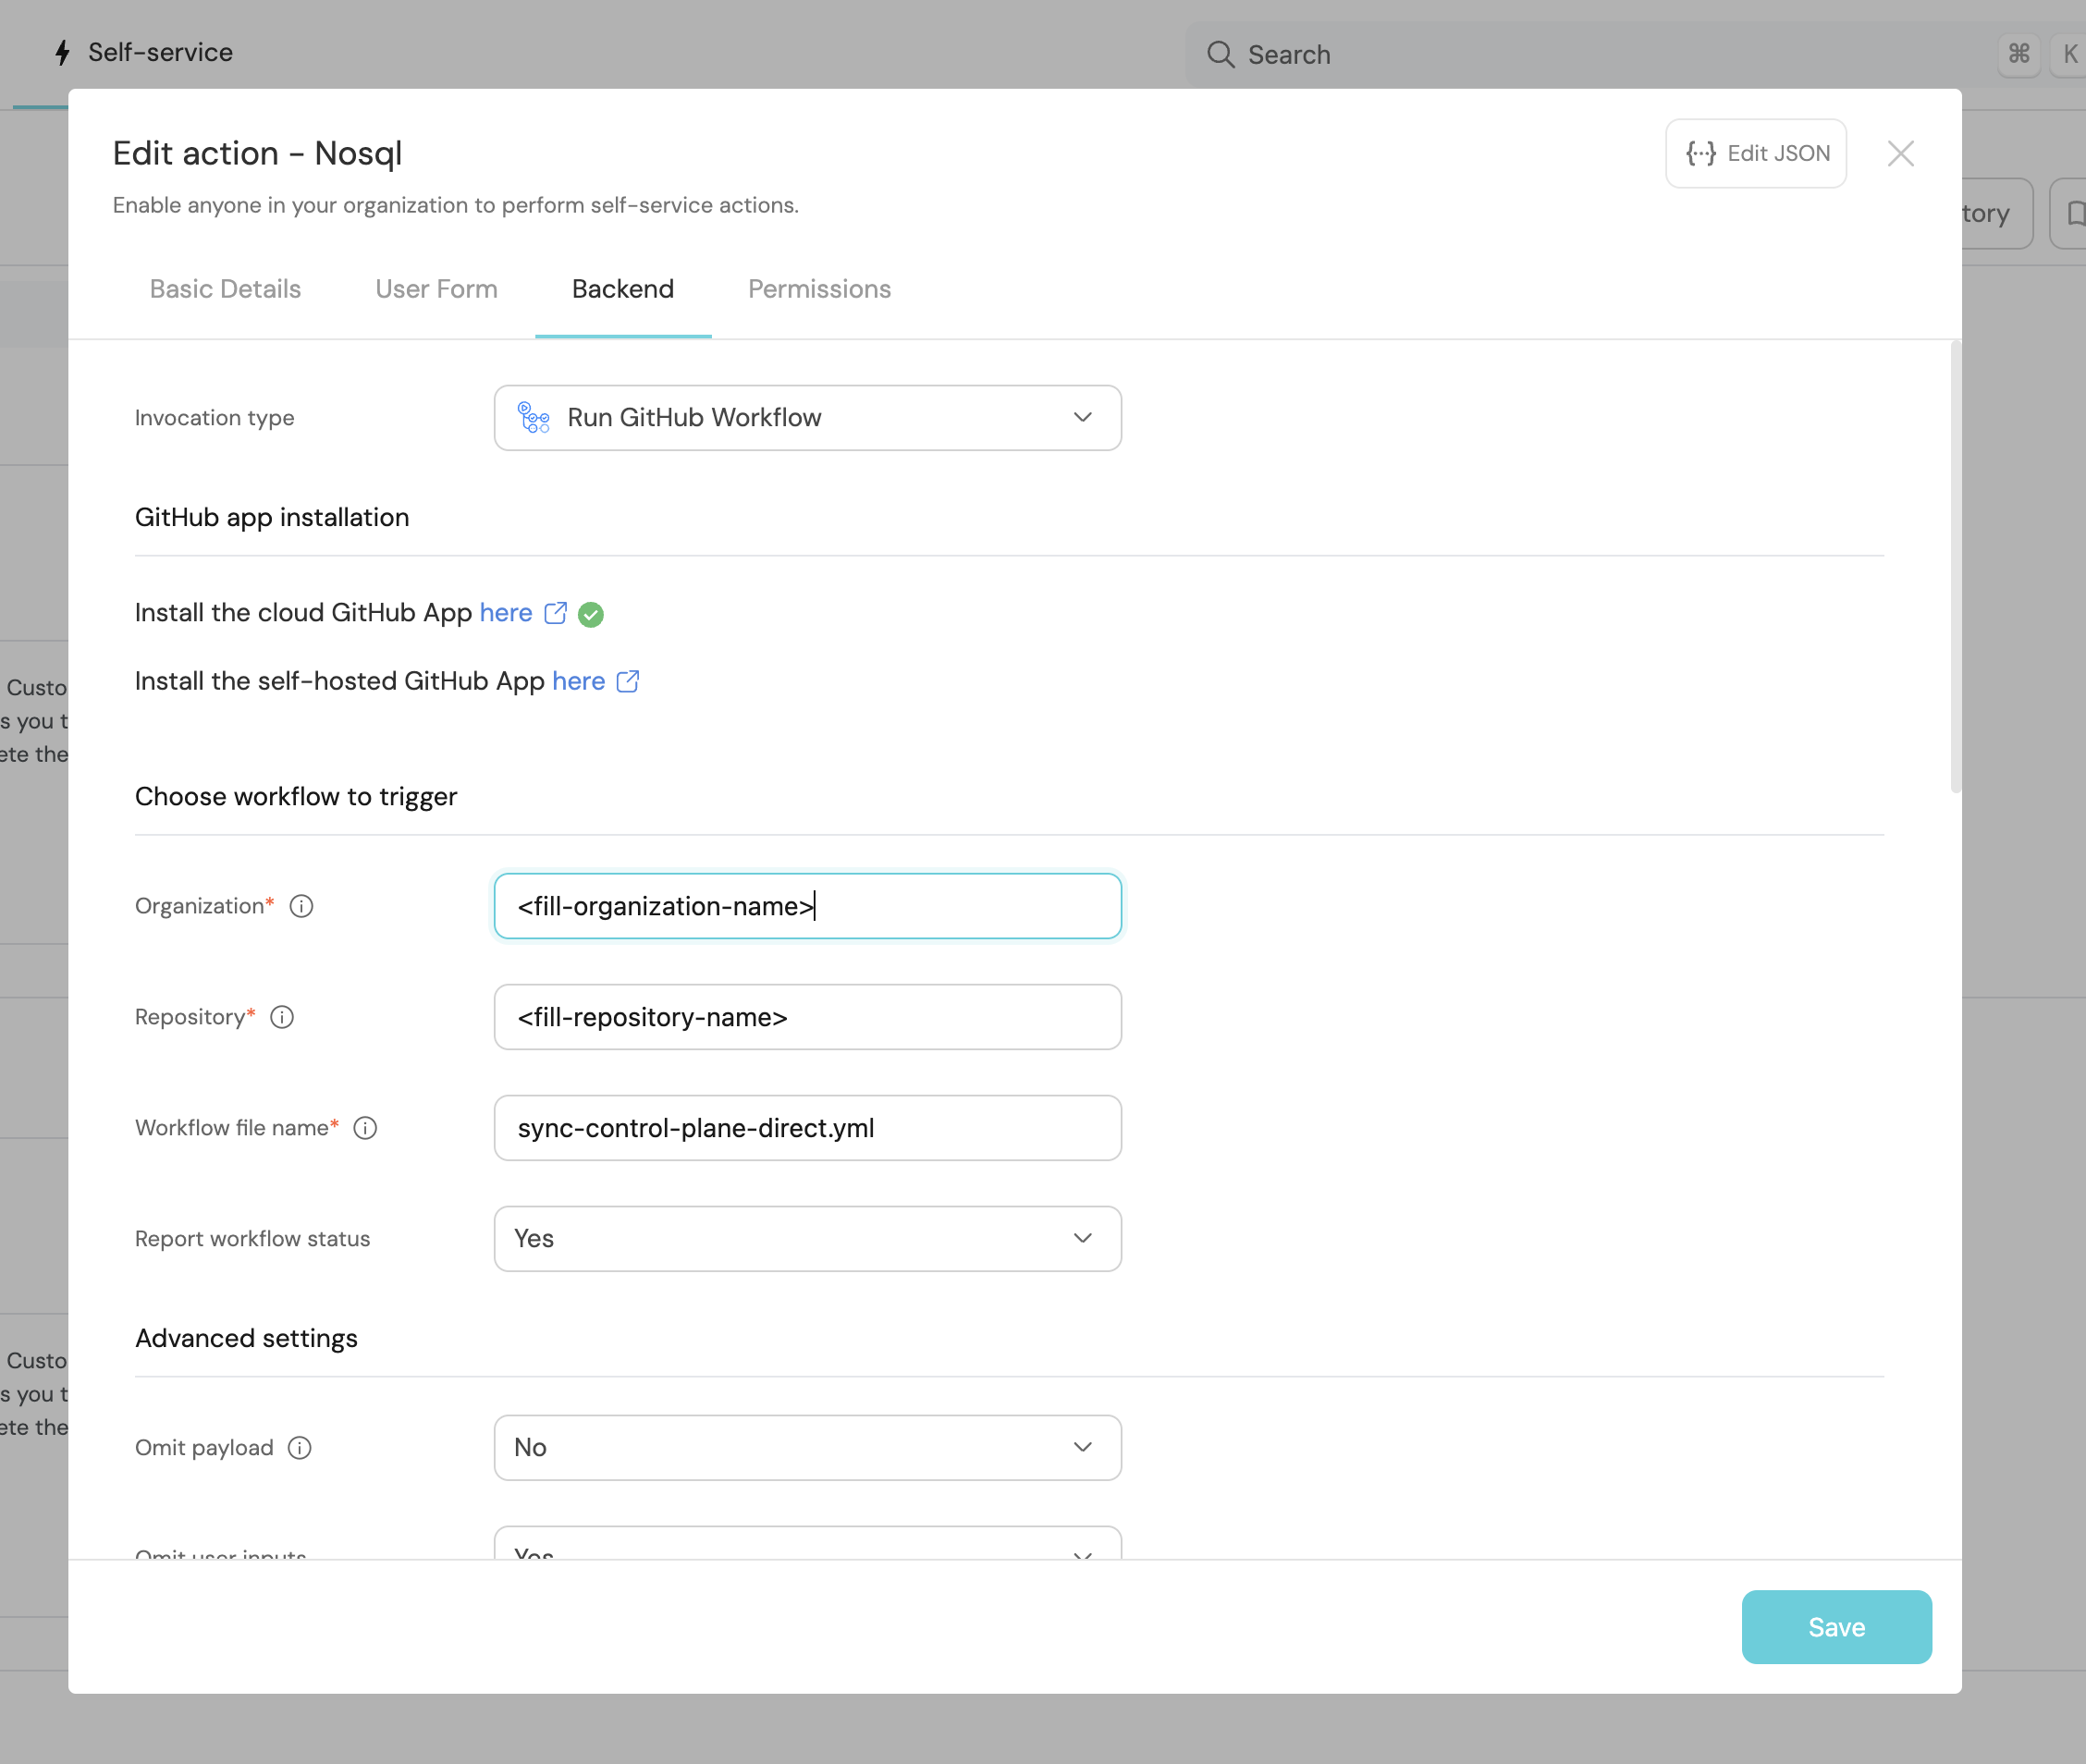
Edit the org and repo of Port's Action, to match yours you can do that by (make sure to do it to all actions create/delete/update):
- Go to the Self-Service Tab
- Hover the wanted action
- Click on the
...button - Click on
Edit Action - Click in the
Backendtab there change theorganizationandrepositoryfields to match yours.
For the sake of simplicity, the GitHub workflow we are using in this example is accessing directly into the Kubernetes cluster.
Sometimes for production environments, this solution is not sufficient because of the requirement of extra auditing, in this case, you can use GitOps to deploy the resources into the cluster.
If you would like to use this method, at the same repo you cloned there is another workflow which is called .github/workflows/gitops.yml that works purely with GitOps which you can integrate with ArgoCD for example.
4. Executing the action
- Now that everything is set up, go to the Self-Service Tab and execute the Create action.
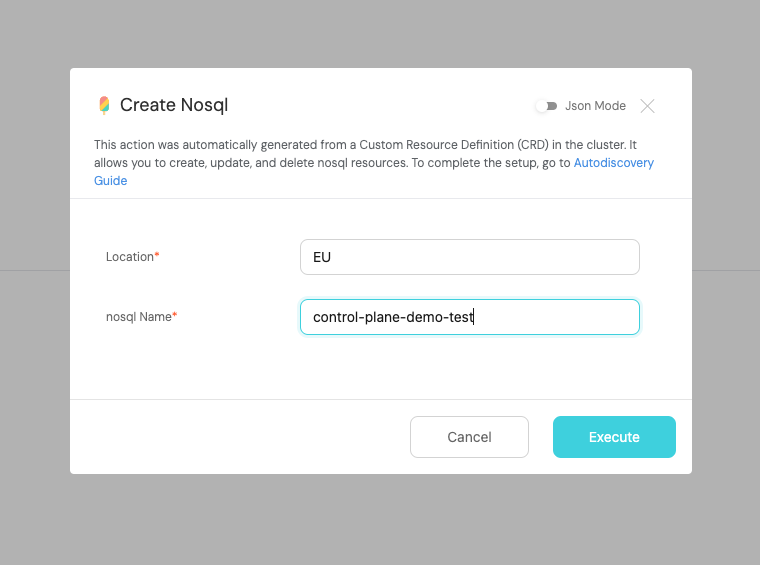
You might have noticed that some fields are not visible in the UI but are present in the CRD.
By default, Port will not show all the fields of the CRD in the UI, it will only show the required ones. You can change this by editing the action JSON, and removing the visible: false from the fields that you want to show in the UI.
- After the action is executed, click on the action run and logs will show up, if everything is succeeded we should see the following logs.

- You are done! Now you can see the created resources in Port's Catalog and at AWS console 🚀
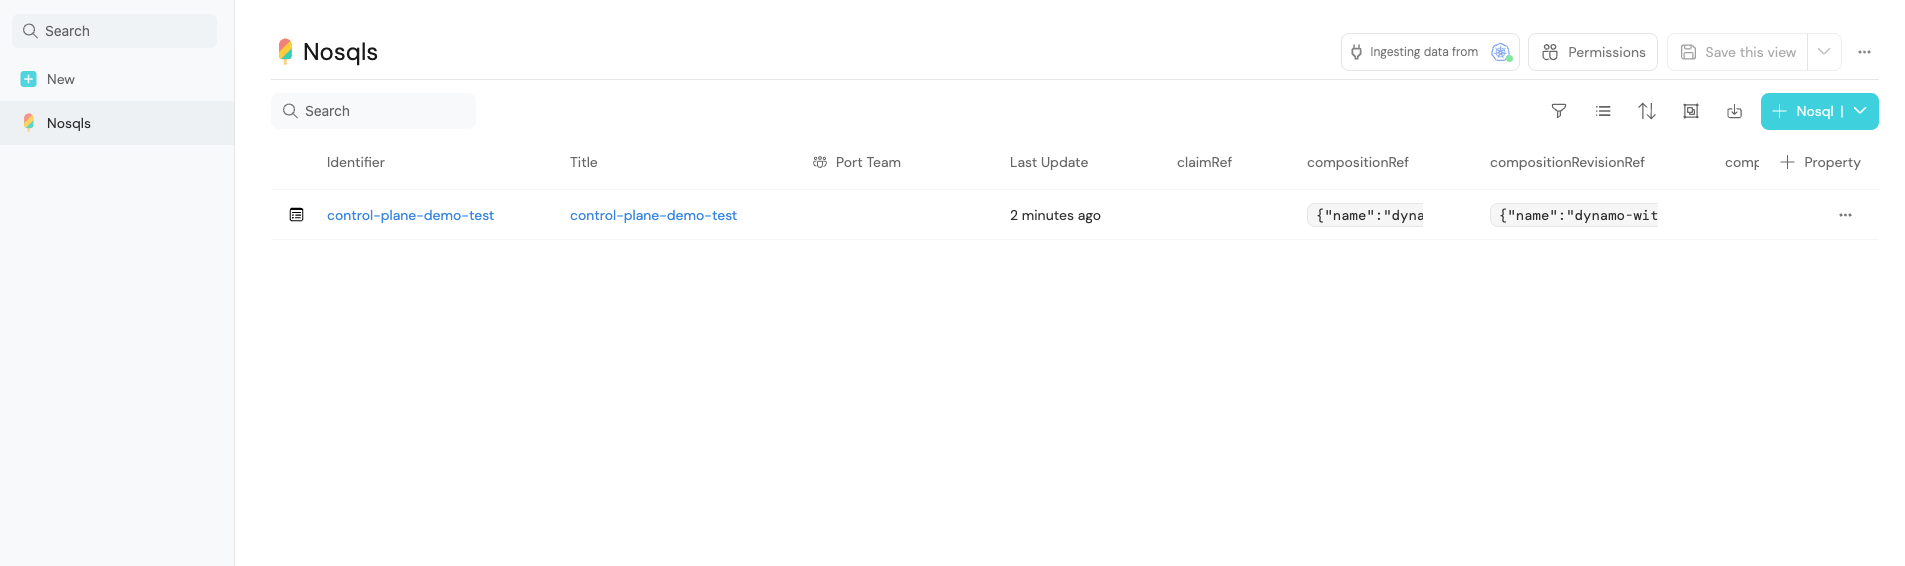
You can also use the Update and Delete actions to update and delete the resources.
Conclusion
By leveraging the power of the K8s API extensions, platform engineers can keep using K8S as the control plane and on top of that, developers can consume the resources directly from Port's UI with ease, while platform engineers can keep track of the usage of the resources.
Troubleshooting
-
If you are not seeing the CRDs in Port's UI, check the logs of the Kubernetes Exporter to see if the CRDs are being discovered and exported to Port.
-
If the action is stuck in progress make sure you changed the Action Organization + Repository to your own repository and organization.
-
If the action is failing, it can be from a various set of problems, make sure the secrets
PORT_CLIENT_ID,PORT_CLIENT_SECRETandKUBE_CONFIGare set correctly and check the logs of the action to see what is the problem.
Next Steps
- Enrich the catalog and visualize the Runtime existing objects in your K8s cluster, by following the Visualize services' k8s runtime guide.
- Port allows multiple ways to enhance the experience of executing
Actions, feel free to alter theActionin Port to your needs by visiting Action Documentation. - Sync data and create more
Blueprintsto enrich the data beyond what exists in K8S. - Build dashboards and reports to visualize the usage of the CRDs and resources in your K8s cluster by following the Build dashboards and reports guide.