Installation
Prerequisites
-
You will need your Port credentials to install the AWS exporter:
Get your Port credentials
To get your Port API credentials go to your Port application, click on the
...button in the top right corner, and selectCredentials. Here you can view and copy yourCLIENT_IDandCLIENT_SECRET: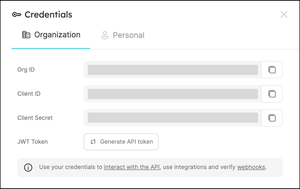
-
The AWS CLI is required for authentication. Make sure your AWS
Access key idandSecret access keyare set. If not, runaws configurein your terminal to configure them.
For the step-by-step installation (not using Terraform), also install:
Terraform Installation (recommended)
Run the following script in your terminal:
# Export your Port credentials
export PORT_CLIENT_ID=YOUR-PORT-CLIENT-ID
export PORT_CLIENT_SECRET=YOUR-PORT-CLIENT-SECRET

# Clone the terraform template
git clone https://github.com/port-labs/template-assets.git

cd template-assets/aws

# Initialize the Terraform requirements
terraform init

# Deploy the aws exporter and provide the resources you want to export
terraform apply -var 'resources=["ecs_service", "lambda", "sns", "sqs", "s3_bucket", "rds_db_instance", "dynamodb_table", "ec2_instance"]'
The above script performs the following actions:
- Creates the resource blueprints in your Port environment.
- Deploys the AWS exporter in your AWS environment with the following resources - S3 bucket, mapping configuration file, AWS secret, AWS IAM policy;
- Setting up Event Bridge Rules that trigger the exporter to update resources;
- Invokes the AWS exporter Lambda function for the first time to get the current resources state.
You can delete resources you don't want to export by removing them from the resources array in the script above.
Step-by-step installation
The steps outlined here can be used to manually install the AWS exporter using CloudFormation.
In order to deploy the application, you will need to fill in the following parameters:
-
Cloud Formation related parameters:
Application name- The stack name of the application created viaAWS CloudFormation.
-
Bucket related parameters:
CreateBucket-trueif you want the application to create and manage your bucket, orfalseif you want to create the bucket on your own.BucketName- The name of your bucket, or a globally unique name for a new bucket.ConfigJsonFileKey- The file key (path) to theconfig.jsonin the bucket.
-
IAM Policy related parameters:
CustomIAMPolicyARN- The ARN of the IAM policy.
-
Secret related parameters:
-
CustomPortCredentialsSecretARN- The ARN of the Port credentials secret;OR
-
SecretName- The name for the new Port credentials secret to create.
-
-
Lambda related parameters:
FunctionName- The function name for the exporter's lambda.ScheduleExpression- The schedule expression to define an event schedule for the exporter.ScheduleState- The schedule initial state -ENABLEDorDISABLED. We recommend to enable it only after one successful run.
-
Prepare a
config.jsonfile that will define which AWS resources to ingest to Port; -
Create the
IAM policythat provides permissions tolistandreadthe AWS resources in theconfig.json;
An IAM policy reference is available here.
-
Deploy our
serverless application.- AWS Console
- AWS CLI
You can deploy the application from the AWS console through this link.
Follow these steps:
-
Create a
parameters.jsonfile to override certain parameters values. For example (replace the placeholders):[
{
"Name": "CustomIAMPolicyARN",
"Value": "<YOUR_IAM_POLICY_ARN>"
},
{
"Name": "CustomPortCredentialsSecretARN",
"Value": "<YOUR_PORT_CREDENTIALS_SECRET_ARN>"
},
{
"Name": "CreateBucket",
"Value": "false"
},
{
"Name": "BucketName",
"Value": "<YOUR_BUCKET_NAME>"
},
{
"Name": "ScheduleExpression",
"Value": "rate(1 hour)"
},
{
"Name": "ScheduleState",
"Value": "DISABLED"
}
] -
Use the following command to create a change set:
aws serverlessrepo create-cloud-formation-change-set --application-id arn:aws:serverlessrepo:eu-west-1:185657066287:applications/port-aws-exporter --stack-name port-aws-exporter --capabilities CAPABILITY_IAM CAPABILITY_RESOURCE_POLICY --parameter-overrides file://parameters.json

# Result
{
  "ApplicationId": "arn:aws:serverlessrepo:eu-west-1:185657066287:applications/port-aws-exporter",
  "ChangeSetId": "<ChangeSetId>",
  ...
} -
With the
<ChangeSetId>from the previous command output, deploy the change set:aws cloudformation execute-change-set --change-set-name "<ChangeSetId>"
After the deployment is complete, use the following AWS SAM CLI command to get a useful list of the exporter's resources:
sam list stack-outputs --stack-name serverlessrepo-port-aws-exporter
The list includes:
Lambda Function ARN- the ARN of the exporter's Lambda;Port Credentials Secret ARN- the ARN of the Port credentials secret;ConfigBucketName- the exporter's bucket name.
For more information regarding how to deploy a serverless application, click here.
- Update the
Port credentials secretwith your credentials;
To learn how to modify a secret's value, look here.
- Upload the
config.jsonto the exporter's S3 bucket.
To learn how to upload a file to S3, look here.
Test the application
In order to test the deployed application, you should run the exporter's lambda with an empty test event ({}), and review the execution status and logs.
A reference showing how to invoke a lambda function with a test event can be found here.
The exporter's lambda can run for more than 15 minutes (the maximum amount of time that a Lambda function can run). If a function has been running for more than 10 minutes, and there are any resources left to sync, a new lambda instance will be launched to continue the syncing process.
Troubleshooting
View the logs
To view the logs of all the lambda instances in one place, you can use Cloudwatch Logs or AWS SAM Logs:
sam logs --stack-name serverlessrepo-port-aws-exporter --tail
Update the schedule settings
After running the exporter successfully for the first time, you probably want to alter the scheduling related properties of the CloudFormation stack:
ScheduleExpression- Make sure to set an interval that is longer than the time it takes for the exporter to execute;ScheduleState- Set the schedule state toENABLED.
If you are using the Terrafom module, update the schedule_state and schedule_expression variables.
In order to determine lambda execution time, you can view the logs, and search for the first and last log lines.
When the exporter finishes its syncing work, it writes the following log: Done handling your resources.
Updating an application's setting or version is done using the same procedure as deploying a new application, similar to step 3 of the installation. By default, the latest available version of the exporter will be used when you run the update/deploy procedure.
For more details, click here.
Configure the AWS Exporter to run on events
In addition to running on schedule, the AWS exporter can be used to act on live events, such as create, update and delete of a resource in your AWS account. That way you can configure a resource to be synced as soon as it changed, in real time.
To configure the AWS exporter to use events as triggers, follow these steps:
-
Prepare an event rule, based on specific events matching resources you want the AWS exporter to update in real time and save it to a Cloudformation YAML template (
template.yml). -
Deploy the event rule using this command:
aws cloudformation deploy --template-file template.yml --stack-name port-aws-exporter-event-rules
Further information
- Refer to the examples page for practical configurations and their corresponding blueprint definitions;
- Learn about more ways of working with Cloudformation stacks;
- Deep-dive into the Event-based Updates mechanism.