Circle CI Actions
Port's Circle CI Action can trigger
a new pipeline
using a customer provided input
and port_payload.
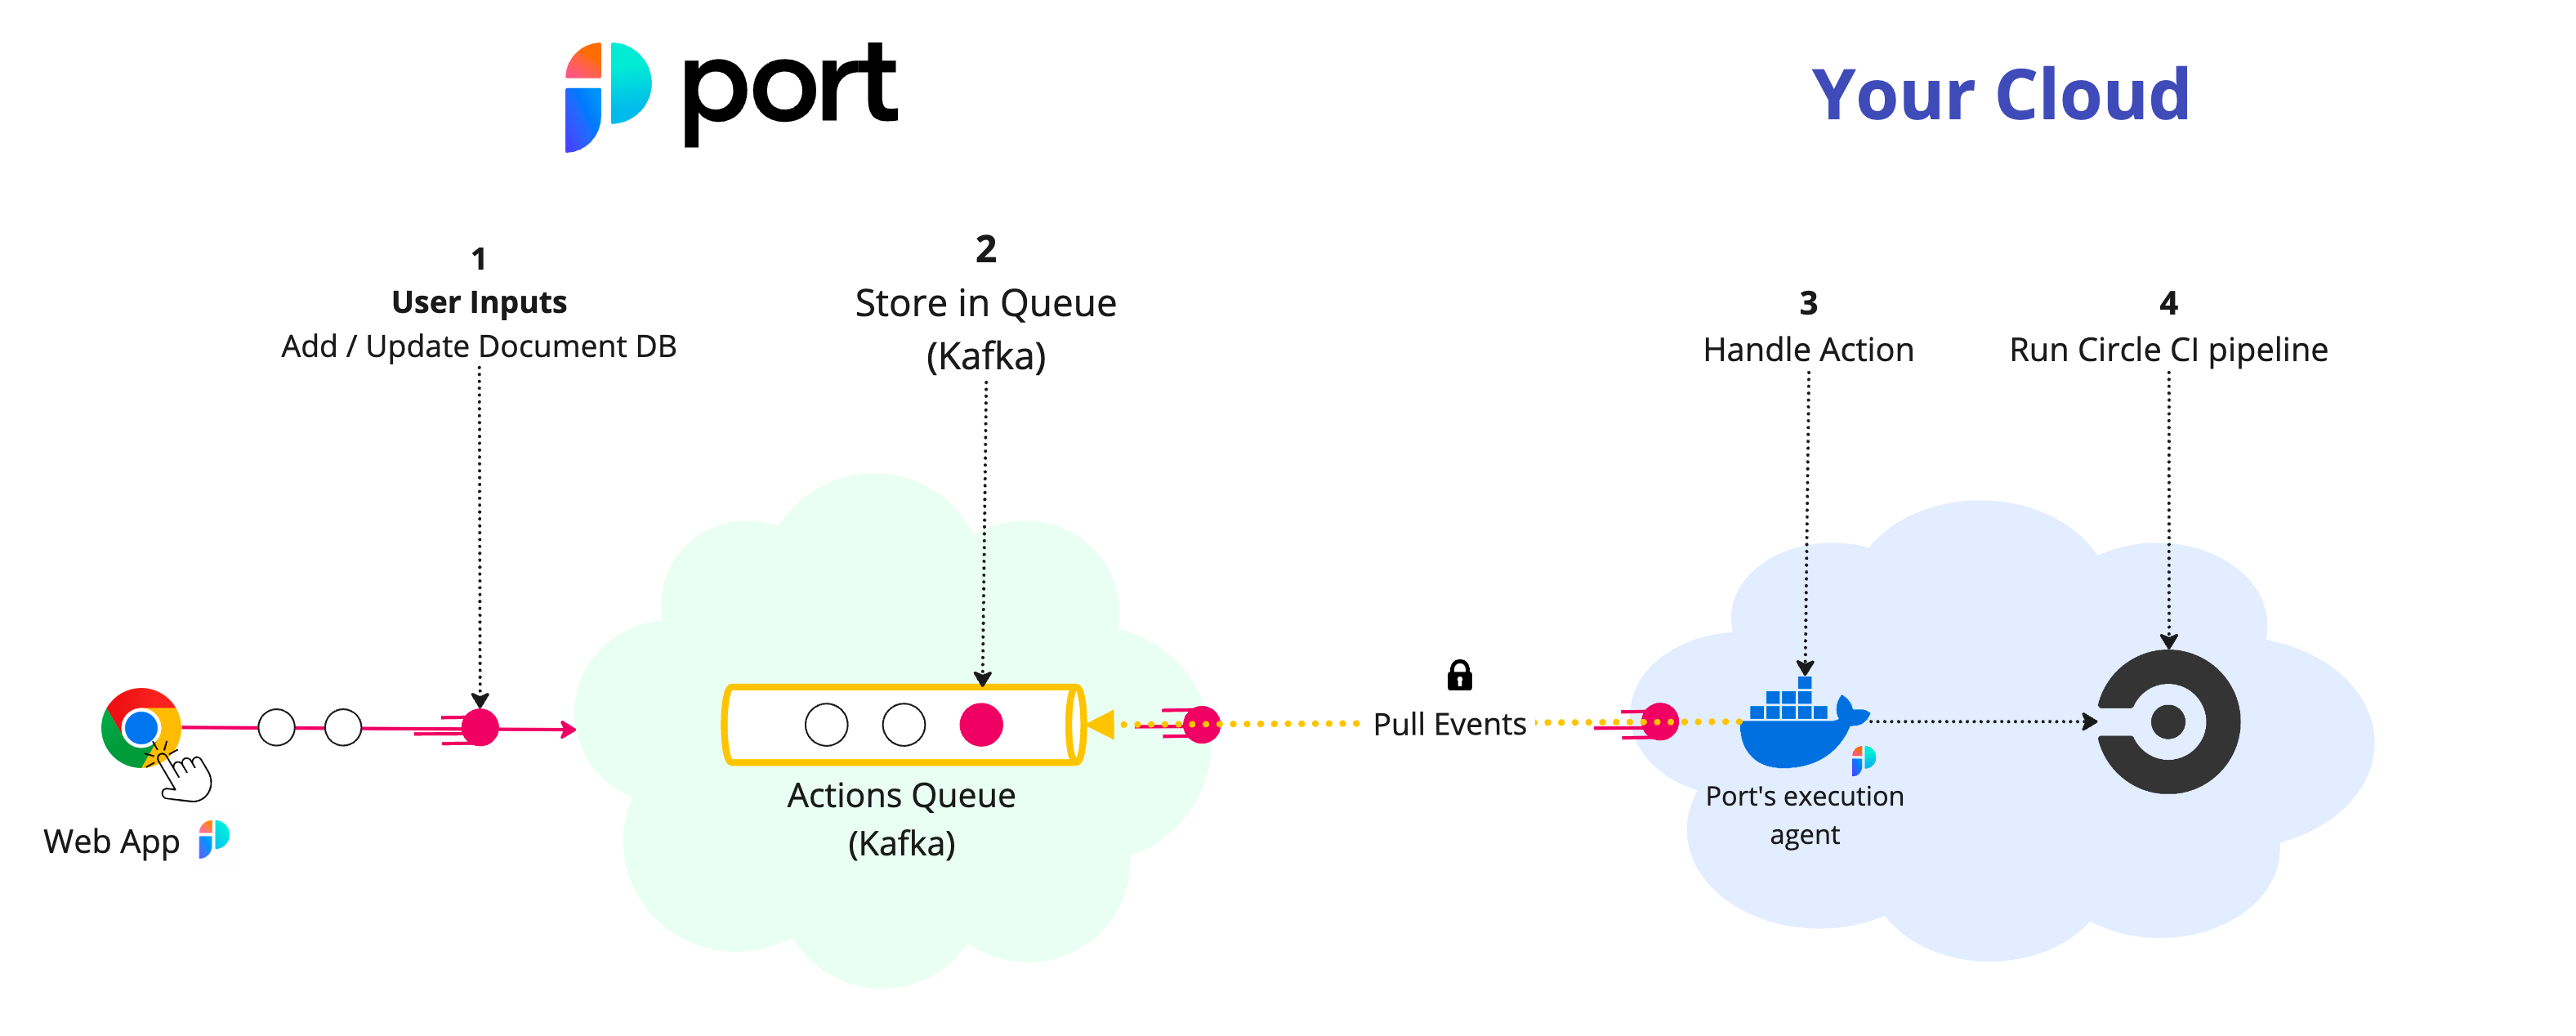
The steps shown in the image above are as follows:
- Port publishes an invoked
Actionmessage containing the pipeline details to a topic; - A secure topic (
ORG_ID.runs) holds all the action invocations; - Port's execution agent pulls the new trigger event from your Kafka topic, and triggers your Circle CI pipeline.
Prerequisites
- Helm must be installed to use the chart. Please refer to Helm's documentation for further details on the installation;
- The connection credentials to Kafka are provided to you by Port;
- If you want to trigger a Circle CI pipeline, you need to have a Circle CI personal API token.
Further steps
- See the Triggering example for Circle CI.
- Contact us through Intercom to set up a Kafka topic for your organization.
- Install the Port execution agent to trigger the Circle CI pipeline.
Triggering example
Create the following blueprint, action and mapping to trigger a Circle CI pipeline.
Blueprint
{
  "identifier": "circle_ci_project",
  "title": "CircleCI Project",
  "icon": "CircleCI",
  "schema": {
    "properties": {
      "project_slug": {
        "title": "Slug",
        "type": "string"
      }
    },
    "required": ["project_slug"]
  },
  "mirrorProperties": {},
  "calculationProperties": {},
  "relations": {}
}
Action
{
  "identifier": "circle_ci_project_trigger_circle_ci_pipeline",
  "title": "Trigger CircleCI pipeline",
  "icon": "CircleCI",
  "trigger": {
    "type": "self-service",
    "operation": "DAY-2",
    "userInputs": {
      "properties": {},
      "required": [],
      "order": []
    },
    "blueprintIdentifier": "circle_ci_project"
  },
  "invocationMethod": {
    "type": "WEBHOOK",
    "url": "https://circleci.com",
    "agent": true,
    "synchronized": false,
    "method": "POST",
    "body": {
      "action": "{{ .action.identifier[(\"circle_ci_project_\" | length):] }}",
      "resourceType": "run",
      "status": "TRIGGERED",
      "trigger": "{{ .trigger | {by, origin, at} }}",
      "context": {
        "entity": "{{.entity.identifier}}",
        "blueprint": "{{.action.blueprint}}",
        "runId": "{{.run.id}}"
      },
      "payload": {
        "entity": "{{ (if .entity == {} then null else .entity end) }}",
        "action": {
          "invocationMethod": {
            "type": "WEBHOOK",
            "agent": true,
            "synchronized": false,
            "method": "POST",
            "url": "https://circleci.com"
          },
          "trigger": "{{.trigger.operation}}"
        },
        "properties": {},
        "censoredProperties": "{{.action.encryptedProperties}}"
      }
    }
  },
  "requiredApproval": false,
  "publish": true
}
Mapping - (Should be saved as a file named invocations.json)
info
To read more about the controlThePayload configuration, please refer to
the Control the payload documentation.
[
  {
    "enabled": ".action == \"trigger_circle_ci_pipeline\"",
    "url": "(env.CIRCLE_CI_URL // \"https://circleci.com\") as $baseUrl | .payload.entity.properties.project_slug | @uri as $path | $baseUrl + \"/api/v2/project/\" + $path + \"/pipeline\"",
    "headers": {
      "Circle-Token": "env.CIRCLE_CI_TOKEN"
    },
    "body": {
      "branch": ".payload.properties.branch // \"main\"",
      "parameters": ".payload.action.invocationMethod as $invocationMethod | .payload.properties | to_entries | map({(.key): (.value | tostring)}) | add | if $invocationMethod.omitUserInputs then {} else . end"
    }
  }
]
Installation
- Add Port's Helm repo by using the following command:
helm repo add port-labs https://port-labs.github.io/helm-charts
note
If you already added this repo earlier, run helm repo update to retrieve
the latest versions of the charts. You can then run helm search repo port-labs to see the charts.
-
Create a JSON file named
invocations.jsonwith the mapping above. -
Install the
port-agentchart by using the following command after filling in the required values:
helm install my-port-agent port-labs/port-agent \
    --create-namespace --namespace port-agent \
    --set-file controlThePayloadConfig=./invocations.json \
    --set env.normal.PORT_ORG_ID=YOUR_ORG_ID \
    --set env.normal.KAFKA_CONSUMER_GROUP_ID=YOUR_KAFKA_CONSUMER_GROUP \
    --set env.secret.PORT_CLIENT_ID=YOUR_PORT_CLIENT_ID \
    --set env.secret.PORT_CLIENT_SECRET=YOUR_PORT_CLIENT_SECRET \
    --set env.secret.CIRCLE_CI_TOKEN=YOUR_CIRCLE_CI_PERSONAL_TOKEN