Setup Actions

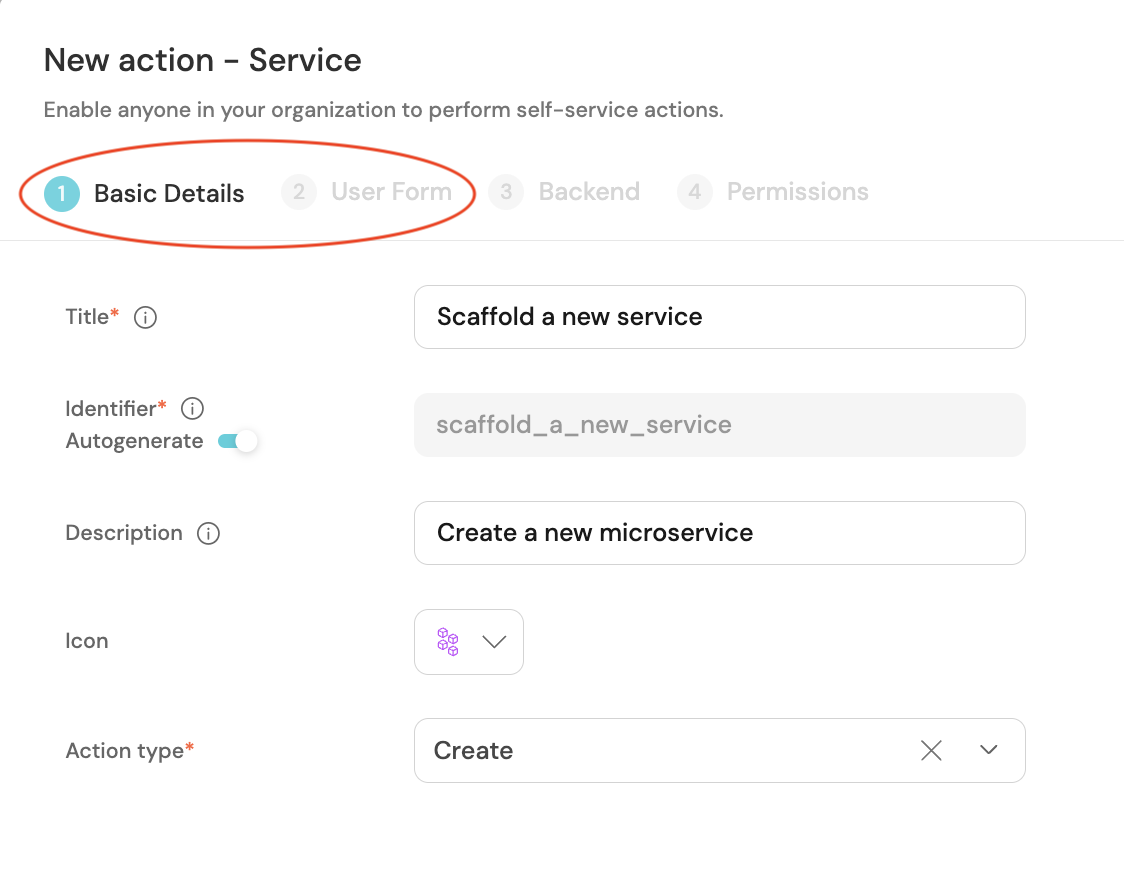
Choose the name, description and icon of the action to make it recognizable.

Select the user inputs you would like the user to fill out to use the action.

Port supports various input types, including constructing wizards with conditions and steps to best fit the experience you want for your users.

Setting up an action includes the following steps:

  1. Define action information - the title, icon, description and associated blueprint;
  2. Select the user inputs - create a wizard-like experience by specifying the input types users need to fill in, while also including input validations;
  3. Configure the action type - Create/Day-2/Delete;
  4. Connect the action to a backend - for every action you define in Port, you tell Port what component is responsible to handle the action's invocation. This is called the invocation method, Port supports various invocation methods for different use cases and environments;
  1. Configure RBAC and guardrails - this optional step lets you choose who can trigger an action, does the action require manual approval from an admin, and who has the permissions to approve or dismiss requests.

๐Ÿ’ก Common actionsโ€‹

Actions can be used to execute any logic that you choose, for example:

  • Scaffold a new microservice;
  • Deploy a new version;
  • Lock deployments;
  • Add a secret;
  • Spin up a temporary developer environment;
  • Extend an environment's TTL;
  • Provision a cloud resource;
  • Update the pod count of a service;
  • Update the auto-scaling group;
  • Change customer configuration;
  • Train a machine learning model;
  • Pre-process a dataset;
  • etc.

In this live demo example, we can see the Self-Service Hub page with example actions. ๐ŸŽฌ

Action structureโ€‹

Each action is represented by a Json schema, as shown in the following section:

{
"identifier": "myIdentifier",
"title": "My title",
"description": "My description",
"icon": "My icon",
"userInputs": {
"properties": {
"myInput1": {
"type": "my_type",
"title": "My input"
},
"myInput2": {
"type": "my_special_type",
"title": "My special input"
}
},
"required": []
},
"invocationMethod": {
"type": "myInvocationType"
},
"trigger": "myActionTrigger",
"requiredApproval": false
}
actions array

Actions configured for a blueprint are saved as an array, in the JSON example above you can see the schema of a single action, in order to save this action definition in your blueprint, remember to wrap it in square brackets ([]) to include it as part of the array:

[
{
"identifier": "myIdentifier",
"title": "My title",
"description": "My description",
"icon": "My icon",
"userInputs": {
"properties": {
... action definition
}
}
]

Structure tableโ€‹

An action consist of several properties:

| Field | Description | Notes | | ------------------ | --------------------------------------------------------------------------------------------------------------------------------- | -------------------------------------------------------------------------------------------------------------------------------------------------------------------------------------------------------------------------------------- | --------------------------------------------------------------------------------------- | | id | Internal Action ID | An internal ID Port assigns to each action. Immutable. | The id field will be added to the action JSON automatically after creating the action | | identifier | Unique identifier | Required. The identifier is used for API calls, programmatic access and distinguishing between different actions | | title | Name | Human-readable name for the action | | description | Description | The value is visible on the action card in the Self-Service Hub and also as a tooltip to users when hovering over the action in the UI | | icon | Action icon | See the full icon list here | | trigger | The type of the action: CREATE, DAY-2 or DELETE | The action type is sent by Port to the action backend as part of the action metadata. In addition, Port automatically places actions in specific places in the developer portal UI to make them accessible and intuitive for the user. | | userInputs | An object containing properties ,required and order as seen in Action user inputs | | requiredApproval | Whether the action requires approval or not | | invocationMethod | The invocation method for the action | Defines the destination where invocations of the action will be delivered, see invocation method for details |

available user inputs

All available user inputs are listed in the user inputs page

userInputs - Form & Wizard UIโ€‹

Port actions support a variety of user inputs which make it easy to create UI forms and wizards.

By using user inputs, you can specify to your users exactly what information your backend requires to handle the action request. In addition, the user inputs provide validation support out-of-the-box, making it easy to put guardrails in place and make sure that input values are standardized.

To learn more about user inputs, refer to the user inputs page.

trigger - Action typeโ€‹

Port actions support 3 action types:

  • CREATE - create actions are used to create new new assets and resources, and are not tied to an existing entity from the software catalog;
  • DAY-2 - day-2 operation actions are used to modify, change, enhance or add to existing resources and entities in the software catalog;
  • DELETE - delete actions are used to trigger the organized deletion of existing resources and their respective entities in the software catalog.

Different action types also include specific representation in the software catalog UI:

  • Each action type has a separate section in the Self-Service Hub page;
  • In the blueprints table, CREATE actions appear as a global button, not tied to any specific entity;
  • In the blueprints table and entity page, DAY-2 and DELETE actions appear specifically on the entity you wish to trigger the action on.

invocationMethod - Connect to a backendโ€‹

Port actions support a variety of target backends that can be triggered when an action is invoked.

The different backends are denoted and configured via the invocationMethod key, the available methods are:

  • Webhook - setup a webhook URL to receive and handle forms and wizards submissions;
  • Kafka - subscribe to Kafka topic to listen to messages with forms and wizards submissions;
  • CI Native (Github Workflow) - setup Port's GitHub app to handle forms & wizards submission via Github Workflows;
  • CI Native (Azure Pipeline)- setup a webhook type service connection to trigger Azure pipelines and handle forms & wizards submission via Github Workflows;
  • Port agent - setup Port's agent tp receive forms & wizards submissions and forward them to your backend on your internal network.

To learn more about the different available invocation methods and backends, refer to the setup backend page.

requireApproval - Require manual approval (optional)โ€‹

Port actions support a manual approval process. Manual approvals let you control who can approve an action invocation request, and also handle notifying the relevant personas when an action request is awaiting their review.

refer to the self-service actions RBAC page to learn more.

Configuring actions in Portโ€‹

{
"identifier": "myIdentifier",
"title": "My title",
"description": "My description",
"icon": "My icon",
"userInputs": {
"properties": {},
"required": []
},
"invocationMethod": {
"type": "myInvocationType"
},
"trigger": "myActionTrigger",
"requiredApproval": false
}
note

The JSON shown above is for a single blueprint action, the actions of a blueprint are stored in an array ([])

Check out Port's API reference to learn more.