Installation
This page will help you install Port's GitLab integration (powered by the Ocean framework).
This page outlines the following steps:
- How to create a GitLab group access token to give the integration permissions to query your GitLab account.
- How to configure and customize the integration before deploying it.
- How to deploy the integration in the configuration that fits your use case.
- A gitlab account with admin privileges.
- A gitlab group account with the
apiscope. - If you choose the real time & always on installation method - a kubernetes cluster to install the integration on.
- Your Port user role is set to
Admin.
Create a GitLab group access token
A group access token can be used for the group it was generated at, as well as for all sub-groups underneath it.
The GitLab integration is able to query multiple GitLab root groups. To do so, it will require multiple group access tokens, each at the correct root group.
GitLab group access tokens example
For example, let's assume the following GitLab account structure:
GitLab account
.
├── microservices-group
│   ├──microservice1-group
│   └──microservice2-group
├── apis-group
│   ├── rest-api-group
│   └── graphql-api-group
In this example:
- To map only the
microservices-group, we require one group access token - one for themicroservices-group. - To map the
microservices-groupand all of its subgroups, we require only one group access token - one for themicroservices-group. - To map the
microservices-group, theapis-groupand all of their subgroups, we require only two group access tokens - one for themicroservices-groupand one for theapis-group. - To map the
microservice1-group, we have 2 options:- Create a group access token for the
microservices-groupand use the token mapping to select just themicroservice1-group. - Create a group access token for the
microservice1-groupdirectly.
- Create a group access token for the
See the token mapping section for more information.
The following steps will guide you how to create a GitLab group access token.
-
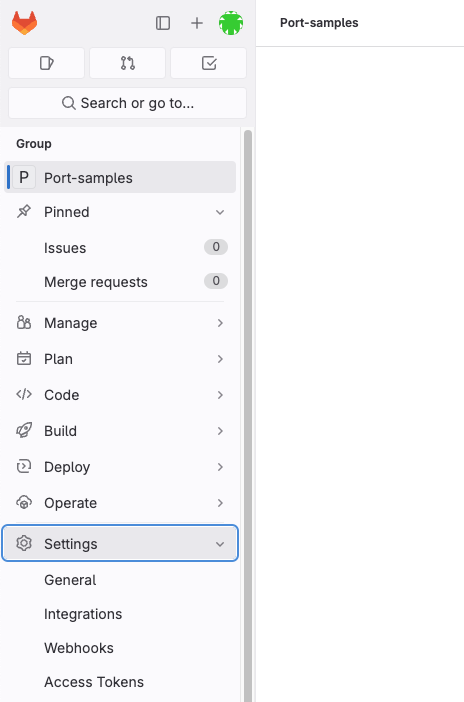
Sign in to GitLab and go to your desired group's settings page:
-
In the "Access Tokens" section, you need to provide the token details, including the name and an optional expiration date. Additionally, select the api scope, and then proceed to click on the "Create access token" button.

-
Click "Create group access token".
-
Copy the generated token and use it when deploying the integration in the following steps.
Configure the GitLab integration
tokenMapping
The GitLab integration supports fetching data related to specific paths in your GitLab groups. The integration is also able to fetch data from different GitLab parent groups by providing additional group tokens. In order to do so, you need to map the desired paths to the relevant access tokens.
The tokenMapping parameter supports specifying the paths that the integration will search for files and information in, using globPatterns.
Mapping format:
{"MY_FIRST_GITLAB_PROJECT_GROUP_TOKEN": ["**/MyFirstGitLabProject/**","**/MySecondGitLabProject/*"]}
Example:
{"glpat-QXbeg-Ev9xtu5_5FsaAQ": ["**/DevopsTeam/*Service", "**/RnDTeam/*Service"]}
When using the tokenMapping parameter in the integration's Helm installation, make sure to escape the necessary characters, for example:
--set integration.secrets.tokenMapping=“\{\“glpat-oh1YXc54pR4eofx6hYy5\“: [\“**\“]\}”
Multiple GitLab group access tokens example:
{"glpat-QXbeg-Ev9xtu5_5FsaAQ": ["**/DevopsTeam/*Service", "**/RnDTeam/*Service"],"glpat-xF7Ae-vXu5ts5_QbEgAQ9": ["**/MarketingTeam/*Service"]}
Configure Realtime webhook events
Expose Endpoint for events
App Host
The appHost parameter is used specifically to enable the real-time functionality of the integration.
If it is not provided, the integration will continue to function correctly. In such a configuration, to retrieve the latest information from the target system, the scheduledResyncInterval parameter has to be set, or a manual resync will need to be triggered through Port's UI.
In order for the GitLab integration to update the data in Port on every change in the GitLab repository, you need to specify the appHost parameter.
The appHost parameter should be set to the url of your GitLab integration instance. In addition, your GitLab instance (whether it is GitLab SaaS or a self-hosted version of GitLab) needs to have the option to send webhook requests to the GitLab integration instance, so please configure your network accordingly.
The default webhook events behavior
The GitLab integration supports listening to GitLab webhooks and updating the relevant entities in Port accordingly.
Supported webhooks are Group webhooks and System hooks.
As part of the installation process, the integration will create a webhook in your GitLab instance, and will use it to listen to the relevant events.
There are a few points to consider before deciding on which webhook to choose :
-
If you choose system hooks, the integration will create a single webhook for the entire GitLab instance. If you choose group webhooks, the integration will create a webhook for each root group in your GitLab instance, unless you provide the
tokenGroupHooksOverrideMappingparameter- and then it will create a webhook for each specified group in this parameter. -
The system hooks has much less event types than the group webhooks.
-
Group Webhooks supported event types:
push_eventsissues_eventsjobs_eventsmerge_requests_eventspipeline_eventsreleases_eventstag_push_eventssubgroup_eventsconfidential_issues_events
-
System Hooks supported event types:
push_eventsmerge_requests_eventsrepository_update_events
This means that if you choose system hooks, the integration will not be able to update the relevant entities in Port on events such as
issues_events,pipeline_eventsand etc.
-
-
Creating a system hook requires admin privileges in GitLab. Due to this, the integration supports that the system hook will be created manually, and the integration will use it to listen to the relevant events.
Specific Group Webhooks
By default, if appHost is provided, the integration will create group webhooks for each root group in your GitLab instance. If you need to create webhooks only for specific groups, you should configure the tokenGroupHooksOverrideMapping parameter.
System Webhooks
To create a system hook there are two options:
In both options you'll need to provide the useSystemHook parameter with the value true.
- Provide a token with admin privileges in GitLab using the
tokenMappingparameter.- When choosing this option, the integration will create the system hook in your GitLab account automatically.
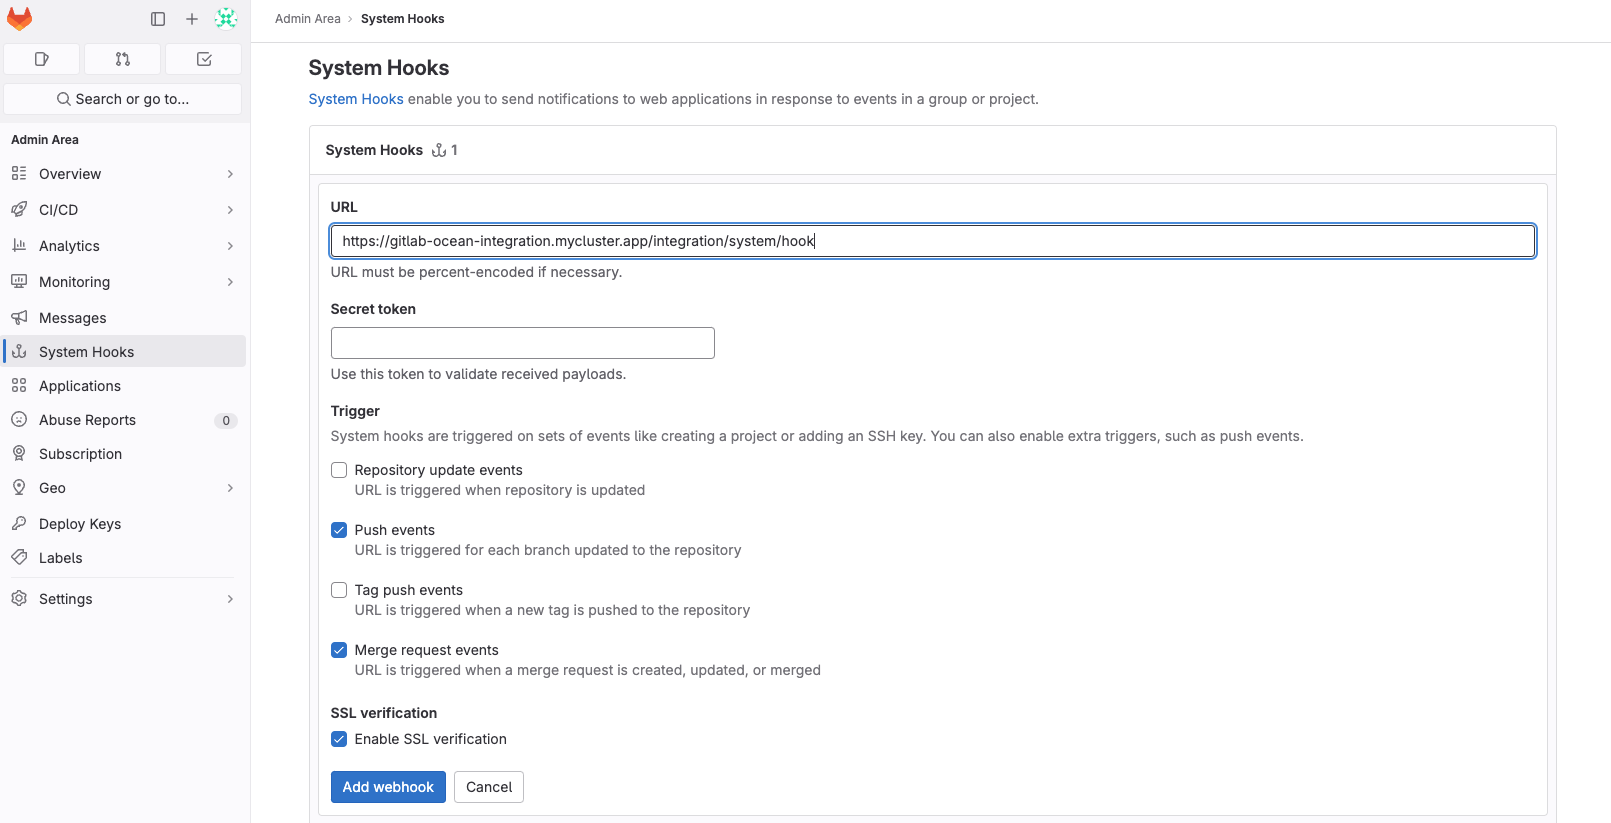
- Create the system hook manually
- Follow the instructions for creating a system hook in GitLab here.
- In the
URLfield, provide theappHostparameter value with the path/integration/system/hook. e.g.https://my-gitlab-integration.com/integration/system/hook. - From the
Triggerssection, the GitLab integration currently supports the following events:pushmerge_request
tokenGroupHooksOverrideMapping
the integration can support listening to webhooks on specified groups, by configuring the tokenGroupHooksOverrideMapping parameter. this parameter is not required, and when you don't use it, the integration will listen to all of the root groups (if not using useSystemHooks=true)
Mapping format:
{"MY_FIRST_GROUPS_TOKEN": {"groups:"{"MY_FIRST_GROUP_FULL_PATH": {"events": [CHOSEN_EVENT_TYPES]}, "MY_OTHER_GROUP_FULL_PATH": {"events": [CHOSEN_EVENT_TYPES]}}}}
Example:
{"glpat-QXbeg-Ev9xtu5_5FsaAQ": {"groups": {"path/to/my-first-group": {"events": ["push_events", "merge_requests_events]}, "path/to/my-other-group": {"events": ["pipelines_events"]}}}}
You can configure multiple tokens, and multiple groups per token (the token should have admin access to those groups), but there are some rules:
- All of the tokens mentioned here must be contained in
tokenMapping. - A "groups" key is required for each token.
- All of the groups in all of the tokens must be non-hierarchical to each other, and not identical (duplicated).
- The group path is the full path in gitlab. If a group path is incorrect, the webhook will not be created.
- The events for each group must match the supported event types mentioned below. if you would like to have all the events provided in the webhook, you can use:
{"events" = []}, but not eliminate this key completely, because it is required.
Deploy the GitLab integration
Choose one of the following installation methods:
- Hosted by Port
- Real Time & Always On
- Scheduled
Using this installation option means that the integration will be hosted by Port, with a customizable resync interval to ingest data into Port.
To install, follow the following steps:
-
Go to the Data sources page of your portal.
-
Click on the
+ Data sourcebutton in the top-right corner. -
Click on the relevant integration in the list.
-
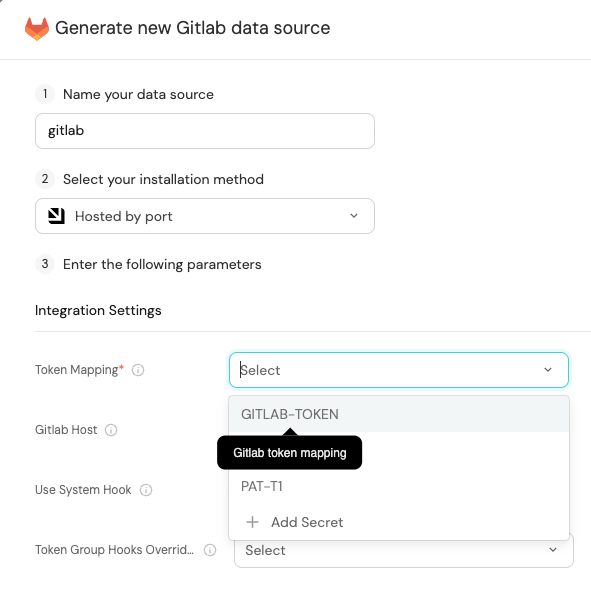
Under
Select your installation method, chooseHosted by Port. -
Configure the
integration settingsandapplication settingsas you wish (see below for details).
Application settings
Every integration hosted by Port has the following customizable application settings:
-
Resync interval: The frequency at which Port will ingest data from the integration. There are various options available, ranging from every 1 hour to once a day. -
Send raw data examples: A boolean toggle (enabledby default). If enabled, raw data examples will be sent from the integration to Port. These examples are used when testing your mapping configuration, they allow you to run yourjqexpressions against real data and see the results.
Integration settings
Every integration has its own tool-specific settings, under the Integration settings section.
Each of these settings has an ⓘ icon next to it, which you can hover over to see a description of the setting.
Port secrets
Some integration settings require sensitive pieces of data, such as tokens.
For these settings, Port secrets will be used, ensuring that your sensitive data is encrypted and secure.
When changing such a setting, you will be prompted to choose an existing secret or create a new one:
Currently, live events are not supported for integrations hosted by Port.
Resyncs will be performed periodically, based on the Resync interval you have configured, or manually triggered by you via Port's UI.
Therefore, real-time events such as GitOps pushes will not be ingested into Port immediately.
Live events are WIP and will be supported in the future.
Using this installation option means that the integration will be able to update Port in real time using webhooks.
This table summarizes the available parameters for the installation. Set them as you wish in the script below, then copy it and run it in your terminal:
| Parameter | Description | Example | Required |
|---|---|---|---|
port.clientId | Your Port client id | ✅ | |
port.clientSecret | Your Port client secret | ✅ | |
port.baseUrl | Your Port API URL - https://api.getport.io for EU, https://api.us.getport.io for US | ✅ | |
integration.secrets.tokenMapping | The token mapping configuration used to query GitLab | ✅ | |
integration.config.appHost | The host of the Port Ocean app. Used to set up the integration endpoint as the target for webhooks created in GitLab | https://my-ocean-integration.com | ❌ |
integration.config.gitlabHost | (for self-hosted GitLab) the URL of your GitLab instance | https://my-gitlab.com | ❌ |
integration.secrets.tokenGroupHooksOverrideMapping | The token group hooks override mapping configuration used to create custom webhooks on groups | ❌ |
Advanced configuration
| Parameter | Description |
|---|---|
integration.eventListener.type | The event listener type. Read more about event listeners |
integration.type | The integration to be installed |
scheduledResyncInterval | The number of minutes between each resync. When not set the integration will resync for each event listener resync event. Read more about scheduledResyncInterval |
initializePortResources | Default true, When set to true the integration will create default blueprints and the port App config Mapping. Read more about initializePortResources |
sendRawDataExamples | Enable sending raw data examples from the third party API to port for testing and managing the integration mapping. Default is true |
- Helm
- ArgoCD
To install the integration using Helm, run the following command:
helm repo add --force-update port-labs https://port-labs.github.io/helm-charts
helm upgrade --install my-gitlab-integration port-labs/port-ocean \
  --set port.clientId="PORT_CLIENT_ID"  \
  --set port.clientSecret="PORT_CLIENT_SECRET"  \
  --set port.baseUrl="https://api.getport.io"  \
  --set initializePortResources=true  \
  --set sendRawDataExamples=true \
  --set scheduledResyncInterval=120 \
  --set integration.identifier="my-gitlab-integration"  \
  --set integration.type="gitlab"  \
  --set integration.eventListener.type="POLLING"  \
  --set integration.secrets.tokenMapping="\{\"TOKEN\": [\"GROUP_NAME/**\"]\}"
The baseUrl, port_region, port.baseUrl, portBaseUrl, port_base_url and OCEAN__PORT__BASE_URL parameters are used to select which instance or Port API will be used.
Port exposes two API instances, one for the EU region of Port, and one for the US region of Port.
- If you use the EU region of Port, available at https://app.getport.io, your Port API URL is
https://api.getport.io - If you use the US region of Port, available at https://app.us.getport.io, your Port API URL is
https://api.us.getport.io
It is also possible to get Port's UI to generate your installation command for you, Port will inject values such as your Port client ID and client secret directly into the command, making it easier to get started.
Follow these steps to setup the integration through Port's UI:
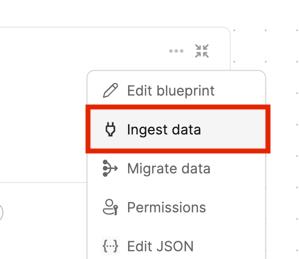
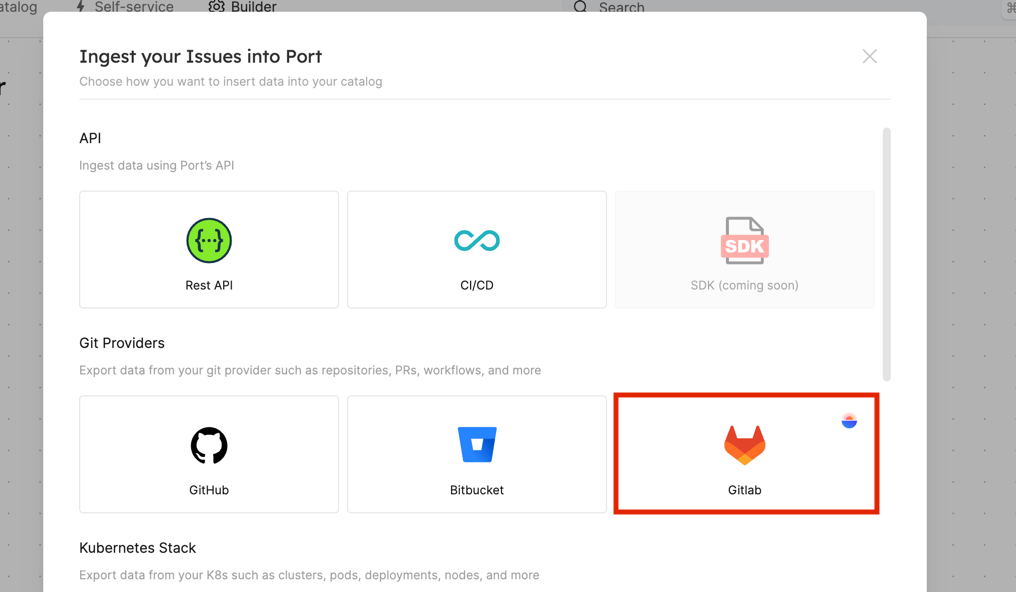
-
Click the ingest button in Port Builder Page for the blueprint you want to ingest using GitLab:
-
Select GitLab under the Git providers category:
-
Copy the helm installation command and set the required configuration;
-
Run the helm command with the updated parameters to install the integration in your Kubernetes cluster.
To install the integration using ArgoCD, follow these steps:
- Create a
values.yamlfile inargocd/my-ocean-gitlab-integrationin your git repository with the content:
Remember to replace the placeholders for GITLAB_TOKEN_MAPPING.
initializePortResources: true
scheduledResyncInterval: 120
integration:
  identifier: my-ocean-gitlab-integration
  type: gitlab
  eventListener:
    type: POLLING
  secrets:
    tokenMapping: GITLAB_TOKEN_MAPPING
- Install the
my-ocean-gitlab-integrationArgoCD Application by creating the followingmy-ocean-gitlab-integration.yamlmanifest:
Remember to replace the placeholders for YOUR_PORT_CLIENT_ID YOUR_PORT_CLIENT_SECRET and YOUR_GIT_REPO_URL.
Multiple sources ArgoCD documentation can be found here.
ArgoCD Application
apiVersion: argoproj.io/v1alpha1
kind: Application
metadata:
  name: my-ocean-gitlab-integration
  namespace: argocd
spec:
  destination:
    namespace: my-ocean-gitlab-integration
    server: https://kubernetes.default.svc
  project: default
  sources:
  - repoURL: 'https://port-labs.github.io/helm-charts/'
    chart: port-ocean
    targetRevision: 0.1.14
    helm:
      valueFiles:
      - $values/argocd/my-ocean-gitlab-integration/values.yaml
      parameters:
        - name: port.clientId
          value: YOUR_PORT_CLIENT_ID
        - name: port.clientSecret
          value: YOUR_PORT_CLIENT_SECRET
        - name: port.baseUrl
          value: https://api.getport.io
  - repoURL: YOUR_GIT_REPO_URL
    targetRevision: main
    ref: values
  syncPolicy:
    automated:
      prune: true
      selfHeal: true
    syncOptions:
    - CreateNamespace=true
The baseUrl, port_region, port.baseUrl, portBaseUrl, port_base_url and OCEAN__PORT__BASE_URL parameters are used to select which instance or Port API will be used.
Port exposes two API instances, one for the EU region of Port, and one for the US region of Port.
- If you use the EU region of Port, available at https://app.getport.io, your Port API URL is
https://api.getport.io - If you use the US region of Port, available at https://app.us.getport.io, your Port API URL is
https://api.us.getport.io
- Apply your application manifest with
kubectl:
kubectl apply -f my-ocean-gitlab-integration.yaml
For advanced configuration such as proxies or self-signed certificates, click here.
- GitLab
- Jenkins
This workflow will run the GitLab integration once and then exit, this is useful for scheduled ingestion of data.
If you want the integration to update Port in real time using webhooks you should use the Real Time & Always On installation option.
Make sure to configure the following GitLab Variables:
| Parameter | Description | Example | Required |
|---|---|---|---|
OCEAN__INTEGRATION__CONFIG__TOKEN_MAPPING | The token mapping configuration used to query GitLab | ✅ | |
OCEAN__PORT__CLIENT_ID | Your Port client (How to get the credentials) id | ✅ | |
OCEAN__PORT__CLIENT_SECRET | Your Port client (How to get the credentials) secret | ✅ | |
OCEAN__PORT__BASE_URL | Your Port API URL - https://api.getport.io for EU, https://api.us.getport.io for US | ✅ | |
OCEAN__INITIALIZE_PORT_RESOURCES | Default true, When set to true the integration will create default blueprints and the port App config Mapping. Read more about initializePortResources | ❌ | |
OCEAN__INTEGRATION__CONFIG__GITLAB_HOST | (for self-hosted GitLab) the URL of your GitLab instance | ❌ | |
OCEAN__INTEGRATION__IDENTIFIER | The identifier of the integration that will be installed | ❌ |
Here is an example for .gitlab-ci.yml workflow file:
stages:
  - deploy_gitlab

variables:
  # Define non-secret variables
  INTEGRATION_TYPE: "gitlab"
  VERSION: "latest"
  # These variables should be set in GitLab's CI/CD variables for security
  # OCEAN__PORT__CLIENT_ID: $OCEAN__PORT__CLIENT_ID
  # OCEAN__PORT__CLIENT_SECRET: $OCEAN__PORT__CLIENT_SECRET
  # OCEAN__INTEGRATION__CONFIG__TOKEN_MAPPING: $OCEAN__INTEGRATION__CONFIG__TOKEN_MAPPING

deploy_gitlab:
  image: docker:24.0.7
  stage: deploy_gitlab
  services:
    - docker:24.0.7-dind
  script:
    - image_name="ghcr.io/port-labs/port-ocean-$INTEGRATION_TYPE:$VERSION"
    - |
      docker run -i --rm --platform=linux/amd64 \
      -e OCEAN__EVENT_LISTENER='{"type":"ONCE"}' \
      -e OCEAN__INITIALIZE_PORT_RESOURCES=true \
      -e OCEAN__SEND_RAW_DATA_EXAMPLES=true \
      -e OCEAN__INTEGRATION__CONFIG__TOKEN_MAPPING="$OCEAN__INTEGRATION__CONFIG__TOKEN_MAPPING" \
      -e OCEAN__PORT__CLIENT_ID=$OCEAN__PORT__CLIENT_ID \
      -e OCEAN__PORT__CLIENT_SECRET=$OCEAN__PORT__CLIENT_SECRET \
      -e OCEAN__PORT__BASE_URL='https://api.getport.io' \
      $image_name
  only:
    - main
The baseUrl, port_region, port.baseUrl, portBaseUrl, port_base_url and OCEAN__PORT__BASE_URL parameters are used to select which instance or Port API will be used.
Port exposes two API instances, one for the EU region of Port, and one for the US region of Port.
- If you use the EU region of Port, available at https://app.getport.io, your Port API URL is
https://api.getport.io - If you use the US region of Port, available at https://app.us.getport.io, your Port API URL is
https://api.us.getport.io
When saving the OCEAN__INTEGRATION__CONFIG__TOKEN_MAPPING variable, be sure to save it as-is, for example given the following token mapping:
{"glpat-QXbeg-Ev9xtu5_5FsaAQ": ["**/DevopsTeam/*Service", "**/RnDTeam/*Service"]}
(Note that this is a one-liner)
Save it as a GitLab variable without any changes (there is no need to wrap it in single-quotes (') or double-quotes (").
Also make sure to keep the double-quotes (") when passing the OCEAN__INTEGRATION__CONFIG__TOKEN_MAPPING parameter to the Docker CLI (see the pipeline example above).
This pipeline will run the GitLab integration once and then exit, this is useful for scheduled ingestion of data.
Your Jenkins agent should be able to run docker commands.
If you want the integration to update Port in real time using webhooks you should use the Real Time & Always On installation option.
Make sure to configure the following Jenkins Credentials of Secret Text type:
| Parameter | Description | Example | Required |
|---|---|---|---|
OCEAN__INTEGRATION__CONFIG__TOKEN_MAPPING | The token mapping configuration used to query GitLab | ✅ | |
OCEAN__PORT__CLIENT_ID | Your Port client (How to get the credentials) id | ✅ | |
OCEAN__PORT__CLIENT_SECRET | Your Port client (How to get the credentials) secret | ✅ | |
OCEAN__PORT__BASE_URL | Your Port API URL - https://api.getport.io for EU, https://api.us.getport.io for US | ✅ | |
OCEAN__INITIALIZE_PORT_RESOURCES | Default true, When set to true the integration will create default blueprints and the port App config Mapping. Read more about initializePortResources | ❌ | |
OCEAN__INTEGRATION__CONFIG__GITLAB_HOST | (for self-hosted GitLab) the URL of your GitLab instance | ❌ | |
OCEAN__INTEGRATION__IDENTIFIER | The identifier of the integration that will be installed | ❌ |
Here is an example for Jenkinsfile groovy pipeline file:
pipeline {
    agent any

    stages {
        stage('Run GitLab Integration') {
            steps {
                script {
                    withCredentials([
                        string(credentialsId: 'OCEAN__INTEGRATION__CONFIG__TOKEN_MAPPING', variable: 'OCEAN__INTEGRATION__CONFIG__TOKEN_MAPPING'),
                        string(credentialsId: 'OCEAN__PORT__CLIENT_ID', variable: 'OCEAN__PORT__CLIENT_ID'),
                        string(credentialsId: 'OCEAN__PORT__CLIENT_SECRET', variable: 'OCEAN__PORT__CLIENT_SECRET'),
                    ]) {
                        sh('''
                            #Set Docker image and run the container
                            integration_type="gitlab"
                            version="latest"
                            image_name="ghcr.io/port-labs/port-ocean-${integration_type}:${version}"
                            docker run -i --rm --platform=linux/amd64 \
                                -e OCEAN__EVENT_LISTENER='{"type":"ONCE"}' \
                                -e OCEAN__INITIALIZE_PORT_RESOURCES=true \
                                -e OCEAN__SEND_RAW_DATA_EXAMPLES=true \
                                -e OCEAN__INTEGRATION__CONFIG__TOKEN_MAPPING="$OCEAN__INTEGRATION__CONFIG__TOKEN_MAPPING" \
                                -e OCEAN__PORT__CLIENT_ID=$OCEAN__PORT__CLIENT_ID \
                                -e OCEAN__PORT__CLIENT_SECRET=$OCEAN__PORT__CLIENT_SECRET \
                                -e OCEAN__PORT__BASE_URL='https://api.getport.io' \
                                $image_name

                            exit $?
                        ''')
                    }
                }
            }
        }
    }
}
The baseUrl, port_region, port.baseUrl, portBaseUrl, port_base_url and OCEAN__PORT__BASE_URL parameters are used to select which instance or Port API will be used.
Port exposes two API instances, one for the EU region of Port, and one for the US region of Port.
- If you use the EU region of Port, available at https://app.getport.io, your Port API URL is
https://api.getport.io - If you use the US region of Port, available at https://app.us.getport.io, your Port API URL is
https://api.us.getport.io
For advanced configuration such as proxies or self-signed certificates, click here.