Authentication
With this feature, you can embed another website that's protected by SSO authentication. To do this, you'll need the required parameters to create a JWT token.
Authentication code flow + PKCE
The following diagram outlines the login scheme used to authenticate with your SSO and gain access to the private resource:
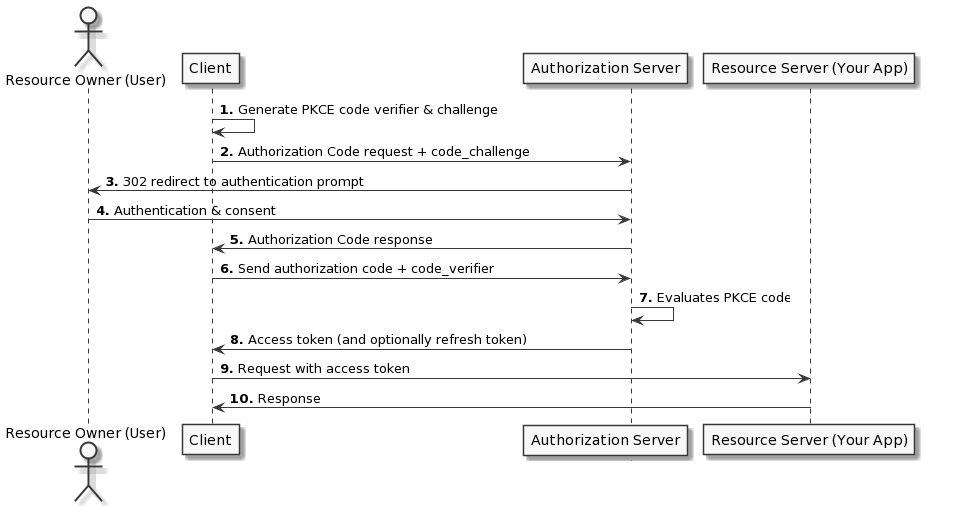
Here is an explanation of the login flow:
- The widget will generate a PKCE
code_verifier&code_challange; - The widget URL is set to the
authorizationUrlalong with theclientIdand the generatedcode_challange; - The widget will then be redirected to the SSO sign-in page;
- The user will sign in using the SSO (If the user is already signed in to the SSO, this step will happen automatically);
- The SSO sign-in page will redirect the widget back to https://app.getport.io with the authorization
codeas a URL hash parameter; - The widget will send the
code,clientIdand thecode_verifierto thetokenURL; - The SSO will validate the PKCE code;
- A response will come back with an access token;
- The widget will pass the access token as a query parameter
auth_token={accessToken}to the URL specified in the property value; - Your page should be displayed now!
Required Parameters
To set up the authentication, you'll need the following parameters:
clientIdauthorizationUrltokenUrl
Here's an example of how to apply these parameters in your Blueprint:
{
  "title": "Grafana",
  "type": "string",
  "format": "url",
  "spec": "embedded-url",
  "specAuthentication": {
    "clientId": "your-client-id",
    "authorizationUrl": "your-authorization-url",
    "tokenUrl": "your-token-url"
  }
}
Examples
Okta
Setup
Steps:
- Follow the steps in Okta's documentation to create an Application in your Okta Organization;
- Make sure the Port host is in the
Redirect Uris:- Go to Applications -> The application you just created -> Login;
- Add
https://app.getport.ioas a Sign-in redirect URI.
- Enable IFrame for Sign-In Page:
- Go to Customizations -> Other;
- Scroll to "IFrame Embedding" and enable it.
Configure Grafana with OAuth & Port embedding
The following example is just for illustration purposes and may not reflect the actual URLs and client IDs used in your Okta setup.
Based on Grafana docs for JWT Configuration & OAuth Configuration
[security] ;Required for the embedding
allow_embedding = true

[auth.jwt] ;Required for the embedding
...
jwk_set_url = https://{your-okta-org}.okta.com/oauth2/default/v1/keys
expect_claims = {"iss": "https://{your-okta-org}.okta.com", "aud": "https://{your-okta-org}.okta.com"}
url_login = true
...

[auth.generic_oauth] ;Regular OAuth authentication
...
client_id = {CLIENT_ID}
client_secret = {CLIENT_SECRET}
auth_url = https://{your-okta-org}.okta.com/oauth2/v1/authorize
token_url = https://{your-okta-org}.okta.com/oauth2/v1/token
api_url = https://{your-okta-org}.okta.com/oauth2/v1/userinfo
enable_login_token = true
use_pkce = true
...
Troubleshooting
- "Okta 400 Bad Request"
- Check that you used the correct authorizationUrl & clientId;
- Check that your application is activated.
- "Okta 400 Bad Request displayed. Your request resulted in an error. The 'redirect_uri' parameter must be a Login redirect URI in the client app settings".
- Make sure you entered https://app.getport.io as a Sign-in redirect URI for your application as mentioned in the steps above.
- "refused to connect."
- Make sure you enabled "IFrame Embedding" as mentioned in the steps above.
- "Could not fetch your auth token."
- Make sure your tokenUrl is the correct url.
Onelogin
Setup
Steps:
- Follow steps 1 & 2 in Onelogin's documentation to add an OpenId Connect (OIDC) application in your Onelogin organization;
- Make sure the Port host is in the
Redirect URIs:- Go to Applications -> The application you just added -> Configuration;
- Add
https://app.getport.ioas a Redirect URI.
Configure Grafana with OAuth & Port embedding
The following example is just for illustration purposes and may not reflect the actual URLs and client IDs used in your Onelogin setup.
Based on Grafana docs for JWT Configuration & OAuth Configuration
[security] ;Required for the embedding
allow_embedding = true

[auth.jwt] ;Required for the embedding
...
jwk_set_url = https://{your-onelogin-org}.onelogin.com/oidc/2/certs
expect_claims = {"iss": "https://{your-onelogin-org}/oidc/2"}
url_login = true
...

[auth.generic_oauth] ;Regular OAuth authentication
...
client_id = {CLIENT_ID}
client_secret = {CLIENT_SECRET}
auth_url = https://{your-onelogin-org}.onelogin.com/oidc/2/auth
token_url = https://{your-onelogin-org}.onelogin.com/oidc/2/token
api_url = https://{your-onelogin-org}.onelogin.com/oidc/2/me
enable_login_token = true
use_pkce = true
...
Troubleshoot
- "unrecognized route or not allowed method"
- Check that you used the correct authorizationUrl.
- "client is invalid"
- Check that you used the correct clientId.
- "redirect_uri did not match any client's registered redirect_uris".
- Make sure you entered https://app.getport.io as a Redirect URI for your application as mentioned in the steps above.
- "Could not fetch your auth token."
- Make sure your tokenUrl is the correct URL.
Azure AD
Setup
Steps:
-
Follow the Register an application steps in Azure Documentation to add an application in your Azure subscription;
-
Follow the Add a redirect URI steps in Azure documentation to add
https://app.getport.ioas a Redirect URI; -
Follow the Configure platform settings to configure your application as
Single-page application; -
Add a custom scope to your new application:
-
In your application click on the Expose an API button on the left sidebar;
-
Click on the
Add a scopebutton to add a scope that will allow Admins and users to consentRead User;
-
Add the scope you just created under the
Authorization Scopefield in the property in your blueprint inside Port....
"schema": {
"properties": {
"ff": {
"type": "string",
"title": "ff",
"format": "url",
"spec": "embedded-url",
"specAuthentication": {
"authorizationUrl": "https://app.com",
"tokenUrl": "https://app.com",
"clientId": "1234",
"authorizationScope": [
"api://xxxx-xxxx-xxxx-xxxx-xxxx/user.read"
]
}
}
}
}
...
-
Configure Grafana with OAuth & Port embedding
The following example is just for illustration purposes and may not reflect the actual URLs and client IDs used in your Azure AD setup.
Based on Grafana docs for JWT Configuration & Azure AD Configuration
[security] ;Required for the embedding
allow_embedding = true

[auth.jwt] ;Required for the embedding
...
email_claim = preferred_username
username_claim = preferred_username
jwk_set_url = "https://login.microsoftonline.com/common/discovery/v2.0/keys"
expect_claims = {"iss": "https://login.microsoftonline.com/{YOUR_APPLICATION_UUID}/v2.0"}
url_login = true
...

[auth.azuread] ;Regular Azure AD authentication
...
client_id = {CLIENT_ID}
client_secret = {CLIENT_SECRET}
auth_url = "https://login.microsoftonline.com/{YOUR_APPLICATION_UUID}/oauth2/v2.0/authorize"
token_url = "https://login.microsoftonline.com/{YOUR_APPLICATION_UUID}/oauth2/v2.0/token"
allowed_domains = "{my-domain}.com"
use_pkce = true
...
Troubleshoot
- "Could not fetch your auth token."
- Make sure your tokenUrl is the correct URL.