Setting up a basic change log listener using AWS Lambda
In this guide, we will show how to deploy a new AWS Lambda function, that will subscribe to the change.log topic and react to changes in our infrastructure as reported by Port.
Prerequisites
To follow this example, please contact us via Intercom to receive a dedicated Kafka topic.
- AWS CLI installed and configured to your desired AWS account;
- A Port API
CLIENT_IDandCLIENT_SECRET; - Connection credentials to the Kafka topic provided to you by Port, will look like this:
KAFKA_BROKERS=b-1-public.publicclusterprod.t9rw6w.c1.kafka.eu-west-1.amazonaws.com:9196,b-2-public.publicclusterprod.t9rw6w.c1.kafka.eu-west-1.amazonaws.com:9196,b-3-public.publicclusterprod.t9rw6w.c1.kafka.eu-west-1.amazonaws.com:9196
KAFKA_RUNS_TOPIC=YOUR_ORG_ID.change.log
KAFKA_AUTHENTICATION_MECHANISM=scram-sha-512
KAFKA_ENABLE_SSL=true
KAFKA_USERNAME=YOUR_KAFKA_USERNAME
KAFKA_PASSWORD=YOUR_KAFKA_PASSWORD
KAFKA_CONSUMER_GROUP_NAME=YOUR_KAFKA_CONSUMER_GROUP
To get yourself started quickly, you can always take a look at the code repository for examples.
Interaction with Port will be primarily conducted using the API in this example, but everything can also be performed using the web UI as well.
Scenario
Whenever the amount of free storage gets too low, create a new execution function that frees up or extends the storage in your VM. Let’s learn how to do that, and what are Port’s changelog capabilities.
Creating the VM blueprint
Let’s configure a VM Blueprint, its base structure is:
{
  "identifier": "vm",
  "title": "VM",
  "icon": "Server",
  "schema": {
    "properties": {
      "region": {
        "title": "Region",
        "type": "string",
        "description": "Region of the VM"
      },
      "cpu_cores": {
        "title": "CPU Cores",
        "type": "number",
        "description": "Number of allocated CPU cores"
      },
      "memory_size": {
        "title": "Memory Size ",
        "type": "number",
        "description": "Amount of allocated memory (GB)"
      },
      "storage_size": {
        "title": "Storage Size",
        "type": "number",
        "description": "Amount of allocated storage (GB)"
      },
      "free_storage": {
        "title": "Free Storage",
        "type": "number",
        "description": "Amount of free storage (GB)"
      },
      "deployed": {
        "title": "Deploy Status",
        "type": "string",
        "description": "The deployment status of this VM"
      }
    },
    "required": []
  },
  "changelogDestination": {
    "type": "KAFKA"
  },
  "calculationProperties": {}
}
Below you can see the python code to create this Blueprint (remember to insert your CLIENT_ID and CLIENT_SECRET in order to get an access token)
Click here to see the code
import requests

CLIENT_ID = 'YOUR_CLIENT_ID'
CLIENT_SECRET = 'YOUR_CLIENT_SECRET'

API_URL = 'https://api.getport.io/v1'

credentials = {'clientId': CLIENT_ID, 'clientSecret': CLIENT_SECRET}

token_response = requests.post(f'{API_URL}/auth/access_token', json=credentials)

access_token = token_response.json()['accessToken']

headers = {
    'Authorization': f'Bearer {access_token}'
}

blueprint = {
    "identifier": "vm",
    "title": "VM",
    "icon": "Server",
    "schema": {
        "properties": {
            "region": {
                "title": "Region",
                "type": "string",
                "description": "Region of the VM"
            },
            "cpu_cores": {
                "title": "CPU Cores",
                "type": "number",
                "description": "Number of allocated CPU cores"
            },
            "memory_size": {
                "title": "Memory Size ",
                "type": "number",
                "description": "Amount of allocated memory (GB)"
            },
            "storage_size": {
                "title": "Storage Size",
                "type": "number",
                "description": "Amount of allocated storage (GB)"
            },
            "free_storage": {
                "title": "Free Storage",
                "type": "number",
                "description": "Amount of free storage"
            },
            "deployed": {
                "title": "Deploy Status",
                "type": "string",
                "description": "The deployment status of this VM"
            }
        },
        "required": []
    },
    "changelogDestination": {
      "type": "KAFKA"
    },
    "calculationProperties": {},

}

response = requests.post(f'{API_URL}/blueprints', json=blueprint, headers=headers)

print(response.json())
Now that you have a blueprint for your VM, you need to deploy the AWS Lambda listener that will fix the storage on the VM whenever an issue occurs.
Setting up AWS resources
In this example, you will deploy an AWS Lambda function written in python.
The AWS setup will require the following resources:
- A secret stored in Secrets Manager with the Kafka authentication credentials.
- An AWS Lambda execution role with access to the new secret.
- An AWS Lambda layer for our extra python libraries.
- An AWS Lambda is configured with the example python code, the code layer and execution role you created. Configured with a Kafka Trigger
Creating a secret for the Lambda
The Lambda function will use a secret configured in AWS Secret Manager to authenticate with the personal Kafka topic provided by Port, let’s go ahead and create that secret in the AWS CLI:
# Remember to replace YOUR_KAFKA_USERNAME and YOUR_KAFKA_PASSWORD with the real username and password provided to you by Port
# You can change the secret name to any name that works for you
aws secretsmanager create-secret --name "PortKafkaAuthCredentials" --secret-string '{"username":"YOUR_KAFKA_USERNAME", "password":"YOUR_KAFKA_PASSWORD"}'
You should see output similar to the following:
{
  "ARN": "arn:aws:secretsmanager:eu-west-1:1111111111:secret:PortKafkaAuthCredentials-aaaaaa",
  "Name": "PortKafkaAuthCredentials",
  "VersionId": "aaaaa00a-00aa-0000-00a0-00000aa00a0a"
}
ARNMake sure to save the ARN value, you will need it to create an execution role for the Lambda function, which can access the newly created secret.
Creating an execution role
Before you deploy your Lambda function, it needs an execution role with access to the Kafka username and password secret you created. Let’s create a basic execution role with assumeRole permission and basic permissions for cloudWatch
aws iam create-role --role-name lambda-port-execution-role --assume-role-policy-document '{"Version": "2012-10-17","Statement": [{ "Effect": "Allow", "Principal": {"Service": "lambda.amazonaws.com"}, "Action": "sts:AssumeRole"}]}'
You should see output similar to the following:
{
  "Role": {
    "Path": "/",
    "RoleName": "lambda-port-execution-role",
    "RoleId": "AROAQFOXMPL6TZ6ITKWND",
    "Arn": "arn:aws:iam::123456789012:role/lambda-port-execution-role",
    "CreateDate": "2020-01-17T23:19:12Z",
    "AssumeRolePolicyDocument": {
      "Version": "2012-10-17",
      "Statement": [
        {
          "Effect": "Allow",
          "Action": [
            "secretsmanager:GetResourcePolicy",
            "secretsmanager:GetSecretValue",
            "secretsmanager:DescribeSecret",
            "secretsmanager:ListSecretVersionIds"
          ],
          "Resource": [
            "arn:aws:secretsmanager:eu-west-1:1111111111:secret:PortKafkaAuthCredentials-aaaaaa"
          ]
        },
        {
          "Effect": "Allow",
          "Action": "secretsmanager:ListSecrets",
          "Resource": "*"
        }
      ]
    }
  }
}
ARNAgain, make sure to save the Arn value, you will use it when deploying your Lambda function
Let’s attach basic Lambda execution permissions to this role with the following command:
aws iam attach-role-policy --role-name lambda-port-execution-role --policy-arn arn:aws:iam::aws:policy/service-role/AWSLambdaBasicExecutionRole
Now let’s add the following policy (You can refer to this AWS document for more information), we’ll create a file called execution-policy.json and paste the following content:
Remember to replace ARN value listed under Resource with the ARN you received as output when creating the secret
{
  "Version": "2012-10-17",
  "Statement": [
    {
      "Effect": "Allow",
      "Action": [
        "secretsmanager:GetResourcePolicy",
        "secretsmanager:GetSecretValue",
        "secretsmanager:DescribeSecret",
        "secretsmanager:ListSecretVersionIds"
      ],
      "Resource": [
        "arn:aws:secretsmanager:eu-west-1:1111111111:secret:PortKafkaAuthCredentials-aaaaaa"
      ]
    },
    {
      "Effect": "Allow",
      "Action": "secretsmanager:ListSecrets",
      "Resource": "*"
    }
  ]
}
Now let’s update the execution role (we’re assuming the execution-policy.json file is in the same directory as the terminal you are running the command from):
aws iam put-role-policy --role-name lambda-port-execution-role --policy-name managed-kafka-secret-access-policy --policy-document file://execution-policy.json
Creating an AWS Lambda layer
Now let’s create a Lambda Layer that will include the extra libraries the Lambda function will use.
The Lambda only needs the requests library, but the example below also includes jsonpickle for some of the log output to make the Lambda logs more verbose and easier to understand when starting to modify the code.
Now, let’s just run all of the commands to both create the layer zip, and deploy it to AWS (be sure to specify the region that you want the layer and lambda to be available in):
# Create layer directory and specify requests as a required library
mkdir lambda_layer
cd lambda_layer
echo requests==2.28.1 > requirements.txt
echo jsonpickle==2.2.0 >> requirements.txt

# Create layer based on requirements.txt in python/ directory
pip install -r requirements.txt --platform manylinux2014_x86_64 --target ./python --only-binary=:all:
# Create a zip of the layer
zip -r layer.zip python
# Upload a new layer version to AWS
aws lambda publish-layer-version --layer-name lambda_port_execution_package_layer --description "Python pacakges layer for lambda Port execution example" --compatible-runtimes python3.6 python3.7 python3.8 python3.9 --zip-file fileb://layer.zip --region eu-west-1
You should see output similar to the following:
{
  "Content": {
    "Location": "https://awslambda-eu-west-1-layers.s3.eu-west-1.amazonaws.com/snapshots/123456789012/my-layer-4aaa2fbb-ff77-4b0a-ad92-5b78a716a96a?versionId=27iWyA73cCAYqyH...",
    "CodeSha256": "tv9jJO+rPbXUUXuRKi7CwHzKtLDkDRJLB3cC3Z/ouXo=",
    "CodeSize": 169
  },
  "LayerArn": "arn:aws:lambda:eu-west-1:123456789012:layer:lambda_port_execution_package_layer",
  "LayerVersionArn": "arn:aws:lambda:eu-west-1:123456789012:layer:lambda_port_execution_package_layer:1",
  "Description": "Python pacakges layer for lambda Port execution example",
  "CreatedDate": "2018-11-14T23:03:52.894+0000",
  "Version": 1,
  "CompatibleArchitectures": ["x86_64"],
  "LicenseInfo": "MIT",
  "CompatibleRuntimes": ["python3.6", "python3.7", "python3.8", "python3.9"]
}
Again, make sure to save the LayerVersionArn value, you will use it to deploy your Lambda function
Creating the Lambda function
You can now create the Lambda function, the initial function is very basic and has specific comments where your actual execution runner logic should go.
Click here to see the function code
# file: lambda_function.py
# lambda entrypoint: lambda_handler

import base64
import os
import logging
from typing import Union
import jsonpickle
import json
import requests
import traceback

logger = logging.getLogger()
logger.setLevel(logging.INFO)

CLIENT_ID = os.environ['PORT_CLIENT_ID']
CLIENT_SECRET = os.environ['PORT_CLIENT_SECRET']

CREATE_TRIGGER = 'CREATE'

API_URL = 'https://api.getport.io/v1'

def get_port_api_token():
    '''
    Get a Port API access token

    This function uses a global ``CLIENT_ID`` and ``CLIENT_SECRET``
    '''
    credentials = {'clientId': CLIENT_ID, 'clientSecret': CLIENT_SECRET}

    token_response = requests.post(f'{API_URL}/auth/access_token', json=credentials)
    access_token = token_response.json()['accessToken']

    return access_token

def update_entity_prop_value(blueprint_identifier: str, identifier: str, property_name: str, property_value: Union[str, int]):
    '''
    Patches a Port entity based on ``entity_props``
    '''
    logger.info('Fetching token')
    token = get_port_api_token()

    headers = {
        'Authorization': f'Bearer {token}'
    }

    entity = {
        'properties': {
            property_name: property_value
        }
    }

    logger.info('Updating entity property values:')
    logger.info(json.dumps(entity))
    response = requests.patch(f'{API_URL}/blueprints/{blueprint_identifier}/entities/{identifier}', json=entity, headers=headers)
    logger.info(response.status_code)
    logger.info(json.dumps(response.json()))

def lambda_handler(event, context):
    '''
    Receives an event from AWS, if configured with a Kafka Trigger, the event includes an array of base64 encoded messages from the different topic partitions
    '''
    logger.info('## ENVIRONMENT VARIABLES\r' + jsonpickle.encode(dict(**os.environ)))
    logger.info('## EVENT\r' + jsonpickle.encode(event))
    logger.info('## CONTEXT\r' + jsonpickle.encode(context))
    for messages in event['records'].values():
        for encoded_message in messages:
            try:
                message_json_string = base64.b64decode(encoded_message['value']).decode('utf-8')
                logger.info('Received message:')
                logger.info(message_json_string)
                message = json.loads(message_json_string)

                change_type = message['action']
                resource_type = message['resourceType']

                # "message" includes one change that occurred in the service catalog
                # since all changes that happen in the catalog will trigger this Lambda, it would be a good idea to add separate handler
                # functions to keep code maintainable

                # # # # # # # # # # # # # # # # # # # # # # # # # # # # # # # #
                # Your handler code for the changes in the catalog comes here #
                # # # # # # # # # # # # # # # # # # # # # # # # # # # # # # # #

                # Here is sample code to find the change in VM free storage space
                if change_type == 'UPDATE' and resource_type == 'entity':
                    blueprint_identifier = message['context']['blueprint']
                    entity_after_change_state = message['diff']['after']
                    entity_identifier = entity_after_change_state["identifier"]
                    entity_title = entity_after_change_state["title"]
                    entity_props_after_change = entity_after_change_state['properties']
                    entity_total_storage = entity_props_after_change['storage_size']
                    entity_free_storage = entity_props_after_change['free_storage']

                    if entity_total_storage * 0.1 > entity_free_storage:
                        logger.warning(f'Entity {entity_title} free storage is too low, fixing...')
                        # Assume a call to direct storage extensions using cloud provider SDK
                        # Or a call to some scheduled task that frees up storage on the VM
                        logger.info(f'Entity {entity_title} Storage freed up, updating in Port')
                        free_storage_after_cleanup = 4
                        update_entity_prop_value(blueprint_identifier, entity_identifier, 'free_storage', free_storage_after_cleanup)
            except Exception as e:
                traceback.print_exc()
                logger.warn(f'Error: {e}')
    return {"message": "ok"}
Deploying the Lambda function
In order to deploy the Lambda function, run the following commands from the terminal (Note the comment where you need to paste in the Lambda code to the new file):
ARNsBe sure to replace ROLE_ARN with the ARN you received as an output when you created an execution role for the Lambda
mkdir port_execution_lambda
cd port_execution_lambda
touch lambda_function.py
# Open lambda_function.py in your favorite editor or IDE and paste
# in the python code written above
# Once the code is in, we can package the lambda and deploy it
zip -FSr function.zip lambda_function.py
# Now let's deploy the Lambda to AWS
aws lambda create-function --function-name port-changelog-lambda \
--zip-file fileb://function.zip --handler lambda_function.lambda_handler --runtime python3.9 \
--role ROLE_ARN --timeout 30
You should see output similar to the following:
{
    "FunctionName": "port-execution-lambda",
    "FunctionArn": "arn:aws:lambda:us-east-2:123456789012:function:port-changelog-lambda",
    "Runtime": "python3.9",
    "Role": "arn:aws:iam::123456789012:role/lambda-port-execution-role",
    "Handler": "lambda_function.lambda_handler",
    "CodeSha256": "FpFMvUhayLkOoVBpNuNiIVML/tuGv2iJQ7t0yWVTU8c=",
    "Version": "$LATEST",
    "TracingConfig": {
        "Mode": "PassThrough"
    },
    "RevisionId": "88ebe1e1-bfdf-4dc3-84de-3017268fa1ff",
    ...
}
You are just a few steps away from a complete execution flow!
Putting everything together
There are just a few more steps left:
- Add the code layer to the Lambda function
- Add the Port
CLIENT_IDandCLIENT_SECRETas environment variables to the Lambda - Add the Kafka trigger
In order to add the layer, you just need to run a simple CLI command:
# Be sure to replace the LAYER_VERSION_ARN with the value you saved
# from the layer creation output
aws lambda update-function-configuration --function-name port-changelog-lambda \
--layers LAYER_VERSION_ARN
You should see an output showing that now the Layers array of the Lambda includes our layer
Now add the client_id and secret variables:
# Be sure to replace YOUR_CLIENT_ID and YOUR_CLIENT_SECRET with real values
aws lambda update-function-configuration --function-name port-changelog-lambda --environment "Variables={PORT_CLIENT_ID=YOUR_CLIENT_ID,PORT_CLIENT_SECRET=YOUR_CLIENT_SECRET}" --query "Environment"
In the command output you should see all of the secrets you configured for your Lambda Function.
If your function needs multiple environment variables, it would be easier to put them all in a JSON file (for example environment.json) and run the following command:
aws lambda update-function-configuration --function-name port-changelog-lambda --environment file://environment.json --query "Environment"
Time to add the Kafka trigger
# Remember to replace YOUR_ORG_ID, SECRET_ARN, and YOUR_KAFKA_CONSUMER_GROUP
aws lambda create-event-source-mapping --topics YOUR_ORG_ID.change.log --source-access-configuration Type=SASL_SCRAM_512_AUTH,URI=SECRET_ARN \
          --function-name port-changelog-lambda \
          --batch-size 1 --starting-position LATEST \
          --self-managed-kafka-event-source-config '{"ConsumerGroupId":"YOUR_KAFKA_CONSUMER_GROUP"}' \
          --self-managed-event-source '{"Endpoints":{"KAFKA_BOOTSTRAP_SERVERS":["b-1-public.publicclusterprod.t9rw6w.c1.kafka.eu-west-1.amazonaws.com:9196", "b-2-public.publicclusterprod.t9rw6w.c1.kafka.eu-west-1.amazonaws.com:9196", "b-3-public.publicclusterprod.t9rw6w.c1.kafka.eu-west-1.amazonaws.com:9196"]}}'
Reacting to changes
Now that you have a Lambda function configured with a Kafka trigger, every change made in the Service Catalog will generate a new message in the dedicated Kafka topic you specified in the trigger. That message will be sent to the Lambda function you deployed, with all of the input data required to understand what change took place, so you can act accordingly.
For more information on the data format of managed Apache Kafka triggers, refer to the AWS docs. The code you wrote in the lambda_handler function already goes over all of the new messages, parses them, decodes and converts to a python dictionary for ease of use.
Let’s create a VM Entity with 10 GB of total storage, with 6 GB of initial free storage.
Here is the JSON for this VM Entity:
{
  "title": "Storage Example VM",
  "team": [],
  "blueprint": "vm",
  "properties": {
    "region": "eu-west-1",
    "cpu_cores": 2,
    "memory_size": 4,
    "storage_size": 10,
    "deployed": "Deployed",
    "free_storage": 6
  },
  "relations": {},
  "identifier": "storage-example"
}
Below you can see the python code to create this VM (remember to insert your CLIENT_ID and CLIENT_SECRET in order to get an access token).
Click here to see the code
import requests

CLIENT_ID = 'YOUR_CLIENT_ID'
CLIENT_SECRET = 'YOUR_CLIENT_SECRET'

API_URL = 'https://api.getport.io/v1'

credentials = {'clientId': CLIENT_ID, 'clientSecret': CLIENT_SECRET}

token_response = requests.post(f'{API_URL}/auth/access_token', json=credentials)

access_token = token_response.json()['accessToken']

blueprint_identifier = 'vm'

headers = {
    'Authorization': f'Bearer {access_token}'
}

entity = {
    "title": "Storage Example VM",
    "team": [],
    "properties": {
        "region": "eu-west-1",
        "cpu_cores": 2,
        "memory_size": 4,
        "storage_size": 10,
        "deployed": "Deployed",
        "free_storage": 6
    },
    "relations": {},
    "identifier": "storage-example"
}

response = requests.post(f'{API_URL}/blueprints/{blueprint_identifier}/entities', json=entity, headers=headers)

print(response.json())
Let’s simulate an occasion where the free storage in the VM has dropped below 10% of the total available storage. We will do that using a PATCH request in python, that will update the free_storage property on the VM.
Click here to see the API call code
import requests

CLIENT_ID = 'YOUR_CLIENT_ID'
CLIENT_SECRET = 'YOUR_CLIENT_SECRET'

API_URL = 'https://api.getport.io/v1'

credentials = {'clientId': CLIENT_ID, 'clientSecret': CLIENT_SECRET}

token_response = requests.post(f'{API_URL}/auth/access_token', json=credentials)

access_token = token_response.json()['accessToken']

blueprint_identifier = 'vm'

headers = {
    'Authorization': f'Bearer {access_token}'
}

entity_identifier = "storage-example"

patch_body = {
    "properties": {
        "free_storage": 0.5
    }
}

response = requests.patch(f'{API_URL}/blueprints/{blueprint_identifier}/entities/{entity_identifier}', json=patch_body, headers=headers)

print(response.json())
This change will automatically send a message to the Kafka topic.
Now the CloudWatch logs for the Lambda function (Accessible in the AWS console through Lambda→functions→port-execution-lambda→Monitor→Logs→View logs in CloudWatch), will show a log of the latest executions of the Lambda function. It also includes the actual message received, and a log of the actions taken by our python code:
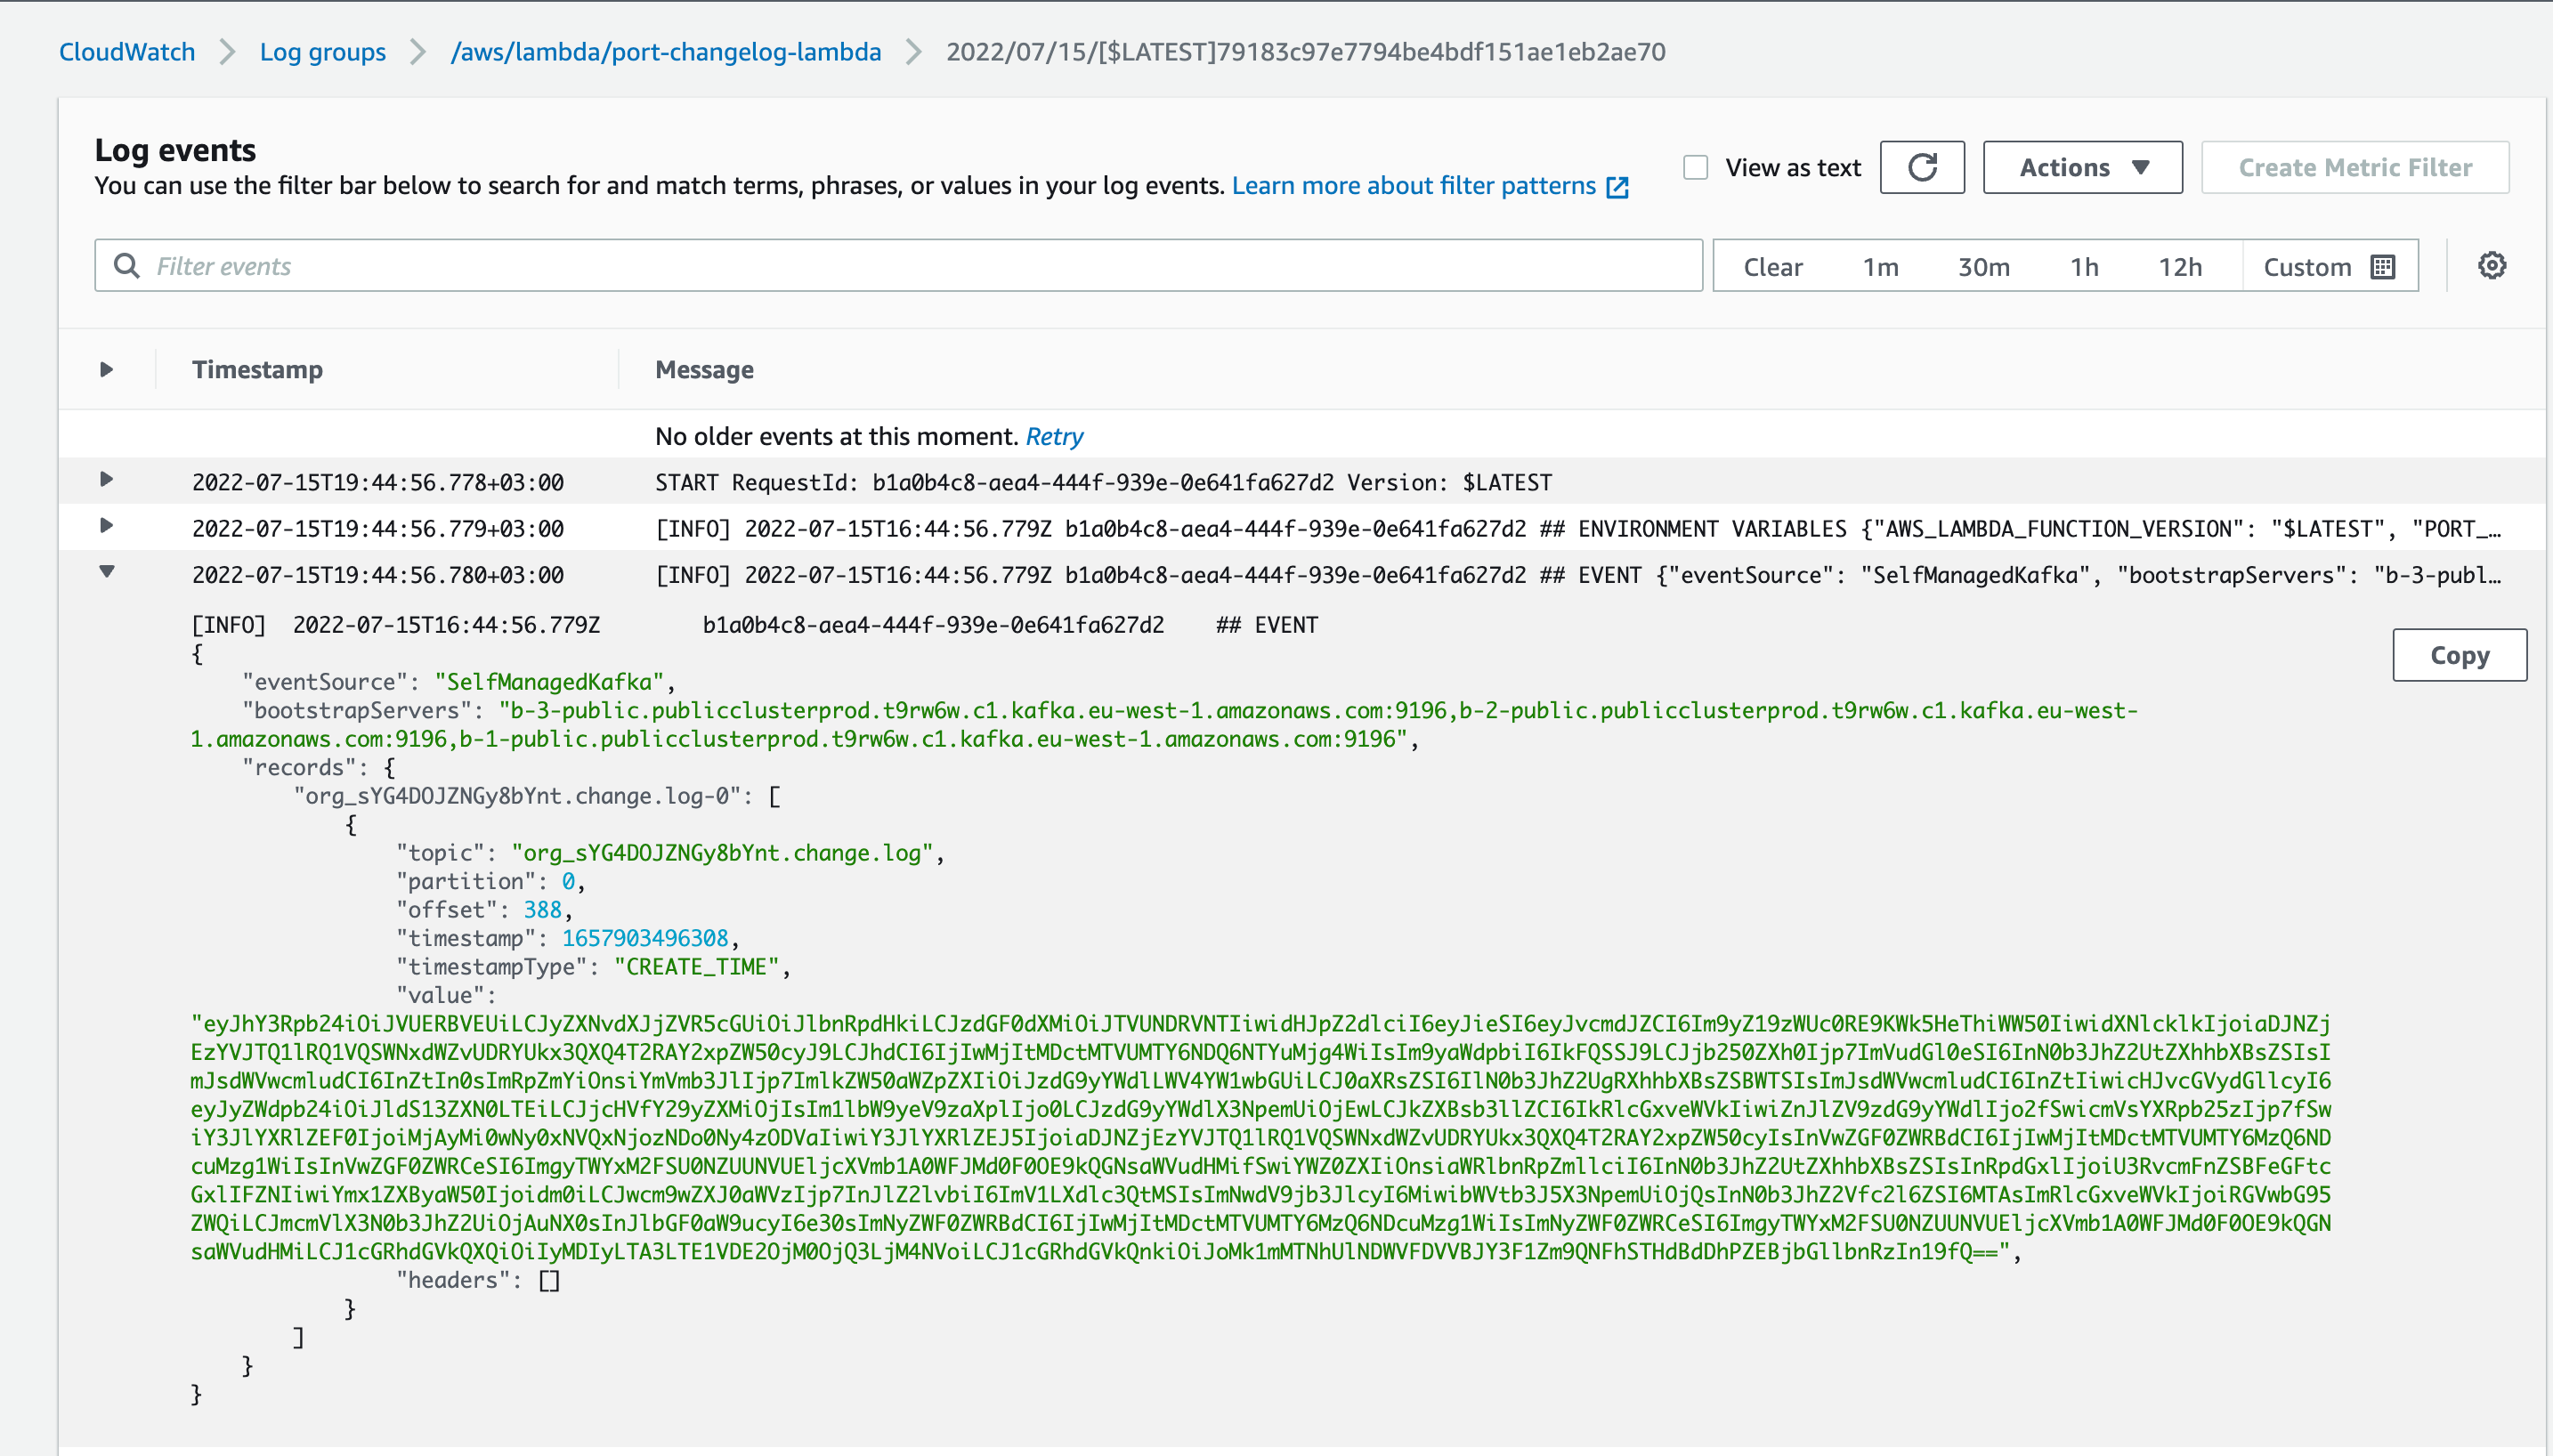
Here is an example of the request payload received from Port, inside the Kafka message (note the before and after keys showing the difference in our VM Entity properties):
{
  "action": "UPDATE",
  "resourceType": "entity",
  "status": "SUCCESS",
  "trigger": {
    "by": {
      "orgId": "org_sYG4DOJZNGy8bYnt",
      "userId": "h2Mf13aRSCYQCUPIcqufoP4XRLwAt8Od@clients"
    },
    "at": "2022-07-15T16:44:56.288Z",
    "origin": "API"
  },
  "context": {
    "entity": "storage-example",
    "blueprint": "vm"
  },
  "diff": {
    "before": {
      "identifier": "storage-example",
      "title": "Storage Example VM",
      "blueprint": "vm",
      "properties": {
        "region": "eu-west-1",
        "cpu_cores": 2,
        "memory_size": 4,
        "storage_size": 10,
        "deployed": "Deployed",
        "free_storage": 6
      },
      "relations": {},
      "createdAt": "2022-07-15T16:34:47.385Z",
      "createdBy": "h2Mf13aRSCYQCUPIcqufoP4XRLwAt8Od@clients",
      "updatedAt": "2022-07-15T16:34:47.385Z",
      "updatedBy": "h2Mf13aRSCYQCUPIcqufoP4XRLwAt8Od@clients"
    },
    "after": {
      "identifier": "storage-example",
      "title": "Storage Example VM",
      "blueprint": "vm",
      "properties": {
        "region": "eu-west-1",
        "cpu_cores": 2,
        "memory_size": 4,
        "storage_size": 10,
        "deployed": "Deployed",
        "free_storage": 0.5
      },
      "relations": {},
      "createdAt": "2022-07-15T16:34:47.385Z",
      "createdBy": "h2Mf13aRSCYQCUPIcqufoP4XRLwAt8Od@clients",
      "updatedAt": "2022-07-15T16:34:47.385Z",
      "updatedBy": "h2Mf13aRSCYQCUPIcqufoP4XRLwAt8Od@clients"
    }
  }
}
In addition to seeing the message topic in Cloudwatch, the Lambda function code will also update the VM Entity, and give it a new free storage value.
Next steps
This was just a very basic example of how to listen and react to changes in the Software Catalog. We left placeholder code for you to insert your own custom logic to fit your infrastructure.
If you want to dive even deeper into Port's execution capabilities, you can explore other examples for Kafka-based Self-Service Actions.