Let developers enrich services using Gitops
This guide takes 10 minutes to complete, and aims to demonstrate Port's flexibility when working with Gitops.
- This guide assumes you have a Port account and that you have finished the onboarding process. We will use the
Serviceblueprint that was created during the onboarding process. - You will need a Git repository (Github, GitLab, or Bitbucket) in which you can place a workflow/pipeline that we will use in this guide. If you don't have one, we recommend creating a new repository named
Port-actions.
The goal of this guide
In this guide we will enrich a service in Port using Gitops. In reality, this can be used by developers to independently add additional valuable data about their services to Port.
After completing it, you will get a sense of how it can benefit different personas in your organization:
- Developers will be able to enrich their services without needing to nag devops engineers.
- Platform engineers will be able to create RBAC-controlled actions for developers, empowering their independence.
- R&D managers will be able to track additional, valuable data about services in the organization.
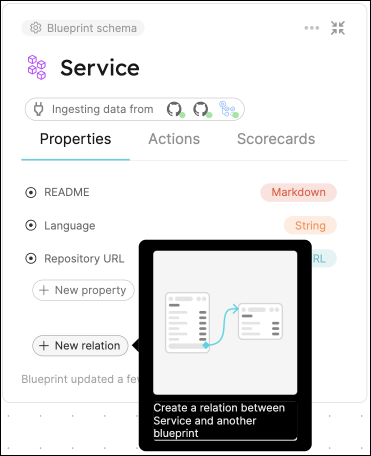
Add new properties to your Service blueprint
Let's start by adding two new properties to the Service blueprint, that we will later populate using Gitops.
-
Go to your Builder, expand the
Serviceblueprint, and click onNew property. -
The first property will be the service's type, chosen from a predefined list of options. Fill out the form like this, then click
Create:

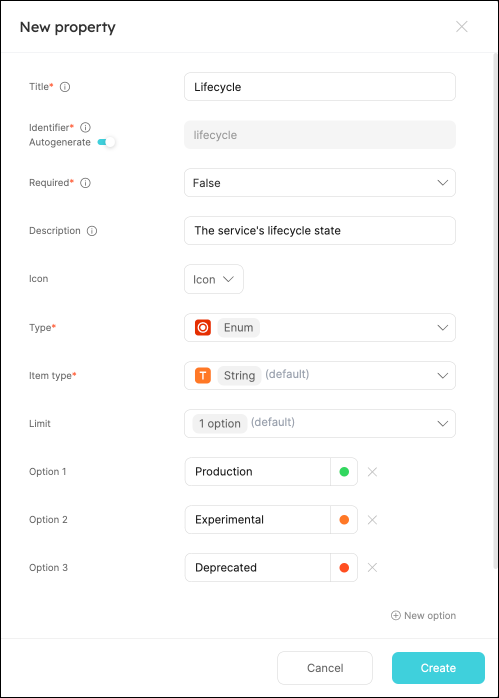
- The second property will be the lifecycle state of the service, also chosen from a predefined list of options. Fill out the form like this, then click
Create:
Note the colors of the inputs, this will make it easier to see a service's lifecycle in your catalog 😎
Model domains for your services
Services that share a business purpose (e.g. payments, shipping) are often grouped together using domains. Let's create a blueprint to represent a domain in Port:
- In your Builder, click on the
Addbutton in the top right corner, then chooseCustom blueprint:
- Click on the
Edit JSONbutton in the top right corner, replace the content with the following definition, then clickCreate:
Blueprint JSON (click to expand)
{
  "identifier": "domain",
  "title": "Domain",
  "icon": "TwoUsers",
  "schema": {
    "properties": {
      "architecture": {
        "title": "Architecture",
        "type": "string",
        "format": "url",
        "spec": "embedded-url"
      }
    },
    "required": []
  },
  "mirrorProperties": {},
  "calculationProperties": {},
  "relations": {}
}
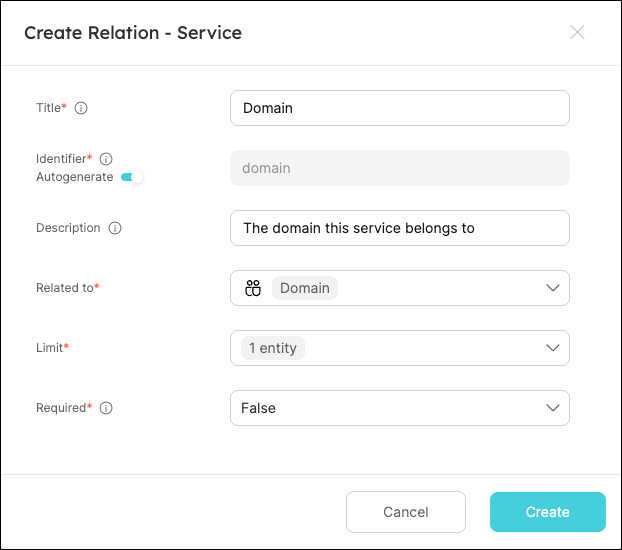
Connect your services to their domains
Now that we have a blueprint to represent a domain, let's connect it to our services. We will do this by adding a relation to the Service blueprint:
- Go to your Builder, expand the
Serviceblueprint, and click onNew relation:
- Fill out the form like this, then click
Create:
Create domains via Gitops
Now that we have a Domain blueprint, we can create some domains in Port. This can be done manually from the UI, or via Gitops which is the method we will use in this guide.
- In your
Port-actions(or equivalent) Github repository, create a new file namedport.ymlin the root directory, and use the following snippet as its content:
port.yml (click to expand)
- identifier: payment
  title: Payment
  blueprint: domain
  properties:
    architecture: https://lucid.app/documents/embedded/c3d64493-a5fe-4b18-98d5-66d355080de3
- identifier: shipping
  title: Shipping
  blueprint: domain
  properties:
    architecture: https://lucid.app/documents/embedded/c3d64493-a5fe-4b18-98d5-66d355080de3
- Head back to your software catalog, you will see that Port has created two new
domainentities:
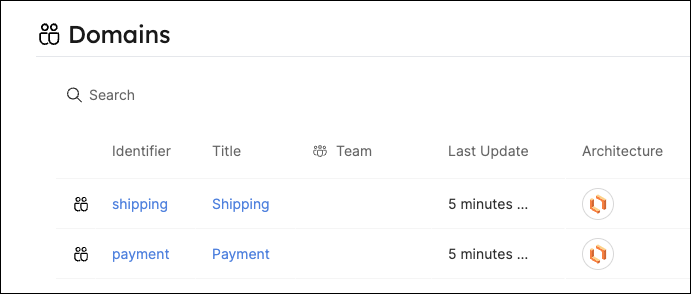
The architecture property is a URL to a Lucidchart diagram. This is a handy way to track a domain's architecture in your software catalog.
Create an action to enrich services
As platform engineers, we want to enable our developers to perform certain actions on their own. Let's create an action that developers can use to add data to a service, and allocate it to a domain.
Setup the action's frontend
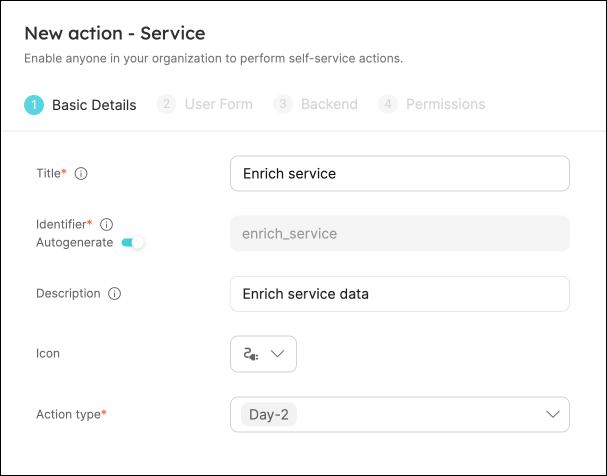
As part of the onboarding process, you should already have an action named Enrich service in your self-service tab. In that case, you can skip to the Define backend type step.
If you skipped the onboarding, or you want to create the action from scratch, complete steps 1-5 below.
Create the action's frontend (steps 1-5)
-
Go to your Self-service page, then click on the
+ New actionbutton in the top right corner. -
From the dropdown, choose the
Serviceblueprint. -
Fill out the basic details like this, then click
Next:
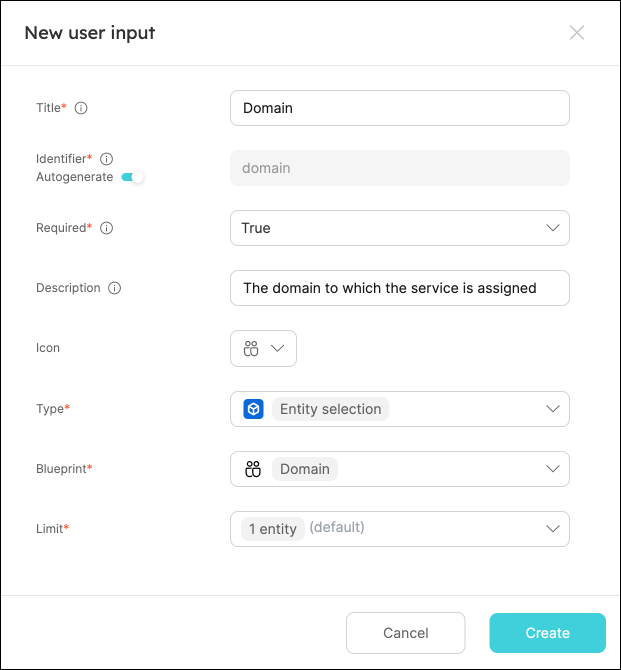
- We want our developers to be able to choose the domain to which the service will be assigned. Click on
New input, fill out the form like this, then clickNext:
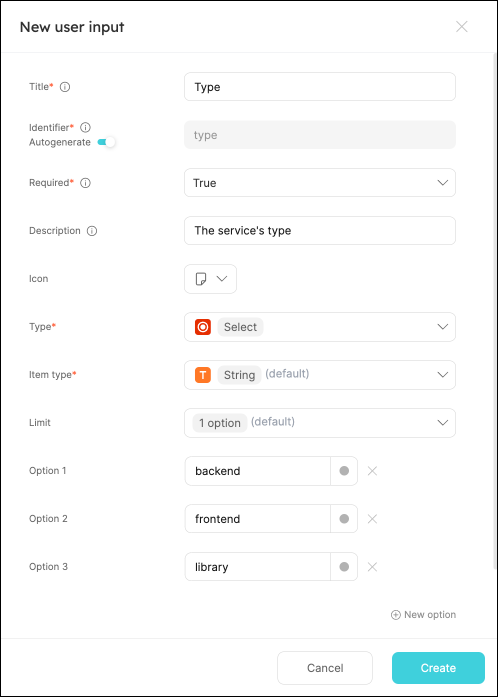
- Let's add two more inputs for our new service properties -
typeandlifecycle. Create two new inputs, fill out their forms like this, then clickNext:

Define backend type
Now we'll define the backend of the action. Port supports multiple invocation types, for this tutorial we will use a Github workflow, a GitLab pipeline, or a Jenkins pipeline(choose this option if you are using Bitbucket).
- Github
- GitLab
- Bitbucket (Jenkins)
Note that you will need to have Port's Github app installed in your Github organization (the one that contains the repository you'll work with).
Fill out the form with your values:
-
Replace the
OrganizationandRepositoryvalues with your values (this is where the workflow will reside and run). -
Name the workflow
port-enrich-service.yml. -
Fill out your workflow details:

-
Scroll down to the
Configure the invocation payloadsection.
This is where you can define which data will be sent to your backend each time the action is executed.For this example, we will send some details that our backend needs to know - the user inputs, the entity, and the id of the action run.
Copy the following JSON snippet and paste it in the payload code box:{
"port_payload": {
"context": {
"entity": "{{ .entity.identifier }}",
"runId": "{{ .run.id }}"
},
"payload": {
"properties": {
"domain": "{{ .inputs.domain }}",
"type": "{{ .inputs.type }}",
"lifecycle": "{{ .inputs.lifecycle }}",
}
}
}
}
First, choose Gitlab as the invocation type.
- Follow the instructions under
Install the Port agent and set GitLab Pipeline trigger token(you can skip step 4, as it is only required when using a self-hosted Gitlab instance).
Then, fill out your workflow details:
-
Replace the
Project NameandGroup Namevalues with your values (this is where the pipeline will reside and run). -
Note that leaving
Default Refblank will automatically use themainbranch of your repository: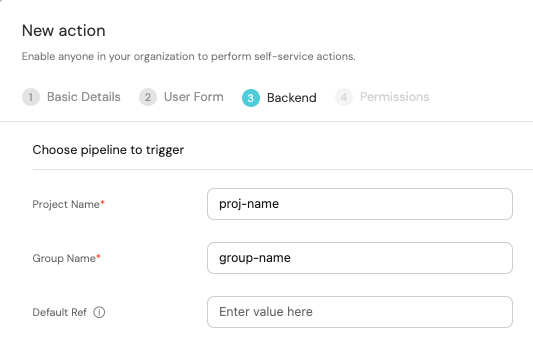
-
Scroll down to the
Configure the invocation payloadsection.
This is where you can define which data will be sent to your backend each time the action is executed.For this example, we will send some details that our backend needs to know, including the service name, and the id of the action run.
Copy the following JSON snippet and paste it in the payload code box:{
"port_payload": {
"context": {
"entity": "{{ .entity.identifier }}",
"runId": "{{ .run.id }}"
},
"payload": {
"properties": {
"domain": "{{ .inputs.domain }}",
"type": "{{ .inputs.type }}",
"lifecycle": "{{ .inputs.lifecycle }}",
}
}
}
}
Note that you will need to have Port's Bitbucket app installed in your Bitbucket workspace (the one that contains the repository you'll work with).
First, choose Jenkins as the invocation type.
-
Follow the instructions under
Define a webhook to trigger a Jenkins jobto obtain your webhook URL. -
Use
enrichServiceas the name of your new job token.
Then, fill out your workflow details:
-
Replace the
Webhook URLwith your value (this is where the pipeline will reside and run). -
Leave the
Use self-hosted agentoption set toNo.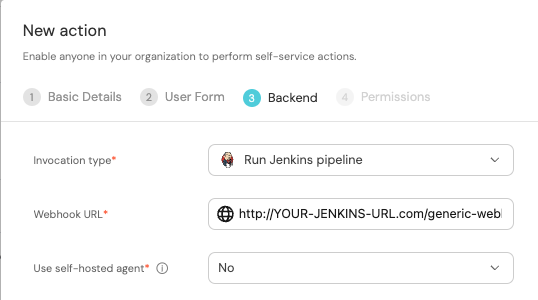
-
Scroll down to the
Configure the invocation payloadsection.
This is where you can define which data will be sent to your backend each time the action is executed.For this example, we will send some details that our backend needs to know - the three user inputs, and the id of the action run.
Copy the following JSON snippet and paste it in the payload code box:{
"port_payload": {
"context": {
"entity": "{{ .entity.identifier }}",
"runId": "{{ .run.id }}"
},
"payload": {
"entity": "{{ .entity }}",
"properties": {
"domain": "{{ .inputs.domain }}",
"type": "{{ .inputs.type }}",
"lifecycle": "{{ .inputs.lifecycle }}",
}
}
}
}
The last step is customizing the action's permissions. For simplicity's sake, we will use the default settings. For more information, see the permissions page. Click Create.
Setup the action's backend
Our action will create a pull-request in the service's repository, containing a port.yml file that will add data to the service in Port. Choose a backend type below to setup the workflow:
- Github
- GitLab
- Bitbucket (Jenkins)
- First, let's create the necessary token and secrets. If you've already completed the
scaffold a new service guide, you should already have these configured and you can skip this step.
-
Go to your Github tokens page, create a personal access token with
repoandadmin:orgscope, and copy it (this token is needed to create a pull-request from our workflow).
-
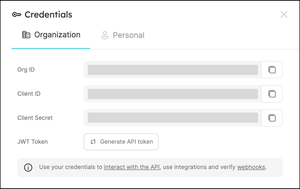
Go to your Port application, click on the
...in the top right corner, then clickCredentials. Copy yourClient IDandClient secret.
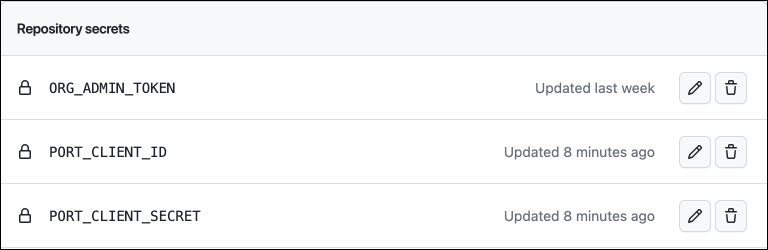
- In your
Port-actions(or equivalent) Github repository, create 3 new secrets underSettings->Secrets and variables->Actions:
ORG_ADMIN_TOKEN- the personal access token you created in the previous step.PORT_CLIENT_ID- the client ID you copied from your Port app.PORT_CLIENT_SECRET- the client secret you copied from your Port app.
-
Go to your Port application, click on the
...in the top right corner, then clickCredentials. Copy yourClient IDandClient secret. -
Under your root group, access
Settings->Access Tokens, and create aMaintainerrole token with theapi,read_repository, andwrite_repositoryscopes. Copy the token's value. -
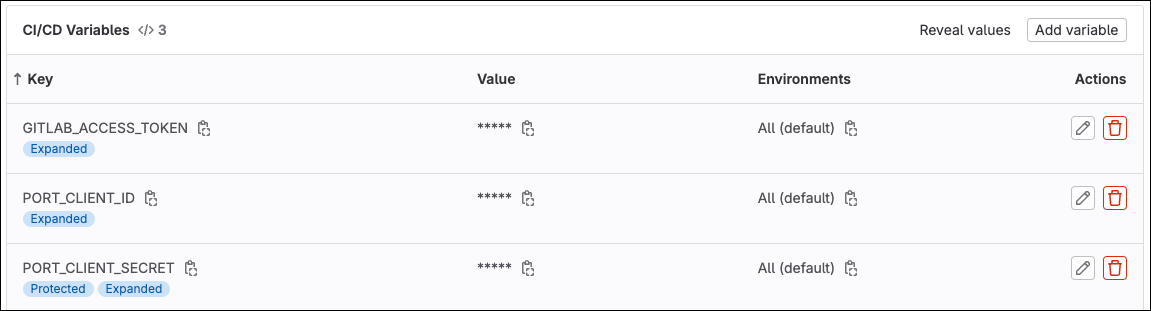
Go to your GitLab project, from the
Settingsmenu in the sidebar on the left, selectCI/CD. -
Expand the
Variablessection and save the following secrets:PORT_CLIENT_ID- Your Port client ID.PORT_CLIENT_SECRET- Your Port client secret.GITLAB_ACCESS_TOKEN- The GitLab group access token you created in the previous step.
-
Create a Bitbucket app password with
Pull requests:writepermissions, and copy its value. -
Create the following Jenkins credentials in your Jenkins instance:
- A
username with passwordcredential namedBITBUCKET_CREDENTIALSwith your Bitbucket username as the username, and theapp passwordyou created in the previous step as the password.
Get your Port credentials
To get your Port API credentials go to your Port application, click on the ... button in the top right corner, and select Credentials. Here you can view and copy your CLIENT_ID and CLIENT_SECRET:
- A
secret textcredential namedPORT_CLIENT_IDwith your Port client ID as the secret. - A
secret textcredential namedPORT_CLIENT_SECRETwith your Port client secret as the secret.
- Create a Jenkins Pipeline with the following configuration:
-
Enable webhook trigger for the pipeline.
-
Define post-content variables for the pipeline with the following names and values:
Name Value LIFECYCLE $.port_payload.payload.properties.lifecycle TYPE $.port_payload.payload.properties.type DOMAIN $.port_payload.payload.properties.domain ENTITY_IDENTIFIER $.port_payload.context.entity REPO_URL $.port_payload.payload.entity.properties.url RUN_ID $.port_payload.context.runId -
Set
enrichServiceas the pipeline's token.
We will now create a YML file that will serve as a template for our services' port.yml configuration file.
- In your repository, create a file named
enrichService.ymlunder/templates/(its path should be/templates/enrichService.yml). - Copy the following snippet and paste it in the file's contents:
enrichService.yml (click to expand)
# enrichService.yml

- identifier: "{{ service_identifier }}"
  blueprint: service
  properties:
    type: "{{ service_type }}"
    lifecycle: "{{ service_lifecycle }}"
  relations:
    domain: "{{ domain_identifier }}"
Now let's create the file that contains our logic:
- Github
- GitLab
- Bitbucket (Jenkins)
In the same repository, under .github/workflows, create a new file named port-enrich-service.yml and use the following snippet as its content:
Github workflow (click to expand)
name: Enrich service
on:
  workflow_dispatch:
    inputs:
      port_payload:
        required: true
        description: Port's payload, including details for who triggered the action and general context
        type: string
jobs:
  enrichService:
    runs-on: ubuntu-latest
    steps:
      # Checkout the workflow's repository
      - uses: actions/checkout@v3
      # Checkout the service's repository
      - uses: actions/checkout@v3
        with:
          repository: "${{ github.repository_owner }}/${{fromJson(inputs.port_payload).context.entity}}"
          path: ./targetRepo
          token: ${{ secrets.ORG_ADMIN_TOKEN }}
      - name: Copy template yml file
        run: |
          cp templates/enrichService.yml ./targetRepo/port.yml
      - name: Update new file data
        run: |
          sed -i 's/{{ service_identifier }}/${{fromJson(inputs.port_payload).context.entity}}/' ./targetRepo/port.yml
          sed -i 's/{{ domain_identifier }}/${{fromJson(inputs.port_payload).payload.properties.domain}}/' ./targetRepo/port.yml
          sed -i 's/{{ service_type }}/${{fromJson(inputs.port_payload).payload.properties.type}}/' ./targetRepo/port.yml
          sed -i 's/{{ service_lifecycle }}/${{fromJson(inputs.port_payload).payload.properties.lifecycle}}/' ./targetRepo/port.yml
      - name: Open a pull request
        uses: peter-evans/create-pull-request@v5
        with:
          token: ${{ secrets.ORG_ADMIN_TOKEN }}
          path: ./targetRepo
          commit-message: Enrich service - ${{fromJson(inputs.port_payload).context.entity}}
          committer: GitHub <noreply@github.com>
          author: ${{ github.actor }} <${{ github.actor }}@users.noreply.github.com>
          signoff: false
          branch: add-port-yml
          delete-branch: true
          title: Create port.yml - ${{fromJson(inputs.port_payload).context.entity}}
          body: |
            Add port.yaml to enrich service in Port.
          draft: false
      - name: Create a log message
        uses: port-labs/port-github-action@v1
        with:
          clientId: ${{ secrets.PORT_CLIENT_ID }}
          clientSecret: ${{ secrets.PORT_CLIENT_SECRET }}
          operation: PATCH_RUN
          runId: ${{fromJson(inputs.port_payload).context.runId}}
          logMessage: Pull request to add port.yml created successfully for service "${{fromJson(inputs.port_payload).context.entity}}" 🚀
In the same repository, create a new file called .gitlab-ci.yml and inside it paste the following:
GitLab pipeline (click to expand)
stages:
  - enrichService

enrichService:
  stage: enrichService
  only:
    - triggers # This pipeline will be triggered via the GitLab webhook service.
  before_script:
    - apt-get update && apt-get install -y jq && apt-get install -y yq
  script:
    - PAYLOAD=$(cat $TRIGGER_PAYLOAD)
    - runID=$(echo $PAYLOAD | jq -r '.port_payload.context.runId')
    - >
      access_token=$(curl --location --request POST 'https://api.getport.io/v1/auth/access_token' --header 'Content-Type: application/json' --data-raw "{\"clientId\": \"$PORT_CLIENT_ID\",\"clientSecret\": \"$PORT_CLIENT_SECRET\"}" | jq '.accessToken' | sed 's/"//g')
    - >
      curl --location --request PATCH "https://api.getport.io/v1/actions/runs/$runID" --header "Authorization: $access_token" --header 'Content-Type: application/json' --data-raw "{\"link\": [\"$CI_PIPELINE_URL\"]
      }"
    - git config --global user.email "gitRunner@git.com"
    - git config --global user.name "Git Runner"
    - SERVICE_IDENTIFIER=$(echo $PAYLOAD | jq -r '.port_payload.payload.entity.identifier')
    - DOMAIN_IDENTIFIER=$(echo $PAYLOAD | jq -r '.port_payload.payload.properties.domain')
    - SERVICE_TYPE=$(echo $PAYLOAD | jq -r '.port_payload.payload.properties.type')
    - SERVICE_LIFECYCLE=$(echo $PAYLOAD | jq -r '.port_payload.payload.properties.lifecycle')
    - git clone https://:${GITLAB_ACCESS_TOKEN}@gitlab.com/${CI_PROJECT_PATH}.git
    - git clone https://:${GITLAB_ACCESS_TOKEN}@gitlab.com/${SERVICE_IDENTIFIER}.git ./targetRepo
    - cp templates/enrichService.yml ./targetRepo/port.yml
    - yq --in-place --arg SERVICE_ID $SERVICE_IDENTIFIER  '.[0].identifier = $SERVICE_ID' ./targetRepo/port.yml -y
    - yq --in-place --arg TYPE $SERVICE_TYPE  '.[0].properties.type = $TYPE' ./targetRepo/port.yml -y
    - yq --in-place --arg LIFECYCLE $SERVICE_LIFECYCLE '.[0].properties.lifecycle = $LIFECYCLE' ./targetRepo/port.yml -Y
    - yq --in-place --arg DOMAIN $DOMAIN_IDENTIFIER  '.[0].relations.domain = $DOMAIN' ./targetRepo/port.yml -Y
    - cd targetRepo
    - git pull
    - git checkout -b add-port-yml
    - git add port.yml
    - git commit -m "Enrich service - ${SERVICE_IDENTIFIER}"
    - set +e
    - output=$(git push origin add-port-yml -o merge_request.create 2>&1)
    - echo "$output"
    - runStatus="SUCCESS"
    - |
      if echo "$output" | grep -qi "rejected"; then
          runStatus="FAILURE"
      elif echo "$output" | grep -qi "error"; then
          runStatus="FAILURE"
      fi
    - echo "$runStatus"
    - |
      if [ "$runStatus" = "SUCCESS" ]; then
          # Generic regex for GitLab merge request URLs
          mergeRequestUrl=$(echo "$output" | grep -oP 'https:\/\/gitlab\.com\/[^\/]+\/[^\/]+\/-\/merge_requests\/\d+')
          echo "Merge Request URL: $mergeRequestUrl"
          curl --location --request POST "https://api.getport.io/v1/actions/runs/$runID/logs" \
          --header 'Content-Type: application/json' \
          --header "Authorization: $access_token" \
          --data-raw "{\"message\": \"PR opened at $mergeRequestUrl\"}"
      else
          curl --location --request POST "https://api.getport.io/v1/actions/runs/$runID/logs" \
          --header 'Content-Type: application/json' \
          --header "Authorization: $access_token" \
          --data-raw "{\"message\": \"The Job failed. Please check the job logs for more information.\"}"
      fi
    - >
      curl --location --request PATCH "https://api.getport.io/v1/actions/runs/$runID" --header "Authorization: $access_token" --header 'Content-Type: application/json' --data-raw "{\"status\": \"${runStatus}\"}"
Create a Jenkins pipeline script with the following content (replace <PORT-ACTIONS-REPO-URL> with the URL of the repository you used in the previous step):
Jenkins pipeline script (click to expand)
import groovy.json.JsonSlurper

pipeline {
    agent any

    environment {
        DOMAIN = "${DOMAIN}"
        LIFECYCLE = "${LIFECYCLE}"
        ENTITY_IDENTIFIER = "${ENTITY_IDENTIFIER}"
        TYPE = "${TYPE}"
        REPO_URL = "${REPO_URL}"
        BITBUCKET_ORG_NAME = ""
        BITBUCKET_CREDENTIALS = credentials("BITBUCKET_CREDENTIALS")
        PORT_ACCESS_TOKEN = ""
        PORT_RUN_ID = "${RUN_ID}"
    }

    stages {
        stage('Get access token') {
            steps {
                script {
                    withCredentials([
                        string(credentialsId: 'PORT_CLIENT_ID', variable: 'PORT_CLIENT_ID'),
                        string(credentialsId: 'PORT_CLIENT_SECRET', variable: 'PORT_CLIENT_SECRET')
                    ]) {
                        // Execute the curl command and capture the output
                        def result = sh(returnStdout: true, script: """
                            accessTokenPayload=\$(curl -X POST \
                                -H "Content-Type: application/json" \
                                -d '{"clientId": "${PORT_CLIENT_ID}", "clientSecret": "${PORT_CLIENT_SECRET}"}' \
                                -s "https://api.getport.io/v1/auth/access_token")
                            echo \$accessTokenPayload
                        """)

                        // Parse the JSON response using JsonSlurper
                        def jsonSlurper = new JsonSlurper()
                        def payloadJson = jsonSlurper.parseText(result.trim())

                        // Access the desired data from the payload
                        PORT_ACCESS_TOKEN = payloadJson.accessToken
                    }

                }
            }
        }
        stage('checkoutTemplate') {
            steps {
                git credentialsId: 'BITBUCKET_CREDENTIALS', url: 'https://hadar-co@bitbucket.org/portsamples/port-actions.git', branch: 'main'
            }
        }
        stage('checkoutDestination') {
            steps {
                sh 'mkdir -p destinationRepo'
                dir('destinationRepo') {
                    git credentialsId: 'BITBUCKET_CREDENTIALS', url: "${REPO_URL}", branch: 'master'
                }
            }
        }
        stage('copyTemplateFile') {
            steps {
                sh 'cp templates/enrichService.yml ./destinationRepo/port.yml'
            }
        }
        stage('updateFileData') {
            steps {
                sh """#!/bin/bash
                    sed -i .bak 's/{{ service_identifier }}/${ENTITY_IDENTIFIER}/' ./destinationRepo/port.yml
                    sed -i .bak 's/{{ domain_identifier }}/${DOMAIN}/' ./destinationRepo/port.yml
                    sed -i .bak 's/{{ service_type }}/${TYPE}/' ./destinationRepo/port.yml
                    sed -i .bak 's/{{ service_lifecycle }}/${LIFECYCLE}/' ./destinationRepo/port.yml
                """
            }
        }
        stage('CreateBranch') {
            steps {
                dir('destinationRepo') {
                    script {
                        sh '''#!/bin/bash
                            ORG_URL="${REPO_URL%/*}"
                            BITBUCKET_ORG_NAME="${ORG_URL##*org/}"
                            curl https://api.bitbucket.org/2.0/repositories/${BITBUCKET_ORG_NAME}/${ENTITY_IDENTIFIER}/refs/branches \
                            -u ${BITBUCKET_CREDENTIALS} -X POST -H "Content-Type: application/json" \
                            -d '{
                                "name" : "add-port-yml",
                                "target" : {
                                    "hash" : "master"
                                }
                            }'
                        '''
                    }
                }
            }
        }
        stage('PushPortYml') {
            steps {
                dir('destinationRepo') {
                   script {
                        sh '''#!/bin/bash
                            ORG_URL="${REPO_URL%/*}"
                            BITBUCKET_ORG_NAME="${ORG_URL##*org/}"
                            curl -X POST -u ${BITBUCKET_CREDENTIALS} https://api.bitbucket.org/2.0/repositories/${BITBUCKET_ORG_NAME}/${ENTITY_IDENTIFIER}/src \
                            -F message="Add port.yml" -F branch=add-port-yml \
                            -F port.yml=@port.yml
                        '''
                    }
                }
            }
        }
        stage('CreatePullRequest') {
            steps {
                dir('destinationRepo') {
                    script {
                        sh '''#!/bin/bash
                            ORG_URL="${REPO_URL%/*}"
                            BITBUCKET_ORG_NAME="${ORG_URL##*org/}"
                            curl -v https://api.bitbucket.org/2.0/repositories/${BITBUCKET_ORG_NAME}/${ENTITY_IDENTIFIER}/pullrequests \
                            -u ${BITBUCKET_CREDENTIALS} \
                            --request POST \
                            --header 'Content-Type: application/json' \
                            --data '{
                                "title": "Add port.yml",
                                "source": {
                                    "branch": {
                                        "name": "add-port-yml"
                                    }
                                }
                            }'
                        '''
                    }
                }
            }
        }
        stage('Update Port Run Status') {
            steps {
                script {
                    def status_report_response = sh(script: """
                        curl -X PATCH \
                          -H "Content-Type: application/json" \
                          -H "Authorization: Bearer ${PORT_ACCESS_TOKEN}" \
                          -d '{"status":"SUCCESS", "message": {"run_status": "Scaffold Jenkins Pipeline completed successfully!"}}' \
                             "https://api.getport.io/v1/actions/runs/${PORT_RUN_ID}"
                    """, returnStdout: true)

                    println(status_report_response)
                }
            }
        }
    }
}
The action is ready to be executed 🚀
Execute the action
-
After creating an action, it will appear under the Self-service page. Find your new
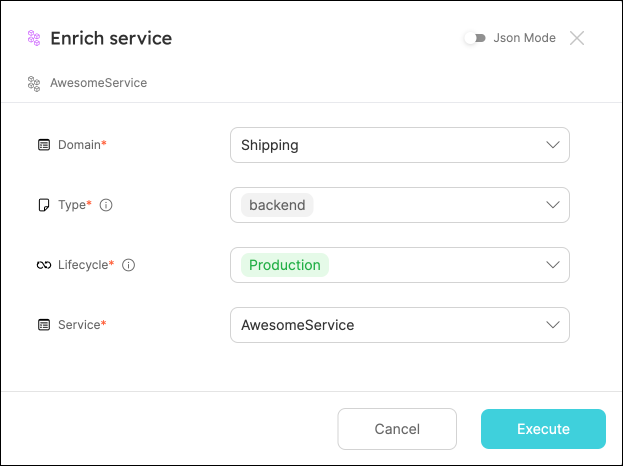
Enrich serviceaction, and click onExecute. -
Choose a service from the dropdown, a domain to assign it to, and any values for its type and lifecycle, then click
Execute:
- A small popup will appear, click on
View details:

This page provides details about the action run. We can see that the backend returned Success and the pull-request was created successfully.
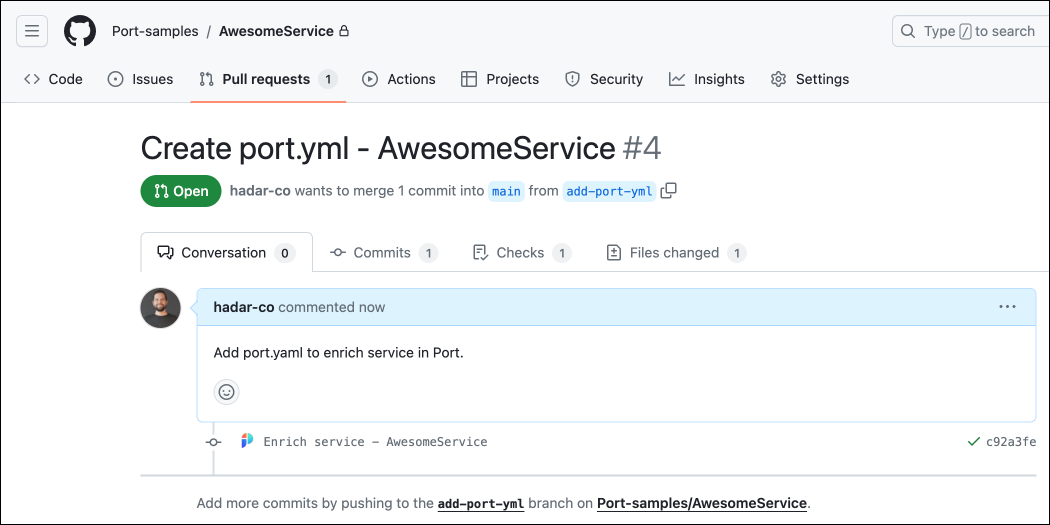
- Head over to your service's repository, you will see that a new pull-request was created:
-
Merge the pull-request, then head back to your software catalog.
-
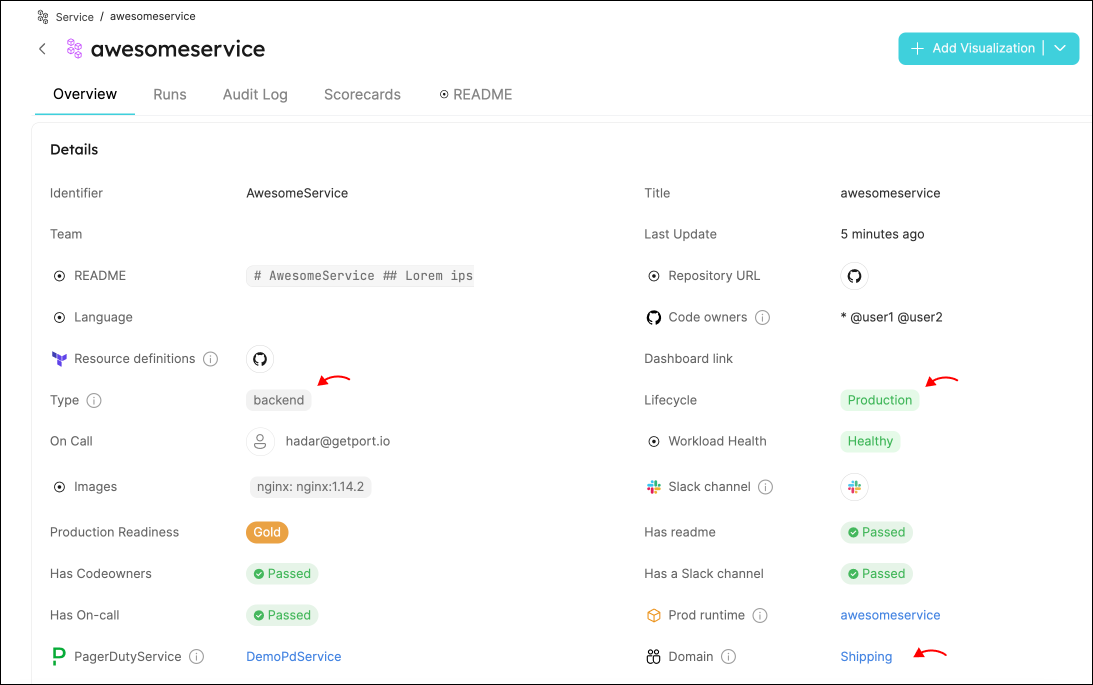
Find your service, and click on its identifier. This will take you to the service's catalog page, where you can see your new properties populated with data:
All done! 💪🏽
Possible daily routine integrations
- Fetch data from a Sentry project and reflect it in your software catalog.
- Create and onboard services with a few clicks from your developer portal.
Conclusion
Gitops is a common practice in modern software development, as it ensures that the state of your infrastructure is always in sync with your codebase.
Port allows you to easily integrate your Gitops practices with your software catalog, reflecting the state of your infrastructure, and allowing you to empower your developers with controlled actions.
More guides & tutorials will be available soon, in the meantime feel free to reach out with any questions via our community slack or Github project.