Terraform: No-Code Resource Provisioning
Port's Terraform provider, combined with Port's self-service actions can be used to expose IaC no-code resource provisioning operations to users. These provisioning operations can automate the lifecycle of different cloud resources.
Working with IaC no-code resource provisioning allows developers to easily manage resources, without needing to know the underlying systems, tools, and practices (such as Terraform).
Let's review an example of how to make use of IaC no-code resource provisioning, using Port's self-service actions.
Example
The following example will demonstrates how to set up self-service actions to create S3 buckets, change their ACL (Day-2 operation), and delete them.
The example uses a backend written in Go, which leverages Terraform templates to execute the aforementioned operations.
The full example can be found HERE.
Another template for managing SNS Topic is also available in the linked repository.
- AWS credentials with permissions to create, change ACL, and delete S3 buckets.
- A Docker daemon for running the backend image.
Running the backend
First, run the backend image with the following command (make sure to replace the placeholders):
docker run \
  -e PORT_CLIENT_ID=<PORT_CLIENT_ID> \
  -e PORT_CLIENT_SECRET=<PORT_CLIENT_SECRET> \
  -e AWS_ACCESS_KEY_ID=<AWS_ACCESS_KEY_ID> \
  -e AWS_SECRET_ACCESS_KEY=<AWS_SECRET_ACCESS_KEY> \
  -e AWS_SESSION_TOKEN=<AWS_SESSION_TOKEN> \
  -e AWS_REGION=<AWS_REGION> \
  -e DEBUG=true \
  -p 8080:8080 \
  -it ghcr.io/port-labs/webhook-terraform:v0.2
Now you have a running server that receives a webhook request from Port and applies them to terraform files!
To make your local machine public to Port, you can use either ngrok or smee.
Port's local webhook debugging guide contains a reference on how to work with smee.
Otherwise, if you choose ngrok, run:
ngrok http 8080
You will see output similar to the following:
ngrok

Session Status                online
...
Forwarding                    https://1234-5678-9101-112-1314-1516-abcd-efgh-ijkl.eu.ngrok.io -> http://localhost:8080
...
Keep the Forwarding URL for later use.
Setup Port resources
First, set up a blueprint for an S3 bucket in Port.
You can create as many properties as you want for the bucket, but this example keeps it lean with 4 properties - URL, Bucket Name, Bucket ACL and Tags.
AWS bucket blueprint
{
  "identifier": "s3_bucket",
  "title": "AWS Bucket",
  "icon": "Bucket",
  "schema": {
    "properties": {
      "url": {
        "type": "string",
        "title": "URL",
        "format": "url"
      },
      "bucket_name": {
        "type": "string",
        "title": "Bucket Name"
      },
      "bucket_acl": {
        "type": "string",
        "title": "Bucket ACL",
        "default": "private"
      },
      "tags": {
        "type": "object",
        "title": "Tags"
      }
    },
    "required": ["url", "bucket_name"]
  },
  "mirrorProperties": {},
  "calculationProperties": {},
  "relations": {}
}
Next, we want to create self-service actions to support Create, Change ACL, and Delete S3 buckets.
Self-service actions for AWS bucket blueprint
Replace <YOUR_WEBHOOK_URL> with the URL you got earlier from Ngrok or Smee.
[
  {
    "identifier": "create_bucket",
    "title": "Create",
    "icon": "Bucket",
    "userInputs": {
      "properties": {
        "bucket_name": {
          "type": "string",
          "title": "Name for the S3 bucket"
        },
        "tags": {
          "type": "object",
          "title": "Tags",
          "default": {}
        }
      },
      "required": ["bucket_name"]
    },
    "invocationMethod": {
      "type": "WEBHOOK",
      "url": "<YOUR_WEBHOOK_URL>"
    },
    "trigger": "CREATE",
    "description": "Create a new S3 Bucket in AWS"
  },
  {
    "identifier": "change_acl",
    "title": "Change ACL",
    "icon": "Bucket",
    "userInputs": {
      "properties": {
        "bucket_acl": {
          "type": "string",
          "enum": ["private", "public-read"],
          "title": "ACL"
        }
      },
      "required": ["bucket_acl"]
    },
    "invocationMethod": {
      "type": "WEBHOOK",
      "url": "<YOUR_WEBHOOK_URL>"
    },
    "trigger": "DAY-2",
    "description": "Change S3 Bucket ACL"
  },
  {
    "identifier": "delete_bucket",
    "title": "Delete",
    "icon": "Bucket",
    "userInputs": {
      "properties": {},
      "required": []
    },
    "invocationMethod": {
      "type": "WEBHOOK",
      "url": "<YOUR_WEBHOOK_URL>"
    },
    "trigger": "DELETE",
    "description": "Delete an S3 Bucket from AWS"
  }
]
Running the Self-service actions
Create
Everything is ready to run the configured self-service actions.
Go to the AWS Bucket blueprint page, and run Create AWS Bucket:
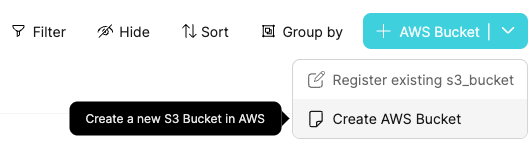
Fill in the name of the S3 bucket (must be globally unique!) and click Create:
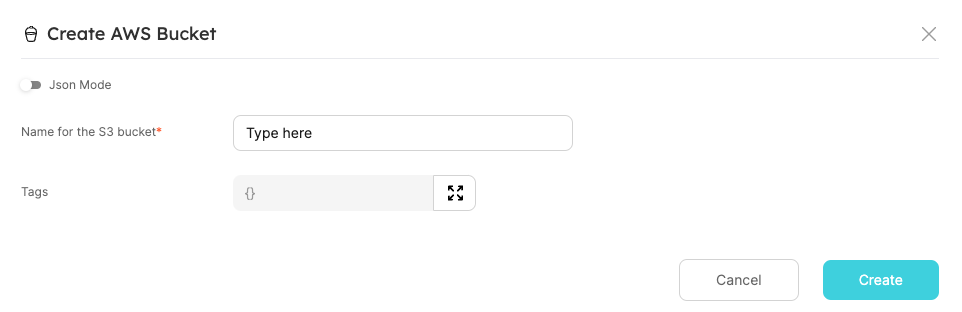
Hooray! In a minute, you'll have a new S3 bucket, which is also added as a Port entity.

Change ACL (day-2 operation)
After creating the bucket, you might want to make changes in its configuration over time.
For example, a valid use case is to change bucket visibility from private to public-read.
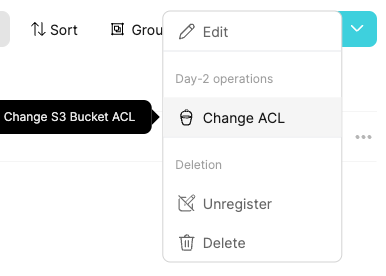
Go to the bucket entity and choose the Change ACL Day-2 operation:
Choose the public-read option for ACL, and Execute:
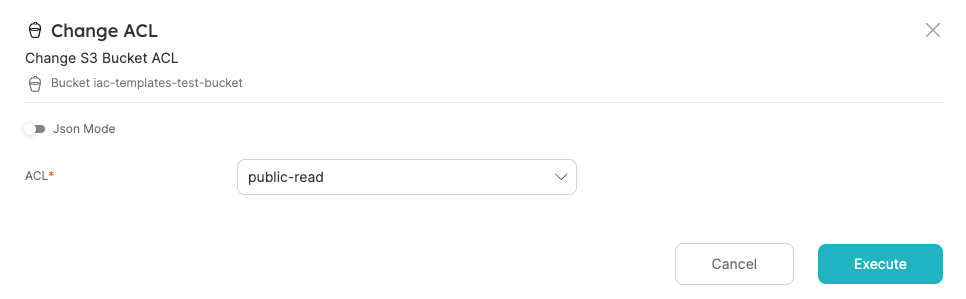
Terraform apply will be triggered behind the scenes, and when it finishes, you will see the entity's Bucket ACL property updated to public-read.
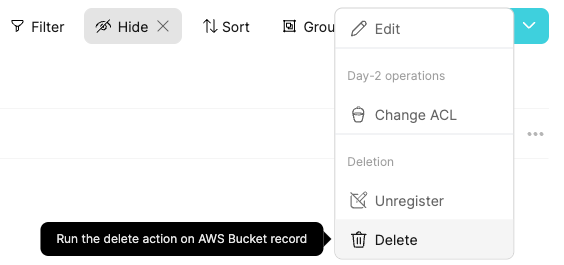
Delete
Finally, you can clear your environment and delete the bucket.
Go to the bucket entity and choose Delete:
Click on Delete:
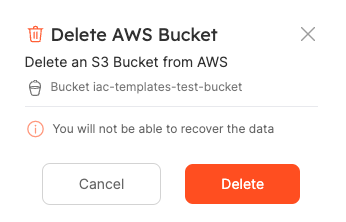
Done! Your bucket will be deleted from AWS and Port.
Summary
IaC no-code resource provisioning help your team efficiently control and configure any cloud resources in your possession.
Port self-service actions allow you to quickly ramp up an event based infrastructure to leverage your IaC no-code resource provisioning workflows.