Datadog
Our Datadog integration allows you to import monitors (also known as alerts), services, slos, sloHistory, and serviceMetrics from your Datadog account into Port, according to your mapping and definition.
Common use cases
- Map monitors, services, slos, slo history, and service metrics in your Datadog workspace environment.
- Watch for object changes (create/update/delete) in real-time, and automatically apply the changes to your entities in Port.
- Create/delete Datadog objects using self-service actions.
Prerequisites
To install the integration, you need a Kubernetes cluster that the integration's container chart will be deployed to.
Please make sure that you have kubectl and helm installed on your machine, and that your kubectl CLI is connected to the Kubernetes cluster where you plan to install the integration.
If you are having trouble installing this integration, please refer to these troubleshooting steps.
Installation
Choose one of the following installation methods:
- Hosted by Port
- Real Time & Always On
- Scheduled
Using this installation option means that the integration will be hosted by Port, with a customizable resync interval to ingest data into Port.
The Hosted by Port option is currently in beta, and is still undergoing final testing before its official release.
Should you encounter any bugs or functionality issues, please let us know so we can rectify them as soon as possible.
Your help is greatly appreciated! ⭐
Live event support
Currently, live events are not supported for integrations hosted by Port.
Resyncs will be performed periodically every 1 hour by default (can be configured differently after installation), or manually triggered by you via Port's UI.
Therefore, real-time events (including GitOps) will not be ingested into Port immediately.
Support for live events is WIP and will be supported in the near future.
Installation
To install, follow the following steps:
-
Go to the Data sources page of your portal.
-
Click on the
+ Data sourcebutton in the top-right corner. -
Click on the relevant integration in the list.
-
Under
Select your installation method, chooseHosted by Port. -
Configure the
integration settingsandapplication settingsas you wish (see below for details).
Application settings
Every integration hosted by Port has the following customizable application settings, which are configurable after installation:
-
Resync interval: The frequency at which Port will ingest data from the integration. There are various options available, ranging from every 1 hour to once a day. -
Send raw data examples: A boolean toggle (enabledby default). If enabled, raw data examples will be sent from the integration to Port. These examples are used when testing your mapping configuration, they allow you to run yourjqexpressions against real data and see the results.
Integration settings
Every integration has its own tool-specific settings, under the Integration settings section.
Each of these settings has an ⓘ icon next to it, which you can hover over to see a description of the setting.
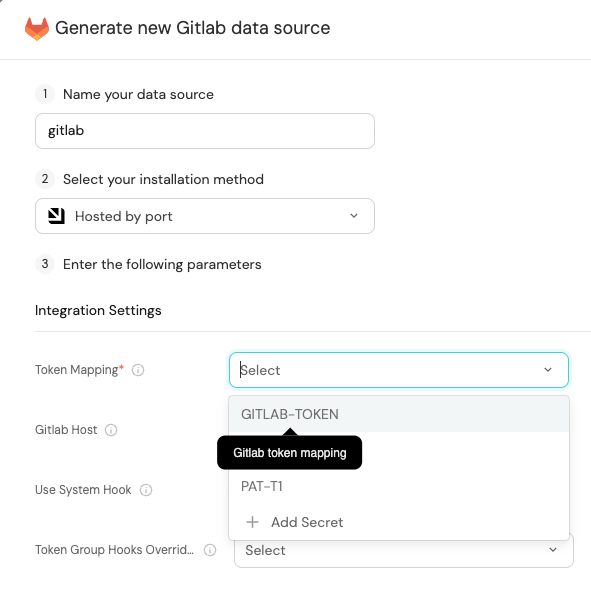
Port secrets
Some integration settings require sensitive pieces of data, such as tokens.
For these settings, Port secrets will be used, ensuring that your sensitive data is encrypted and secure.
When changing such a setting, you will be prompted to choose an existing secret or create a new one:
Port source IP addresses
When using this installation method, Port will make outbound calls to your 3rd-party applications from static IP addresses.
You may need to add these addresses to your allowlist, in order to allow Port to interact with the integrated service:
- Europe (EU)
- United States (US)
54.73.167.226
63.33.143.237
54.76.185.219
3.234.37.33
54.225.172.136
3.225.234.99
Using this installation option means that the integration will be able to update Port in real time using webhooks.
This table summarizes the available parameters for the installation. Set them as you wish in the script below, then copy it and run it in your terminal:
| Parameter | Description | Example | Required |
|---|---|---|---|
port.clientId | Your port client id | ✅ | |
port.clientSecret | Your port client secret | ✅ | |
port.baseUrl | Your Port API URL - https://api.getport.io for EU, https://api.us.getport.io for US | ✅ | |
integration.secrets.datadogApiKey | Datadog API key, docs can be found here | ✅ | |
integration.secrets.datadogApplicationKey | Datadog application key, docs can be found here | ✅ | |
integration.config.datadogBaseUrl | The base Datadog host. Defaults to https://api.datadoghq.com. If in EU, use https://api.datadoghq.eu | ✅ | |
integration.secrets.datadogWebhookToken | Datadog webhook token. Learn more | ❌ | |
integration.config.appHost | The host of the Port Ocean app. Used to set up the integration endpoint as the target for webhooks created in Datadog | https://my-ocean-integration.com | ✅ |
Advanced configuration
| Parameter | Description |
|---|---|
integration.eventListener.type | The event listener type. Read more about event listeners |
integration.type | The integration to be installed |
scheduledResyncInterval | The number of minutes between each resync. When not set the integration will resync for each event listener resync event. Read more about scheduledResyncInterval |
initializePortResources | Default true, When set to true the integration will create default blueprints and the port App config Mapping. Read more about initializePortResources |
sendRawDataExamples | Enable sending raw data examples from the third party API to port for testing and managing the integration mapping. Default is true |
- Helm
- ArgoCD
To install the integration using Helm, run the following command:
helm repo add --force-update port-labs https://port-labs.github.io/helm-charts
helm upgrade --install my-datadog-integration port-labs/port-ocean \
  --set port.clientId="PORT_CLIENT_ID"  \
  --set port.clientSecret="PORT_CLIENT_SECRET"  \
  --set port.baseUrl="https://api.getport.io"  \
  --set initializePortResources=true  \
  --set scheduledResyncInterval=60 \
  --set integration.identifier="my-datadog-integration"  \
  --set integration.type="datadog"  \
  --set integration.eventListener.type="POLLING"  \
  --set integration.config.datadogBaseUrl="https://api.datadoghq.com"  \
  --set integration.secrets.datadogApiKey="<your-datadog-api-key>"  \
  --set integration.secrets.datadogApplicationKey="<your-datadog-application-key>"
The baseUrl, port_region, port.baseUrl, portBaseUrl, port_base_url and OCEAN__PORT__BASE_URL parameters are used to select which instance or Port API will be used.
Port exposes two API instances, one for the EU region of Port, and one for the US region of Port.
- If you use the EU region of Port, available at https://app.getport.io, your Port API URL is
https://api.getport.io - If you use the US region of Port, available at https://app.us.getport.io, your Port API URL is
https://api.us.getport.io
To install the integration using ArgoCD, follow these steps:
- Create a
values.yamlfile inargocd/my-ocean-datadog-integrationin your git repository with the content:
Remember to replace the placeholder for DATADOG_BASE_URL, DATADOG_API_KEY and DATADOG_APPLICATION_KEY.
initializePortResources: true
scheduledResyncInterval: 60
integration:
  identifier: my-ocean-datadog-integration
  type: datadog
  eventListener:
    type: POLLING
  config:
    datadogBaseUrl: DATADOG_BASE_URL
  secrets:
    datadogApiKey: DATADOG_API_KEY
    datadogApplicationKey: DATADOG_APPLICATION_KEY
- Install the
my-ocean-datadog-integrationArgoCD Application by creating the followingmy-ocean-datadog-integration.yamlmanifest:
Remember to replace the placeholders for YOUR_PORT_CLIENT_ID YOUR_PORT_CLIENT_SECRET and YOUR_GIT_REPO_URL.
Multiple sources ArgoCD documentation can be found here.
ArgoCD Application
apiVersion: argoproj.io/v1alpha1
kind: Application
metadata:
  name: my-ocean-datadog-integration
  namespace: argocd
spec:
  destination:
    namespace: mmy-ocean-datadog-integration
    server: https://kubernetes.default.svc
  project: default
  sources:
  - repoURL: 'https://port-labs.github.io/helm-charts/'
    chart: port-ocean
    targetRevision: 0.1.14
    helm:
      valueFiles:
      - $values/argocd/my-ocean-datadog-integration/values.yaml
      parameters:
        - name: port.clientId
          value: YOUR_PORT_CLIENT_ID
        - name: port.clientSecret
          value: YOUR_PORT_CLIENT_SECRET
        - name: port.baseUrl
          value: https://api.getport.io
  - repoURL: YOUR_GIT_REPO_URL
    targetRevision: main
    ref: values
  syncPolicy:
    automated:
      prune: true
      selfHeal: true
    syncOptions:
    - CreateNamespace=true
The baseUrl, port_region, port.baseUrl, portBaseUrl, port_base_url and OCEAN__PORT__BASE_URL parameters are used to select which instance or Port API will be used.
Port exposes two API instances, one for the EU region of Port, and one for the US region of Port.
- If you use the EU region of Port, available at https://app.getport.io, your Port API URL is
https://api.getport.io - If you use the US region of Port, available at https://app.us.getport.io, your Port API URL is
https://api.us.getport.io
- Apply your application manifest with
kubectl:
kubectl apply -f my-ocean-datadog-integration.yaml
For advanced configuration such as proxies or self-signed certificates, click here.
- GitHub
- Jenkins
- Azure Devops
- GitLab
This workflow will run the Datadog integration once and then exit, this is useful for scheduled ingestion of data.
If you want the integration to update Port in real time using webhooks you should use the Real Time & Always On installation option.
Make sure to configure the following Github Secrets:
| Parameter | Description | Example | Required |
|---|---|---|---|
port_client_id | Your Port client (How to get the credentials) id | ✅ | |
port_client_secret | Your Port client (How to get the credentials) secret | ✅ | |
port_base_url | Your Port API URL - https://api.getport.io for EU, https://api.us.getport.io for US | ✅ | |
config -> datadog_base_url | US: https://api.datadoghq.com EU: https://api.datadoghq.eu | ✅ | |
config -> datadog_api_key | Datadog API key, docs can be found here | ✅ | |
config -> datadog_application_key | Datadog application key, docs can be found here | ✅ | |
config -> datadog_webhook_token | Datadog webhook token. Learn more | ❌ | |
initialize_port_resources | Default true, When set to true the integration will create default blueprints and the port App config Mapping. Read more about initializePortResources | ❌ | |
identifier | The identifier of the integration that will be installed | ❌ | |
version | The version of the integration that will be installed | latest | ❌ |
The following example uses the Ocean Sail Github Action to run the Datadog integration. For further information about the action, please visit the Ocean Sail Github Action
Here is an example for datadog-integration.yml workflow file:
name: Datadog Exporter Workflow

# This workflow is responsible for running Datadog exporter.

on:
  workflow_dispatch:

jobs:
  run-integration:
    runs-on: ubuntu-latest

    steps:
      - uses: port-labs/ocean-sail@v1
        with:
          type: 'datadog'
          port_client_id: ${{ secrets.OCEAN__PORT__CLIENT_ID }}
          port_client_secret: ${{ secrets.OCEAN__PORT__CLIENT_SECRET }}
          port_base_url: https://api.getport.io
          config: |
            datadog_base_url: https://api.datadoghq.com
            datadog_api_key: ${{ secrets.DATADOG_API_KEY }}
            datadog_application_key:  ${{ secrets.DATADOG_APP_KEY }}
This pipeline will run the Datadog integration once and then exit, this is useful for scheduled ingestion of data.
Your Jenkins agent should be able to run docker commands.
If you want the integration to update Port in real time using webhooks you should use the Real Time & Always On installation option.
Make sure to configure the following Jenkins Credentials of Secret Text type:
| Parameter | Description | Example | Required |
|---|---|---|---|
OCEAN__INTEGRATION__CONFIG__DATADOG_API_KEY | Datadog API key, docs can be found here | ✅ | |
OCEAN__INTEGRATION__CONFIG__DATADOG_APPLICATION_KEY | Datadog application key, docs can be found here | ✅ | |
OCEAN__INTEGRATION__CONFIG__DATADOG_BASE_URL | The base API url | https://api.datadoghq.com / https://api.datadoghq.eu | ✅ |
OCEAN__INTEGRATION__CONFIG__DATADOG_WEBHOOK_TOKEN | Datadog webhook token. Learn more | ❌ | |
OCEAN__PORT__CLIENT_ID | Your Port client (How to get the credentials) id | ✅ | |
OCEAN__PORT__CLIENT_SECRET | Your Port client (How to get the credentials) secret | ✅ | |
OCEAN__PORT__BASE_URL | Your Port API URL - https://api.getport.io for EU, https://api.us.getport.io for US | ✅ | |
OCEAN__INITIALIZE_PORT_RESOURCES | Default true, When set to true the integration will create default blueprints and the port App config Mapping. Read more about initializePortResources | ❌ | |
OCEAN__INTEGRATION__IDENTIFIER | The identifier of the integration that will be installed | ❌ |
Here is an example for Jenkinsfile groovy pipeline file:
pipeline {
    agent any

    stages {
        stage('Run Datadog Integration') {
            steps {
                script {
                    withCredentials([
                        string(credentialsId: 'OCEAN__INTEGRATION__CONFIG__DATADOG_API_KEY', variable: 'OCEAN__INTEGRATION__CONFIG__DATADOG_API_KEY'),
                        string(credentialsId: 'OCEAN__INTEGRATION__CONFIG__DATADOG_APPLICATION_KEY', variable: 'OCEAN__INTEGRATION__CONFIG__DATADOG_APPLICATION_KEY'),
                        string(credentialsId: 'OCEAN__INTEGRATION__CONFIG__DATADOG_BASE_URL', variable: 'OCEAN__INTEGRATION__CONFIG__DATADOG_BASE_URL'),
                        string(credentialsId: 'OCEAN__PORT__CLIENT_ID', variable: 'OCEAN__PORT__CLIENT_ID'),
                        string(credentialsId: 'OCEAN__PORT__CLIENT_SECRET', variable: 'OCEAN__PORT__CLIENT_SECRET'),
                    ]) {
                        sh('''
                            #Set Docker image and run the container
                            integration_type="datadog"
                            version="latest"
                            image_name="ghcr.io/port-labs/port-ocean-${integration_type}:${version}"
                            docker run -i --rm --platform=linux/amd64 \
                                -e OCEAN__EVENT_LISTENER='{"type":"ONCE"}' \
                                -e OCEAN__INITIALIZE_PORT_RESOURCES=true \
                                -e OCEAN__INTEGRATION__CONFIG__DATADOG_API_KEY=$OCEAN__INTEGRATION__CONFIG__DATADOG_API_KEY \
                                -e OCEAN__INTEGRATION__CONFIG__DATADOG_APPLICATION_KEY=$OCEAN__INTEGRATION__CONFIG__DATADOG_APPLICATION_KEY \
                                -e OCEAN__INTEGRATION__CONFIG__DATADOG_BASE_URL=$OCEAN__INTEGRATION__CONFIG__DATADOG_BASE_URL \
                                -e OCEAN__PORT__CLIENT_ID=$OCEAN__PORT__CLIENT_ID \
                                -e OCEAN__PORT__CLIENT_SECRET=$OCEAN__PORT__CLIENT_SECRET \
                                -e OCEAN__PORT__BASE_URL='https://api.getport.io' \
                                $image_name

                            exit $?
                        ''')
                    }
                }
            }
        }
    }
}
This pipeline will run the Datadog integration once and then exit, this is useful for scheduled ingestion of data.
Your Azure Devops agent should be able to run docker commands. Learn more about agents here.
If you want the integration to update Port in real time using webhooks you should use the Real Time & Always On installation option.
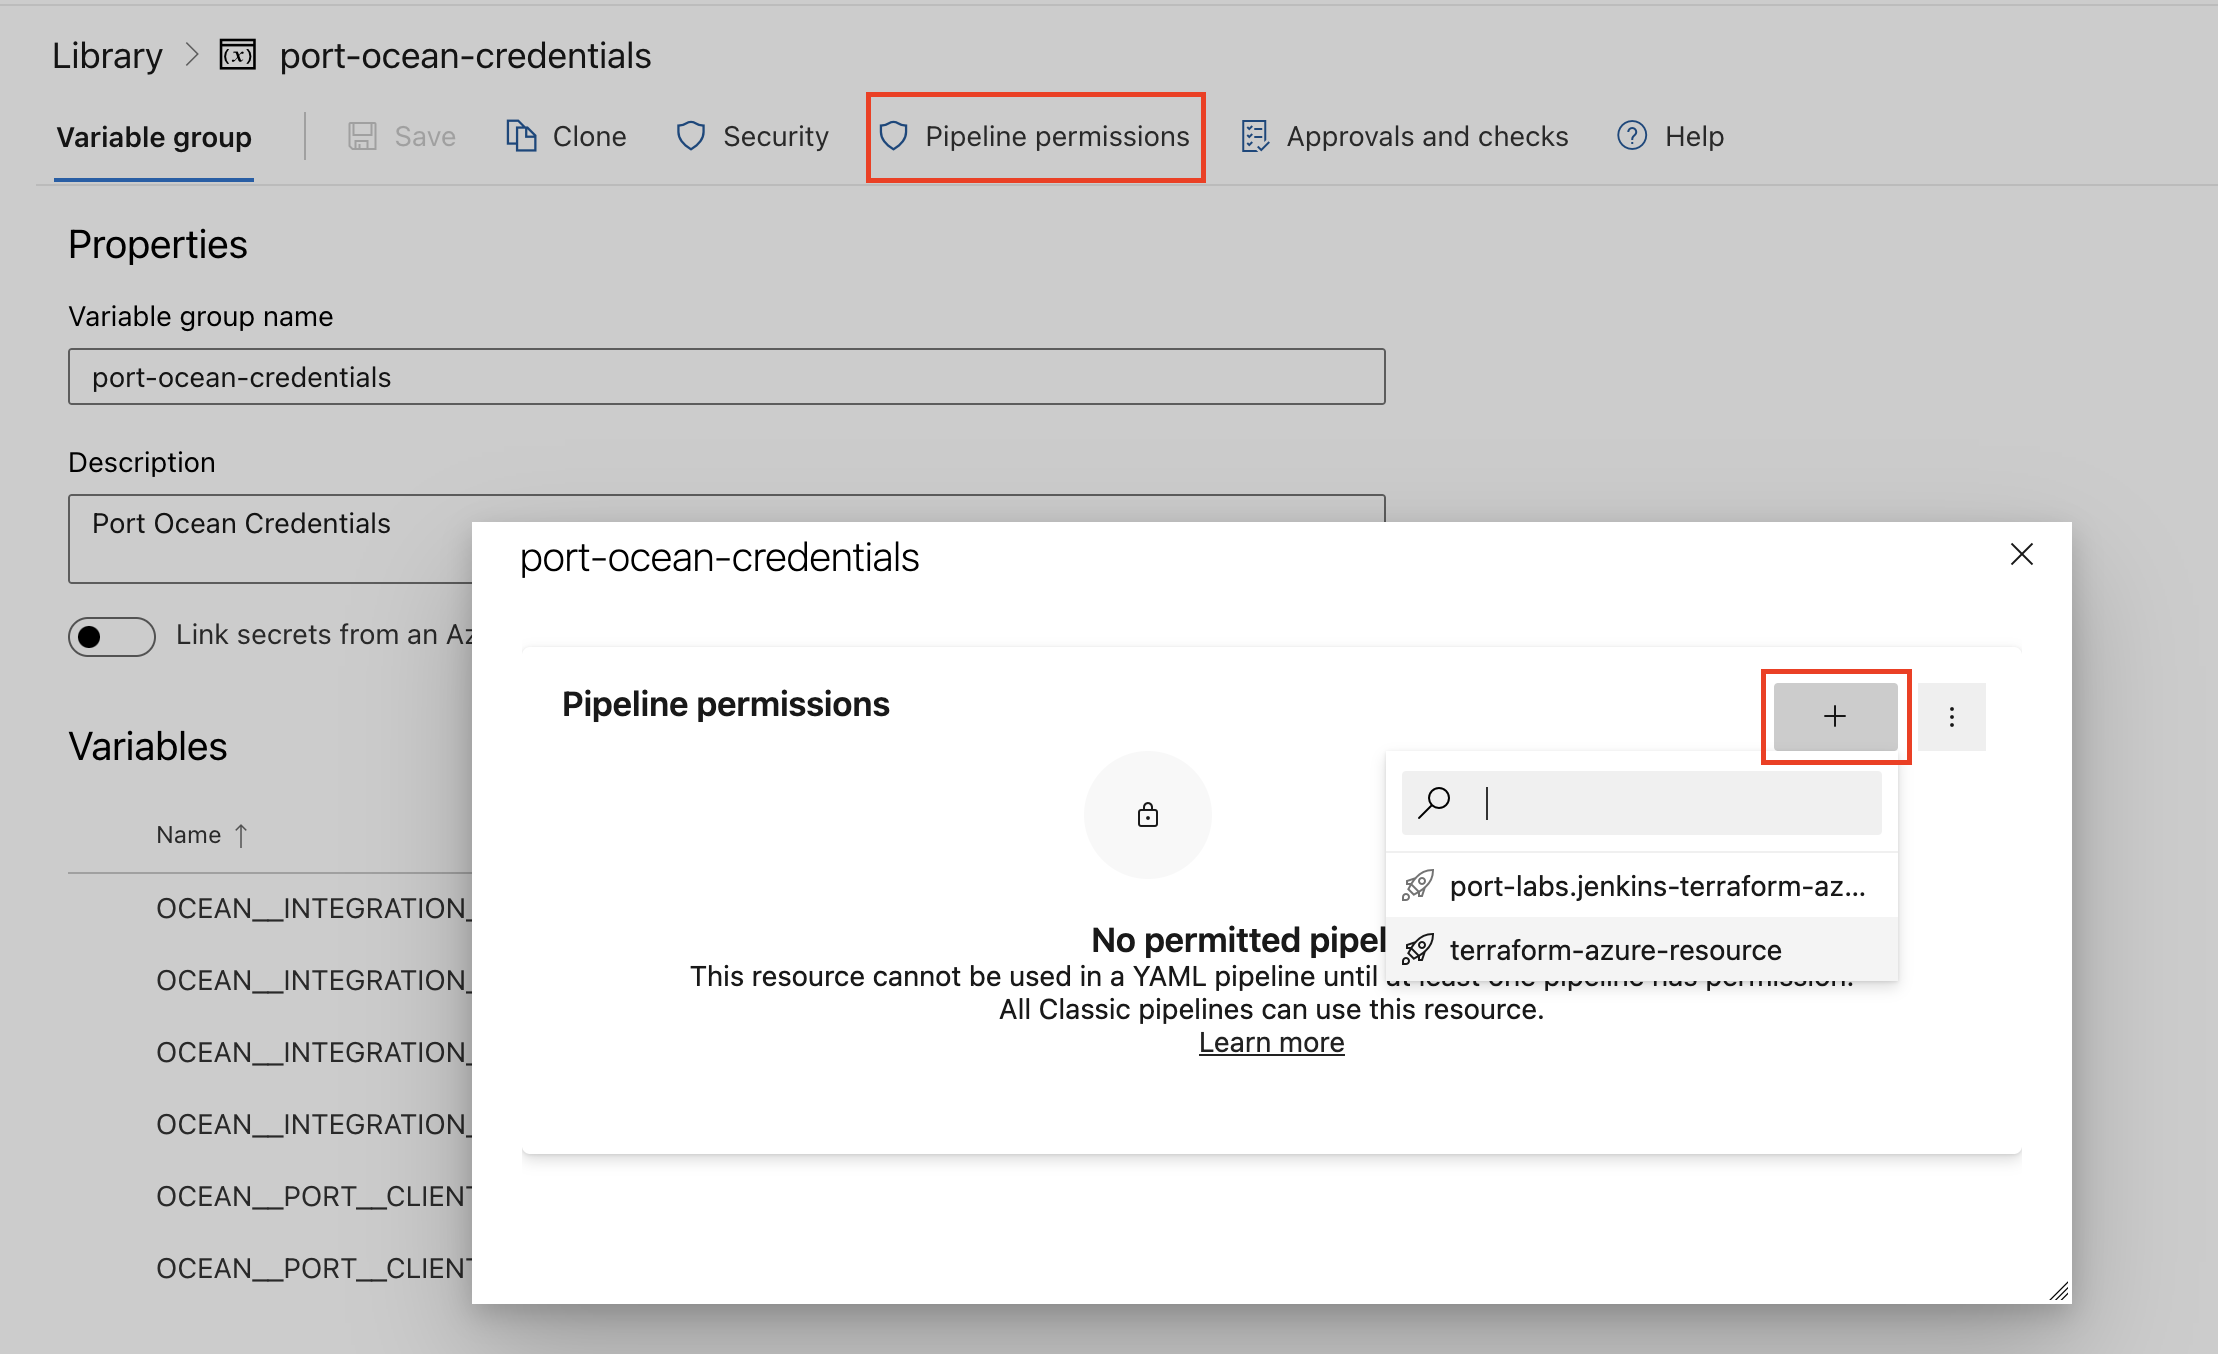
Variable groups store values and secrets you'll use in your pipelines across your project. Learn more
Setting Up Your Credentials
- Create a Variable Group: Name it port-ocean-credentials. Store the required variables from the table.
- Authorize Your Pipeline:
- Go to "Library" -> "Variable groups."
- Find port-ocean-credentials and click on it.
- Select "Pipeline Permissions" and add your pipeline to the authorized list.
| Parameter | Description | Example | Required |
|---|---|---|---|
OCEAN__INTEGRATION__CONFIG__DATADOG_API_KEY | Datadog API key, docs can be found here | ✅ | |
OCEAN__INTEGRATION__CONFIG__DATADOG_APPLICATION_KEY | Datadog application key, docs can be found here | ✅ | |
OCEAN__INTEGRATION__CONFIG__DATADOG_BASE_URL | The base API url | https://api.datadoghq.com / https://api.datadoghq.eu | ✅ |
OCEAN__INTEGRATION__CONFIG__DATADOG_WEBHOOK_TOKEN | Datadog webhook token. Learn more | �❌ | |
OCEAN__PORT__CLIENT_ID | Your Port client (How to get the credentials) id | ✅ | |
OCEAN__PORT__CLIENT_SECRET | Your Port client (How to get the credentials) secret | ✅ | |
OCEAN__PORT__BASE_URL | Your Port API URL - https://api.getport.io for EU, https://api.us.getport.io for US | ✅ | |
OCEAN__INITIALIZE_PORT_RESOURCES | Default true, When set to true the integration will create default blueprints and the port App config Mapping. Read more about initializePortResources | ❌ | |
OCEAN__INTEGRATION__IDENTIFIER | The identifier of the integration that will be installed | ❌ |
Here is an example for datadog-integration.yml pipeline file:
trigger:
  - main

pool:
  vmImage: "ubuntu-latest"

variables:
  - group: port-ocean-credentials

steps:
  - script: |
      # Set Docker image and run the container
      integration_type="datadog"
      version="latest"

      image_name="ghcr.io/port-labs/port-ocean-$integration_type:$version"

      docker run -i --rm \
        -e OCEAN__EVENT_LISTENER='{"type":"ONCE"}' \
        -e OCEAN__INITIALIZE_PORT_RESOURCES=true \
        -e OCEAN__INTEGRATION__CONFIG__DATADOG_API_KEY=$(OCEAN__INTEGRATION__CONFIG__DATADOG_API_KEY) \
        -e OCEAN__INTEGRATION__CONFIG__DATADOG_APPLICATION_KEY=$(OCEAN__INTEGRATION__CONFIG__DATADOG_APPLICATION_KEY) \
        -e OCEAN__INTEGRATION__CONFIG__DATADOG_BASE_URL=$(OCEAN__INTEGRATION__CONFIG__DATADOG_BASE_URL) \
        -e OCEAN__PORT__CLIENT_ID=$(OCEAN__PORT__CLIENT_ID) \
        -e OCEAN__PORT__CLIENT_SECRET=$(OCEAN__PORT__CLIENT_SECRET) \
        -e OCEAN__PORT__BASE_URL='https://api.getport.io' \
        $image_name

      exit $?
    displayName: "Ingest Data into Port"
This workflow will run the Datadog integration once and then exit, this is useful for scheduled ingestion of data.
If you want the integration to update Port in real time using webhooks you should use the Real Time & Always On installation option.
Make sure to configure the following GitLab variables:
| Parameter | Description | Example | Required |
|---|---|---|---|
OCEAN__INTEGRATION__CONFIG__DATADOG_API_KEY | Datadog API key, docs can be found here | ✅ | |
OCEAN__INTEGRATION__CONFIG__DATADOG_APPLICATION_KEY | Datadog application key, docs can be found here | ✅ | |
OCEAN__INTEGRATION__CONFIG__DATADOG_BASE_URL | The base API url | https://api.datadoghq.com / https://api.datadoghq.eu | ✅ |
OCEAN__INTEGRATION__CONFIG__DATADOG_WEBHOOK_TOKEN | Datadog webhook token. Learn more | ❌ | |
OCEAN__PORT__CLIENT_ID | Your Port client (How to get the credentials) id | ✅ | |
OCEAN__PORT__CLIENT_SECRET | Your Port client (How to get the credentials) secret | ✅ | |
OCEAN__PORT__BASE_URL | Your Port API URL - https://api.getport.io for EU, https://api.us.getport.io for US | ✅ | |
OCEAN__INITIALIZE_PORT_RESOURCES | Default true, When set to true the integration will create default blueprints and the port App config Mapping. Read more about initializePortResources | ❌ | |
OCEAN__INTEGRATION__IDENTIFIER | The identifier of the integration that will be installed | ❌ |
Here is an example for .gitlab-ci.yml pipeline file:
default:
  image: docker:24.0.5
  services:
    - docker:24.0.5-dind
  before_script:
    - docker info

variables:
  INTEGRATION_TYPE: datadog
  VERSION: latest

stages:
  - ingest

ingest_data:
  stage: ingest
  variables:
    IMAGE_NAME: ghcr.io/port-labs/port-ocean-$INTEGRATION_TYPE:$VERSION
  script:
    - |
      docker run -i --rm --platform=linux/amd64 \
        -e OCEAN__EVENT_LISTENER='{"type":"ONCE"}' \
        -e OCEAN__INITIALIZE_PORT_RESOURCES=true \
        -e OCEAN__INTEGRATION__CONFIG__DATADOG_API_KEY=$OCEAN__INTEGRATION__CONFIG__DATADOG_API_KEY \
        -e OCEAN__INTEGRATION__CONFIG__DATADOG_APPLICATION_KEY=$OCEAN__INTEGRATION__CONFIG__DATADOG_APPLICATION_KEY \
        -e OCEAN__INTEGRATION__CONFIG__DATADOG_BASE_URL=$OCEAN__INTEGRATION__CONFIG__DATADOG_BASE_URL \
        -e OCEAN__PORT__CLIENT_ID=$OCEAN__PORT__CLIENT_ID \
        -e OCEAN__PORT__CLIENT_SECRET=$OCEAN__PORT__CLIENT_SECRET \
        -e OCEAN__PORT__BASE_URL='https://api.getport.io' \
        $IMAGE_NAME

  rules: # Run only when changes are made to the main branch
    - if: '$CI_COMMIT_BRANCH == "main"'
The baseUrl, port_region, port.baseUrl, portBaseUrl, port_base_url and OCEAN__PORT__BASE_URL parameters are used to select which instance or Port API will be used.
Port exposes two API instances, one for the EU region of Port, and one for the US region of Port.
- If you use the EU region of Port, available at https://app.getport.io, your Port API URL is
https://api.getport.io - If you use the US region of Port, available at https://app.us.getport.io, your Port API URL is
https://api.us.getport.io
For advanced configuration such as proxies or self-signed certificates, click here.
Ingesting Datadog objects
The Datadog integration uses a YAML configuration to describe the process of loading data into the developer portal.
Here is an example snippet from the config which demonstrates the process for getting service data from Datadog:
createMissingRelatedEntities: true
deleteDependentEntities: true
resources:
  - kind: service
    selector:
      query: 'true'
    port:
      entity:
        mappings:
          blueprint: '"datadogService"'
          identifier: .attributes.schema."dd-service"
          title: .attributes.schema."dd-service"
          properties:
            application: .attributes.schema.application
            languages: .attributes.schema.languages
            description: .attributes.schema.description
            tags: .attributes.schema.tags
            type: .attributes.schema.type
            links: .attributes.schema.links | map(.url)
            owners: '[.attributes.schema.contacts[] | select(.type == "email") | .contact]'
The integration makes use of the JQ JSON processor to select, modify, concatenate, transform and perform other operations on existing fields and values from Datadog's API events.
In the example above, two additional parameters are used:
createMissingRelatedEntities - used to enable the creation of missing related entities in Port. This is useful when you want to create an entity and its related entities in one call, or if you want to create an entity whose related entity does not exist yet.
deleteDependentEntities - used to enable deletion of dependent Port entities. This is useful when you have two blueprints with a required relation, and the target entity in the relation should be deleted. In this scenario, the delete operation will fail if this parameter is set to false. If set to true, the source entity will be deleted as well.
Configuration structure
The integration configuration determines which resources will be queried from Datadog, and which entities and properties will be created in Port.
Kind)The following resources can be used to map data from Datadog, it is possible to reference any field that appears in the API responses linked below for the mapping configuration.
-
The root key of the integration configuration is the
resourceskey:resources:
- kind: service
selector:
... -
The
kindkey is a specifier for a Datadog object:resources:
- kind: service
selector:
... -
The
selectorand thequerykeys allow you to filter which objects of the specifiedkindwill be ingested into your software catalog:resources:
- kind: service
selector:
query: "true" # JQ boolean expression. If evaluated to false - this object will be skipped.
port: -
The
port,entityand themappingskeys are used to map the Datadog object fields to Port entities. To create multiple mappings of the same kind, you can add another item in theresourcesarray;resources:
- kind: service
selector:
query: "true"
port:
entity:
mappings: # Mappings between one Datadog object to a Port entity. Each value is a JQ query.
blueprint: '"datadogService"'
identifier: .attributes.schema."dd-service"
title: .attributes.schema."dd-service"
properties:
application: .attributes.schema.application
languages: .attributes.schema.languages
description: .attributes.schema.description
tags: .attributes.schema.tags
type: .attributes.schema.type
links: .attributes.schema.links | map(.url)
owners: '[.attributes.schema.contacts[] | select(.type == "email") | .contact]'
- kind: service # In this instance project is mapped again with a different filter
selector:
query: '.name == "MyServiceName"'
port:
entity:
mappings: ...
Note the value of the blueprint key - if you want to use a hardcoded string, you need to encapsulate it in 2 sets of quotes, for example use a pair of single-quotes (') and then another pair of double-quotes (")
Ingest data into Port
To ingest Datadog objects using the integration configuration, you can follow the steps below:
- Go to the DevPortal Builder page.
- Select a blueprint you want to ingest using Datadog.
- Choose the Ingest Data option from the menu.
- Click on
+ Data sourceat the top right corner - Select Datadog under the APM & Alerting providers category.
- Modify the configuration according to your needs.
- Click
Resync.
Examples
Examples of blueprints and the relevant integration configurations:
Monitor
Monitor blueprint
{
  "identifier": "datadogMonitor",
  "description": "This blueprint represents a datadog monitor",
  "title": "Datadog Monitor",
  "icon": "Datadog",
  "schema": {
    "properties": {
      "monitorType": {
        "type": "string",
        "title": "Monitor Type"
      },
      "tags": {
        "type": "array",
        "title": "Tags"
      },
      "overallState": {
        "type": "string",
        "title": "Overall state",
        "enum": ["Alert", "Ignored", "No Data", "OK", "Skipped", "Unknown", "Warn"],
        "enumColors": {
          "Alert": "red",
          "Ignored": "darkGray",
          "No Data": "lightGray",
          "OK": "green",
          "Skipped": "yellow",
          "Unknown": "purple",
          "Warn": "orange"
        }
      },
      "priority": {
        "type": "string",
        "title": "Priority"
      },
      "thresholds": {
        "type": "object",
        "title": "Thresholds"
      },
      "createdBy": {
        "type": "string",
        "title": "Creator"
      },
      "createdAt": {
        "title": "Created At",
        "type": "string",
        "format": "date-time"
      },
      "updatedAt": {
        "title": "Updated At",
        "type": "string",
        "format": "date-time"
      }
    },
    "required": []
  },
  "mirrorProperties": {},
  "calculationProperties": {},
  "relations": {}
}
Integration configuration
createMissingRelatedEntities: true
deleteDependentEntities: true
resources:
  - kind: monitor
    selector:
      query: 'true'
    port:
      entity:
        mappings:
          blueprint: '"datadogMonitor"'
          identifier: .id | tostring
          title: .name
          properties:
            tags: .tags
            monitorType: .type
            overallState: .overall_state
            thresholds: .thresholds
            priority: .priority
            createdBy: .creator.email
            createdAt: .created
            updatedAt: .modified
Service
Service blueprint
{
  "identifier": "datadogService",
  "description": "This blueprint represents a Datadog service",
  "title": "Datadog Service",
  "icon": "Datadog",
  "schema": {
    "properties": {
      "application": {
        "title": "Application",
        "type": "string"
      },
      "description": {
        "title": "Description",
        "type": "string"
      },
      "tags": {
        "type": "array",
        "items": {
          "type": "string"
        },
        "title": "Tags"
      },
      "languages": {
        "items": {
          "type": "string"
        },
        "title": "Languages",
        "type": "array"
      },
      "type": {
        "title": "Type",
        "type": "string",
        "enum": [
          "web",
          "db",
          "custom",
          "cache",
          "function",
          "browser",
          "mobile"
        ],
        "enumColors": {
          "web": "lightGray",
          "db": "lightGray",
          "custom": "lightGray",
          "cache": "lightGray",
          "function": "lightGray",
          "browser": "lightGray",
          "mobile": "lightGray"
        }
      },
      "owners": {
        "type": "array",
        "title": "Service Owners",
        "items": {
          "type": "string"
        }
      },
      "links": {
        "title": "Service Links",
        "type": "array",
        "description": "Links to external resources and repositories",
        "items": {
          "type": "string",
          "format": "url"
        }
      }
    },
    "required": []
  },
  "mirrorProperties": {},
  "calculationProperties": {},
  "aggregationProperties": {},
  "relations": {}
}
Integration configuration
createMissingRelatedEntities: true
deleteDependentEntities: true
resources:
  - kind: service
    selector:
      query: 'true'
    port:
      entity:
        mappings:
          blueprint: '"datadogService"'
          identifier: .attributes.schema."dd-service"
          title: .attributes.schema."dd-service"
          properties:
            application: .attributes.schema.application
            languages: .attributes.schema.languages
            description: .attributes.schema.description
            tags: .attributes.schema.tags
            type: .attributes.schema.type
            links: .attributes.schema.links | map(.url)
            owners: '[.attributes.schema.contacts[] | select(.type == "email") | .contact]'
SLO
SLO blueprint
{
  "identifier": "datadogSlo",
  "description": "This blueprint represents a datadog SLO",
  "title": "Datadog SLO",
  "icon": "Datadog",
  "schema": {
    "properties": {
      "tags": {
        "type": "array",
        "title": "Tags"
      },
      "sloType": {
        "title": "Type",
        "type": "string"
      },
      "description": {
        "title": "Description",
        "type": "string"
      },
      "warningThreshold": {
        "icon": "DefaultProperty",
        "title": "Warning Threshold",
        "type": "number"
      },
      "targetThreshold": {
        "icon": "DefaultProperty",
        "title": "Target Threshold",
        "type": "number"
      },
      "createdAt": {
        "title": "Created At",
        "type": "string",
        "format": "date-time"
      },
      "updatedAt": {
        "title": "Updated At",
        "type": "string",
        "format": "date-time"
      },
      "createdBy": {
        "title": "Creator",
        "type": "string"
      }
    },
    "required": []
  },
  "mirrorProperties": {},
  "calculationProperties": {},
  "aggregationProperties": {
    "sli_average": {
      "title": "SLI Average",
      "type": "number",
      "target": "datadogSloHistory",
      "calculationSpec": {
        "func": "average",
        "averageOf": "total",
        "property": "sliValue",
        "measureTimeBy": "$createdAt",
        "calculationBy": "property"
      }
    }
  },
  "relations": {
    "monitors": {
      "title": "SLO Monitors",
      "description": "The monitors tracking this SLO",
      "target": "datadogMonitor",
      "required": false,
      "many": true
    },
    "services": {
      "title": "Services",
      "description": "The services tracked by this SLO",
      "target": "datadogService",
      "required": false,
      "many": true
    }
  }
}
Integration configuration
createMissingRelatedEntities: true
deleteDependentEntities: true
resources:
  - kind: slo
    selector:
      query: 'true'
    port:
      entity:
        mappings:
          identifier: .id | tostring
          title: .name
          blueprint: '"datadogSlo"'
          properties:
            tags: .tags
            sloType: .type
            description: .description
            warningThreshold: .warning_threshold
            targetThreshold: .target_threshold
            createdBy: .creator.email
            createdAt: .created_at | todate
            updatedAt: .modified_at | todate
          relations:
            monitors: .monitor_ids | map(tostring)
            services: >-
              .monitor_tags + .tags | map(select(startswith("service:"))) |
              unique | map(split(":")[1])
Based on the best practices for tagging infrastructure, the default mapping connects SLOs to services using tags that starts with the service keyword.
SLO history
SLO history blueprint
{
  "identifier": "datadogSloHistory",
  "description": "This blueprint represents a datadog SLO history",
  "title": "Datadog SLO History",
  "icon": "Datadog",
  "schema": {
    "properties": {
      "monitor_type": {
        "icon": "DefaultProperty",
        "title": "Type",
        "type": "string"
      },
      "sliValue": {
        "icon": "DefaultProperty",
        "title": "SLI Value",
        "type": "number"
      },
      "sampling_start_date": {
        "icon": "DefaultProperty",
        "type": "string",
        "title": "Sampling Start Date",
        "format": "date-time"
      },
      "sampling_end_date": {
        "icon": "DefaultProperty",
        "type": "string",
        "title": "Sampling End Date",
        "format": "date-time"
      }
    },
    "required": []
  },
  "mirrorProperties": {
    "slo_target": {
      "title": "SLO Target",
      "path": "slo.targetThreshold"
    },
    "slo_warning_threshold": {
      "title": "SLO Warning Threshold",
      "path": "slo.warningThreshold"
    }
  },
  "calculationProperties": {},
  "aggregationProperties": {},
  "relations": {
    "slo": {
      "title": "SLO",
      "description": "The SLO to which this history belongs to",
      "target": "datadogSlo",
      "required": false,
      "many": false
    }
  }
}
Integration configuration
createMissingRelatedEntities: true
deleteDependentEntities: true
resources:
  - kind: sloHistory
    selector:
      query: 'true'
      sampleIntervalPeriodInDays: 7
    port:
      entity:
        mappings:
          identifier: .slo.id | tostring
          title: .slo.name
          blueprint: '"datadogSloHistory"'
          properties:
            monitory_type: .type
            sampling_start_date: .from_ts | todate
            sampling_end_date: .to_ts | todate
            sliValue: .overall.sli_value
          relations:
            slo: .slo.id
Based on the best practices for tagging infrastructure, the default JQ maps SLOs to services using tags that starts with the service keyword
Service Metric
Service Metric blueprint
{
  "identifier": "datadogServiceMetric",
  "description": "This blueprint represents a Datadog service metric",
  "title": "Datadog Service Metric",
  "icon": "Datadog",
  "schema": {
    "properties": {
      "query": {
        "type": "string",
        "title": "Query",
        "description": "The Datadog query used to retrieve this metric"
      },
      "series": {
        "type": "array",
        "title": "Series",
        "description": "Array containing detailed information about the metric series"
      },
      "res_type": {
        "type": "string",
        "title": "Response Type",
        "description": "The type of response from the Datadog API"
      },
      "from_date": {
        "type": "string",
        "format": "date-time",
        "title": "From Date",
        "description": "Unix timestamp of the start of the queried time period"
      },
      "to_date": {
        "type": "string",
        "format": "date-time",
        "title": "To Date",
        "description": "Unix timestamp of the end of the queried time period"
      },
      "env": {
        "type": "string",
        "title": "Environment",
        "description": "The environment of the service"
      }
    },
    "required": []
  },
  "mirrorProperties": {},
  "calculationProperties": {},
  "relations": {
    "service": {
      "title": "Service",
      "description": "The service associated with this query",
      "target": "datadogService",
      "required": false,
      "many": false
    }
  }
}
Integration configuration
The datadogSelector section within each serviceMetric resource demonstrates how to fetch multiple metrics (e.g., system.mem.used, system.disk.used) from Datadog with a variety of filters. You can control the:
- Metric: Specify the exact metric name (e.g.,
avg:system.mem.used) - Environment: Filter by specific environments (e.g.,
prod, or use*for all) - Service: Filter by specific services in your datadog service catalog (use
*for all) - Timeframe: Define the time range for data retrieval (in minutes)
This configuration allows you to tailor your data fetching to specific needs and scenarios.
Note: The env and service filters let you specify custom tag names in your Datadog account. For example, your service tag could be servicename, and your environment tag could be envt or environment.
createMissingRelatedEntities: true
deleteDependentEntities: true
resources:
  - kind: serviceMetric
    selector:
      query: "true"
      datadogSelector:
        metric: "avg:system.mem.used"
        env:
          tag: env
          value: "*"
        service:
          tag: servicename
          value: "*"
        timeframe: 10
    port:
      entity:
        mappings:
          blueprint: '"datadogServiceMetric"'
          identifier: .__query_id
          title: .query
          properties:
            query: .__query
            series: .series
            res_type: .res_type
            from_date: ".from_date / 1000 | todate"
            to_date: ".to_date / 1000 | todate"
            env: .__env
          relations:
            service: .__service
  - kind: serviceMetric
    selector:
      query: "true"
      datadogSelector:
        metric: "avg:system.disk.used"
        env:
          tag: env
          value: "prod"
        service:
          tag: servicename
          value: "*"
        timeframe: 5
    port:
      entity:
        mappings:
          blueprint: '"datadogServiceMetric"'
          identifier: .__query_id
          title: .query
          properties:
            query: .__query
            series: .series
            res_type: .res_type
            from_date: ".from_date / 1000 | todate"
            to_date: ".to_date / 1000 | todate"
            env: .__env
          relations:
            service: .__service
Based on the best practices for tagging infrastructure, the default JQ maps service metrics to services using tags that starts with the service keyword
Let's Test It
This section includes a sample response data from Datadog. In addition, it includes the entity created from the resync event based on the Ocean configuration provided in the previous section.
Payload
Here is an example of the payload structure from Datadog:
Monitor response data
{
  "id":15173866,
  "org_id":1000147697,
  "type":"query alert",
  "name":"A change @webhook-PORT",
  "message":"A change has happened",
  "tags":[
    "app:webserver"
  ],
  "query":"change(avg(last_5m),last_1h):avg:datadog.agent.running{local} by {version,host} > 40",
  "options":{
    "thresholds":{
        "critical":40.0,
        "warning":30.0
    },
    "notify_audit":false,
    "include_tags":true,
    "new_group_delay":60,
    "notify_no_data":false,
    "timeout_h":0,
    "silenced":{

    }
  },
  "multi":true,
  "created_at":1706707941000,
  "created":"2024-01-31T13:32:21.270116+00:00",
  "modified":"2024-02-02T16:31:40.516062+00:00",
  "deleted":"None"[
    "REDACTED"
  ],
  "restricted_roles":"None"[
    "REDACTED"
  ],
  "priority":5,
  "overall_state_modified":"2024-03-08T20:52:46+00:00",
  "overall_state":"No Data",
  "creator":{
    "name":"John Doe",
    "email":"john.doe@gmail.com",
    "handle":"john.doe@gmail.com",
    "id":1001199545
  },
  "matching_downtimes":[

  ]
}
Service response data
{
   "type":"service-definition",
   "id":"04fbab48-a233-4592-8c53-d1bfe282e6c3",
   "attributes":{
      "meta":{
         "last-modified-time":"2024-05-29T10:31:06.833444245Z",
         "github-html-url":"",
         "ingestion-source":"api",
         "origin":"unknown",
         "origin-detail":"",
         "warnings":[
            {
               "keyword-location":"/properties/integrations/properties/opsgenie/properties/service-url/pattern",
               "instance-location":"/integrations/opsgenie/service-url",
               "message":"does not match pattern '^(https?://)?[a-zA-Z\\\\d_\\\\-.]+\\\\.opsgenie\\\\.com/service/([a-zA-Z\\\\d_\\\\-]+)/?$'"
            },
            {
               "keyword-location":"/properties/integrations/properties/pagerduty/properties/service-url/pattern",
               "instance-location":"/integrations/pagerduty/service-url",
               "message":"does not match pattern '^(https?://)?[a-zA-Z\\\\d_\\\\-.]+\\\\.pagerduty\\\\.com/service-directory/(P[a-zA-Z\\\\d_\\\\-]+)/?$'"
            }
         ],
         "ingested-schema-version":"v2.1"
      },
      "schema":{
         "schema-version":"v2.2",
         "dd-service":"inventory-management",
         "team":"Inventory Management Team",
         "application":"Inventory System",
         "tier":"Tier 1",
         "description":"Service for managing product inventory and stock levels.",
         "lifecycle":"production",
         "contacts":[
            {
               "name":"Inventory Team",
               "type":"email",
               "contact":"inventory-team@example.com"
            },
            {
               "name":"Warehouse Support",
               "type":"email",
               "contact":"warehouse-support@example.com"
            }
         ],
         "links":[
            {
               "name":"Repository",
               "type":"repo",
               "provider":"GitHub",
               "url":"https://github.com/example/inventory-service"
            },
            {
               "name":"Runbook",
               "type":"runbook",
               "provider":"Confluence",
               "url":"https://wiki.example.com/runbooks/inventory-service"
            }
         ],
         "tags":[
            "inventory",
            "stock"
         ],
         "integrations":{
            "pagerduty":{
               "service-url":"https://pagerduty.com/services/inventory"
            },
            "opsgenie":{
               "service-url":"https://opsgenie.com/services/inventory",
               "region":"US"
            }
         },
         "extensions":{
            "qui_6":{

            }
         }
      }
    }
  }
}
SLO response data
{
   "id":"b6869ae6189d59baa421feb8b437fe9e",
   "name":"Availability SLO for shopping-cart service",
   "tags":[
      "service:shopping-cart",
      "env:none"
   ],
   "monitor_tags":[

   ],
   "thresholds":[
      {
         "timeframe":"7d",
         "target":99.9,
         "target_display":"99.9"
      }
   ],
   "type":"monitor",
   "type_id":0,
   "description":"This SLO tracks the availability of the shopping-cart service. Availability is measured as the number of successful requests divided by the number of total requests for the service",
   "timeframe":"7d",
   "target_threshold":99.9,
   "monitor_ids":[
      15173866,
      15216083,
      15254771
   ],
   "creator":{
      "name":"John Doe",
      "handle":"john.doe@gmail.com",
      "email":"john.doe@gmail.com"
   },
   "created_at":1707215619,
   "modified_at":1707215619
}
SLO history response data
{
  "thresholds": {
    "7d": {
      "timeframe": "7d",
      "target": 99,
      "target_display": "99."
    }
  },
  "from_ts": 1719254776,
  "to_ts": 1719859576,
  "type": "monitor",
  "type_id": 0,
  "slo": {
    "id": "5ec82408e83c54b4b5b2574ee428a26c",
    "name": "Host {{host.name}} with IP {{host.ip}} is not having enough memory",
    "tags": [
      "p69hx03",
      "pages-laptop"
    ],
    "monitor_tags": [],
    "thresholds": [
      {
        "timeframe": "7d",
        "target": 99,
        "target_display": "99."
      }
    ],
    "type": "monitor",
    "type_id": 0,
    "description": "Testing SLOs from DataDog",
    "timeframe": "7d",
    "target_threshold": 99,
    "monitor_ids": [
      147793
    ],
    "creator": {
      "name": "John Doe",
      "handle": "janesmith@gmail.com",
      "email": "janesmith@gmail.com"
    },
    "created_at": 1683878238,
    "modified_at": 1684773765
  },
  "overall": {
    "name": "Host {{host.name}} with IP {{host.ip}} is not having enough memory",
    "preview": false,
    "monitor_type": "query alert",
    "monitor_modified": 1683815332,
    "errors": null,
    "span_precision": 2,
    "history": [
      [
        1714596313,
        1
      ]
    ],
    "uptime": 3,
    "sli_value": 10,
    "precision": {
      "custom": 2,
      "7d": 2
    },
    "corrections": [],
    "state": "breached"
  }
}
Service metric response data
The Datadog response is enriched with a variety of metadata fields, including:
__service: The name or identifier of the service generating the data.__query_id: A unique identifier for the query that generated the data.__query: The original query used to retrieve the data.__env: The environment associated with the data (e.g., production, staging).
This enrichment significantly enhances the usability of the Datadog response by providing valuable context and facilitating easier analysis and troubleshooting.
{
  "status": "ok",
  "res_type": "time_series",
  "resp_version": 1,
  "query": "avg:system.mem.used{service:inventory-management,env:staging}",
  "from_date": 1723796537000,
  "to_date": 1723797137000,
  "series": [
    {
      "unit": [
        {
          "family": "bytes",
          "id": 2,
          "name": "byte",
          "short_name": "B",
          "plural": "bytes",
          "scale_factor": 1.0
        }
      ],
      "query_index": 0,
      "aggr": "avg",
      "metric": "system.mem.used",
      "tag_set": [],
      "expression": "avg:system.mem.used{env:staging,service:inventory-management}",
      "scope": "env:staging,service:inventory-management",
      "interval": 2,
      "length": 39,
      "start": 1723796546000,
      "end": 1723797117000,
      "pointlist": [
        [1723796546000.0, 528986112.0],
        [1723796562000.0, 531886080.0],
        [1723796576000.0, 528867328.0],
        [1723796592000.0, 522272768.0],
        [1723796606000.0, 533704704.0],
        [1723796846000.0, 533028864.0],
        [1723796862000.0, 527417344.0],
        [1723796876000.0, 531513344.0],
        [1723796892000.0, 533577728.0],
        [1723796906000.0, 533471232.0],
        [1723796922000.0, 528125952.0],
        [1723796936000.0, 530542592.0],
        [1723796952000.0, 530767872.0],
        [1723796966000.0, 526966784.0],
        [1723796982000.0, 528560128.0],
        [1723796996000.0, 530792448.0],
        [1723797012000.0, 527384576.0],
        [1723797026000.0, 529534976.0],
        [1723797042000.0, 521650176.0],
        [1723797056000.0, 531001344.0],
        [1723797072000.0, 525955072.0],
        [1723797086000.0, 529469440.0],
        [1723797102000.0, 532279296.0],
        [1723797116000.0, 526979072.0]
      ],
      "display_name": "system.mem.used",
      "attributes": {}
    }
  ],
  "values": [],
  "times": [],
  "message": "",
  "group_by": [],
  "__service": "inventory-management",
  "__query_id": "avg:system.mem.used/service:inventory-management/env:staging",
  "__query": "avg:system.mem.used",
  "__env": "staging"
}
Mapping Result
The combination of the sample payload and the Ocean configuration generates the following Port entity:
Monitor entity in Port
{
  "identifier": "15173866",
  "title": "A change @webhook-PORT",
  "icon": "Datadog",
  "blueprint": "datadogMonitor",
  "team": [],
  "properties": {
    "tags": [
      "app:webserver"
    ],
    "overallState": "No Data",
    "priority": "5",
    "createdAt": "2024-01-31T13:32:21.270116+00:00",
    "updatedAt": "2024-02-02T16:31:40.516062+00:00",
    "createdBy": "john.doe@gmail.com",
    "monitorType": "query alert"
  },
  "relations": {},
  "createdAt": "2024-05-29T09:43:34.750Z",
  "createdBy": "<port-client-id>",
  "updatedAt": "2024-05-29T09:43:34.750Z",
  "updatedBy": "<port-client-id>"
}
Service entity in Port
{
  "identifier": "inventory-management",
  "title": "inventory-management",
  "icon": "Datadog",
  "blueprint": "datadogService",
  "team": [],
  "properties": {
    "owners": [
      "inventory-team@example.com",
      "warehouse-support@example.com"
    ],
    "links": [
      "https://github.com/example/inventory-service",
      "https://wiki.example.com/runbooks/inventory-service"
    ],
    "description": "Service for managing product inventory and stock levels.",
    "tags": [
      "inventory",
      "stock"
    ],
    "application": "Inventory System"
  },
  "relations": {},
  "createdAt": "2024-05-29T10:31:44.283Z",
  "createdBy": "<port-client-id>",
  "updatedAt": "2024-05-29T10:31:44.283Z",
  "updatedBy": "<port-client-id>"
}
SLO entity in Port
{
  "identifier": "b6869ae6189d59baa421feb8b437fe9e",
  "title": "Availability SLO for shopping-cart service",
  "icon": "Datadog",
  "blueprint": "datadogSlo",
  "team": [],
  "properties": {
    "description": "This SLO tracks the availability of the shopping-cart service. Availability is measured as the number of successful requests divided by the number of total requests for the service",
    "updatedAt": "2024-02-06T10:33:39Z",
    "createdBy": "ahosea15@gmail.com",
    "sloType": "monitor",
    "targetThreshold": "99.9",
    "tags": [
      "service:shopping-cart",
      "env:none"
    ],
    "createdAt": "2024-02-06T10:33:39Z"
  },
  "relations": {
    "monitors": [
      "15173866",
      "15216083",
      "15254771"
    ],
    "services": [
      "shopping-cart"
    ]
  },
  "createdAt": "2024-05-29T09:43:51.946Z",
  "createdBy": "<port-client-id>",
  "updatedAt": "2024-05-29T12:02:01.559Z",
  "updatedBy": "<port-client-id>"
}
SLO history entity in Port
{
  "identifier": "5ec82408e83c54b4b5b2574ee428a26c",
  "title": "Host {{host.name}} with IP {{host.ip}} is not having enough memory",
  "icon": "Datadog",
  "blueprint": "datadogSloHistory",
  "team": [],
  "properties": {
    "sampling_end_date": "2024-07-01T18:46:16Z",
    "sliValue": 10,
    "sampling_start_date": "2024-06-24T18:46:16Z"
  },
  "relations": {
    "slo": "5ec82408e83c54b4b5b2574ee428a26c"
  },
  "createdAt": "2024-07-01T09:43:51.946Z",
  "createdBy": "<port-client-id>",
  "updatedAt": "2024-07-01T12:02:01.559Z",
  "updatedBy": "<port-client-id>"
}
Service metric entity in Port
{
  "identifier": "avg:system.disk.used/service:inventory-management/env:prod",
  "title": "avg:system.disk.used{service:inventory-management,env:prod}",
  "icon": null,
  "blueprint": "datadogServiceMetric",
  "team": [],
  "properties": {
    "query": "avg:system.disk.used",
    "series": [],
    "res_type": "time_series",
    "from_date": "2024-08-16T07:32:00Z",
    "to_date": "2024-08-16T08:02:00Z",
    "env": "prod"
  },
  "relations": {
    "service": "inventory-management"
  },
  "createdAt": "2024-08-15T15:54:36.638Z",
  "createdBy": "<port-client-id>",
  "updatedAt": "2024-08-16T08:02:02.399Z",
  "updatedBy": "<port-client-id>"
}
Alternative installation via webhook
While the Ocean integration described above is the recommended installation method, you may prefer to use a webhook to ingest data from Datadog. If so, follow this guide.