GitLab SaaS
If you use the cloud (SaaS) version of GitLab in your organization, the simplest way to trigger your pipelines from Port is to use the webhook backend.
GitLab allows you to create webhooks URLs that can be triggered from external services, such as Port, causing a pipeline to run in your GitLab project.
Configure the backend
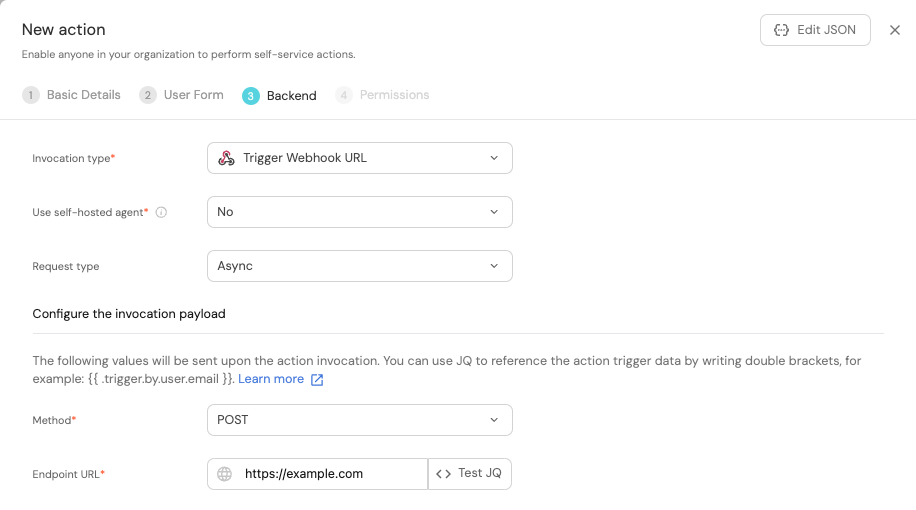
Choose Trigger Webhook URL as the backend type when creating a new self-service action or automation.
When using the webhook backend, you need to configure several parameters:

- Since we are using GitLab SaaS, the
Use self-hosted agentoption should be set toNo. - Read about the
Request typein the webhook backend page. - The
Methodfield should be set toPOST. - The
Endpoint URLfield should be filled with the webhook URL you create in GitLab (see below).
If you wish to create a self-service action or automation via Port's API, choose the webhook backend type under the invocationMethod object.
Create the webhook URL
A webhook URL used to trigger a pipeline in GitLab looks like this:
https://gitlab.com/api/v4/projects/{GITLAB_PROJECT_ID}/ref/main/trigger/pipeline?token={GITLAB_TRIGGER_TOKEN}
As you can see, there are two parameters that need to be filled in:
-
{GITLAB_PROJECT_ID}- The ID of the GitLab project containing your pipeline file.
To obtain the project ID, navigate to your project in GitLab, click on the⋮button in the top right corner, and selectCopy project ID. -
{GITLAB_TRIGGER_TOKEN}- The token used to authenticate the request.To create a new trigger token, follow these steps:
- Navigate to your GitLab project page.
- Go to
Settings->CI/CD. - Expand
Pipeline trigger tokens. - Select
Add new token. - Add a description and click
Create pipeline trigger token.
Note: You must have (at least) the
Maintainerrole in the project to create a new trigger token.
Webhook security
For increased security, you can validate the webhook signature.
Configure the payload
The payload is the data sent to the webhook URL every time the action/automation is executed. It is defined by the action/automation creator and can include any data that is needed by the GitLab pipeline.
When using the webhook backend, the payload is defined under the headers and body fields.
- For more information about defining a payload for self-service actions, click here.
- For more information about defining a payload for automations, click here.
Examples
For guides and examples of self-service actions using a GitLab pipeline as the backend, check out the guides section.