Falco Sidekick
In this example you are going to create a webhook integration between Falco Sidekick and Port, which will ingest alert entities.
Port configuration
Create the following blueprint definition:
Alert blueprint
{
  "identifier": "falco_alert",
  "title": "Falco Alert",
  "icon": "Alert",
  "schema": {
    "properties": {
      "priority": {
        "title": "Priority",
        "type": "string"
      },
      "output": {
        "title": "Output",
        "type": "string"
      },
      "rule": {
        "title": "Rule",
        "type": "string"
      },
      "time": {
        "title": "Time",
        "type": "string",
        "format": "date-time"
      },
      "source": {
        "title": "Source",
        "type": "string"
      },
      "tags": {
        "title": "Tags",
        "type": "array"
      },
      "output_field": {
        "title": "Output Field",
        "type": "object"
      },
      "hostname": {
        "title": "Hostname",
        "type": "string"
      }
    },
    "required": []
  },
  "mirrorProperties": {},
  "calculationProperties": {},
  "aggregationProperties": {},
  "relations": {}
}
Create the following webhook configuration using Port's UI
Alert webhook configuration
-
Basic details tab - fill the following details:
- Title :
Falco Alert Mapper; - Identifier :
falco_alert_mapper; - Description :
A webhook configuration to map Falco sidekicks alerts to Port; - Icon :
Alert;
- Title :
-
Integration configuration tab - fill the following JQ mapping:
[
  {
    "blueprint": "falco_alert",
    "filter": "true",
    "entity": {
      "identifier": ".body.hostname + \"-\" + .body.time | tostring",
      "title": ".body.hostname + \"-\" + .body.time | tostring",
      "properties": {
        "priority": ".body.priority",
        "rule": ".body.rule",
        "time": ".body.time",
        "source": ".body.source",
        "tags": ".body.tags",
        "hostname": ".body.hostname",
        "output_field": ".body.output_fields",
        "output": ".body.output"
      }
    }
  }
] -
Click Save at the bottom of the page.
Configure Falco Sidekick to send webhook
-
If you're using Falcosidekick with Docker, use the following command for installation. Replace
YOUR_WEBHOOK_URLwith the value of theurlkey you received after creating the webhook configuration;docker run -d -p 2801:2801 -e WEBHOOK_ADDRESS=YOUR_WEBHOOK_URL falcosecurity/falcosidekick -
If you prefer installing Falcosidekick with Helm, follow these steps:
- Add the webhook configuration to your config.yaml file, replacing
YOUR_WEBHOOK_URLwith the actual URL from the webhook setup.
Example configuration file
webhook:
address: YOUR_WEBHOOK_URL- Install or upgrade the Helm chart with the following commands:
helm repo add falcosecurity https://falcosecurity.github.io/charts
helm repo update

helm install falco --config-file=config.yaml falcosecurity/falco - Add the webhook configuration to your config.yaml file, replacing
Done! Any change that happens to your alerts in your server will trigger a webhook event to the webhook URL provided by Port. Port will parse the events according to the mapping and update the catalog entities accordingly.
Let's Test It
This section includes a sample response data from Dynatrace. In addition, it includes the entity created from the resync event based on the Ocean configuration provided in the previous section.
Payload
Here is an example of the payload structure from Dynatrace:
Problem response data
{
  "affectedEntities": [
    {
      "entityId": {
        "id": "string",
        "type": "string"
      },
      "name": "string"
    }
  ],
  "displayId": "string",
  "endTime": 1574697669865,
  "entityTags": [
    {
      "context": "CONTEXTLESS",
      "key": "architecture",
      "stringRepresentation": "architecture:x86",
      "value": "x86"
    },
    {
      "context": "ENVIRONMENT",
      "key": "Infrastructure",
      "stringRepresentation": "[ENVIRONMENT]Infrastructure:Linux",
      "value": "Linux"
    }
  ],
  "evidenceDetails": {
    "details": [
      {
        "displayName": "Availability evidence",
        "entity": {},
        "evidenceType": "AVAILABILITY_EVIDENCE",
        "groupingEntity": {},
        "rootCauseRelevant": true,
        "startTime": 1
      },
      {
        "displayName": "User action evidence",
        "entity": {},
        "evidenceType": "USER_ACTION_EVIDENCE",
        "groupingEntity": {},
        "rootCauseRelevant": true,
        "startTime": 1
      }
    ],
    "totalCount": 1
  },
  "impactAnalysis": {
    "impacts": [
      {
        "estimatedAffectedUsers": 1,
        "impactType": "APPLICATION",
        "impactedEntity": {}
      }
    ]
  },
  "impactLevel": "APPLICATION",
  "impactedEntities": [{}],
  "linkedProblemInfo": {
    "displayId": "string",
    "problemId": "string"
  },
  "managementZones": [
    {
      "id": "string",
      "name": "HOST"
    }
  ],
  "problemFilters": [
    {
      "id": "E2A930951",
      "name": "BASELINE"
    }
  ],
  "problemId": "06F288EE2A930951",
  "recentComments": {
    "comments": [
      {
        "authorName": "string",
        "content": "string",
        "context": "string",
        "createdAtTimestamp": 1,
        "id": "string"
      }
    ],
    "nextPageKey": "AQAAABQBAAAABQ==",
    "pageSize": 1,
    "totalCount": 1
  },
  "rootCauseEntity": {},
  "severityLevel": "AVAILABILITY",
  "startTime": 1574697667547,
  "status": "CLOSED",
  "title": "title"
}
Mapping Result
The combination of the sample payload and the Ocean configuration generates the following Port entity:
Problem entity in Port
{
  "identifier": "06F288EE2A930951",
  "title": "title",
  "blueprint": "dynatraceProblem",
  "team": [],
  "icon": "Dynatrace",
  "properties": {
    "entityTags": ["architecture:x86", "[ENVIRONMENT]Infrastructure:Linux"],
    "evidenceDetails": ["Availability evidence", "User action evidence"],
    "managementZones": ["HOST"],
    "problemFilters": ["BASELINE"],
    "severityLevel": "AVAILABILITY",
    "status": "CLOSED",
    "startTime": "2019-11-25T14:14:27Z",
    "endTime": "2020-04-30T14:52:41Z"
  },
  "relations": {
    "impactedEntities": ["HOST-06F288EE2A930951"],
    "linkedProblemInfo": "06F288EE2A930951",
    "rootCauseEntity": "HOST-06F288EE2A930951"
  },
  "createdAt": "2024-2-6T09:30:57.924Z",
  "createdBy": "hBx3VFZjqgLPEoQLp7POx5XaoB0cgsxW",
  "updatedAt": "2024-2-6T11:49:20.881Z",
  "updatedBy": "hBx3VFZjqgLPEoQLp7POx5XaoB0cgsxW"
}
Connect Falco Alerts to a Namespace
This guide aims to cover how to connect a Falco alert to an existing Namespace in Port using tags.
This guide assumes:
- You have a Port account and that you have finished the onboarding process.
- You have K8 exporters installed and configured in your environment. We will use the
Namespaceblueprint from the guide. - You have Falco installed and configured in your environment.
Add namespace to alerts in Falco
Adding namespaces via tags to alerts in Falco allows you to categorize and filter them. You can use namespaces to group alerts that are related to a specific Kubernetes Namespace in Port. In this guide, we will add a namespace to tell us what namespace the alert is tied to:
- Log in to your server instance using methods available to you: SSH, Docker Exec,
docker compose run <bash/sh>, etc. - With necessary permissions and using your favourite editor (Vim, Nano, Emacs), open the YAML file where your Falco Rules are defined. It is usually
/etc/falco/falco_rules.yaml. - Navigate to the rule object you are interested in.
- Navigate to the
tagskey to add a tag that represents the namespace - Add a tag that represents the Namespace the alert related to,
port-auth-namespace. For this guide, let's assume there is a namespace entity identified byauth-namespacein yourNamespaceblueprint in Port. - Save the file
/etc/falco/falco_rules.yaml (click to expand)
- rule: Fileless execution via memfd_create
  desc: >
    Detect if a binary is executed from memory using the memfd_create technique. This is a well-known defense evasion
    technique for executing malware on a victim machine without storing the payload on disk and to avoid leaving traces
    about what has been executed. Adopters can whitelist processes that may use fileless execution for benign purposes
    by adding items to the list known_memfd_execution_processes.
  condition: >
    spawned_process
    and proc.is_exe_from_memfd=true
    and not known_memfd_execution_processes
  output: Fileless execution via memfd_create (container_start_ts=%container.start_ts proc_cwd=%proc.cwd evt_res=%evt.res proc_sname=%proc.sname gparent=%proc.aname[2] evt_type=%evt.type user=%user.name user_uid=%user.uid user_loginuid=%user.loginuid process=%proc.name proc_exepath=%proc.exepath parent=%proc.pname command=%proc.cmdline terminal=%proc.tty exe_flags=%evt.arg.flags %container.info)
  priority: CRITICAL
  tags: [maturity_stable, host, container, process, mitre_defense_evasion, T1620, port-auth-namespace]
The Falco Rule will likely already have several tags, we ensure we are able to control how these tags are related to the Namespace blueprint. To do this, we prefix the tag name with the keyword port-. With JQ, we can then select the first tag starting with this keyword (Alerts are not supposed to belong to more than one namespace). Hence the name of our example tag being, port-auth-namespace which will correspond to a Namespace entity identified by auth-namespace in Port.
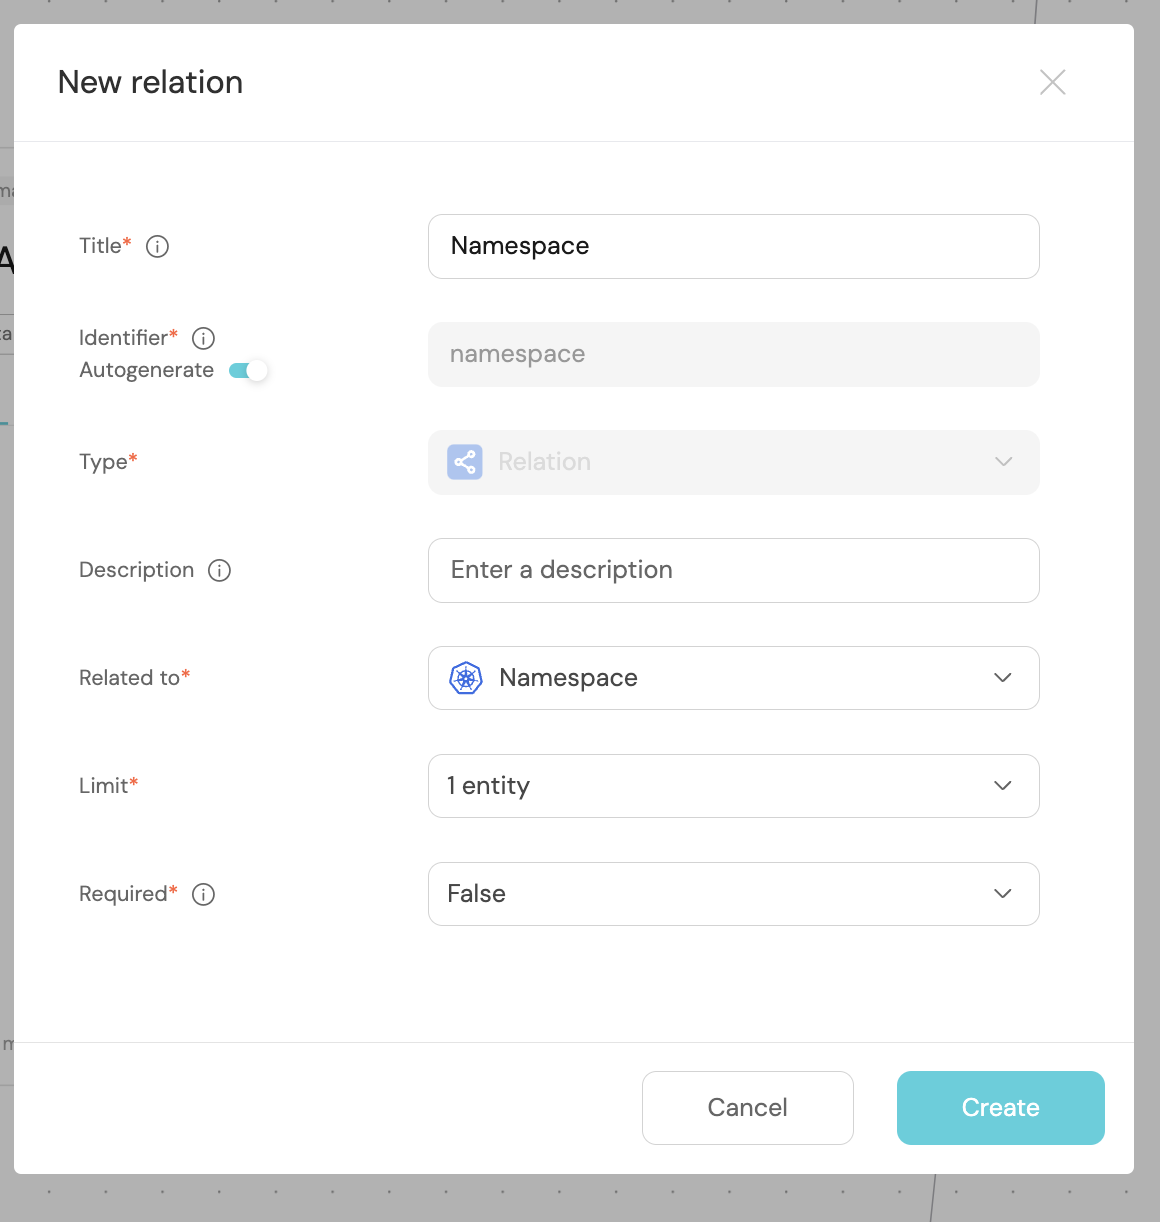
Create the service relation
Now that Port is synced with our Falco Alerts, let's reflect the Alert in our resources to display the alert associated with a Namespace. First, we will need to create a relation between our Alert and the corresponding Namespace.
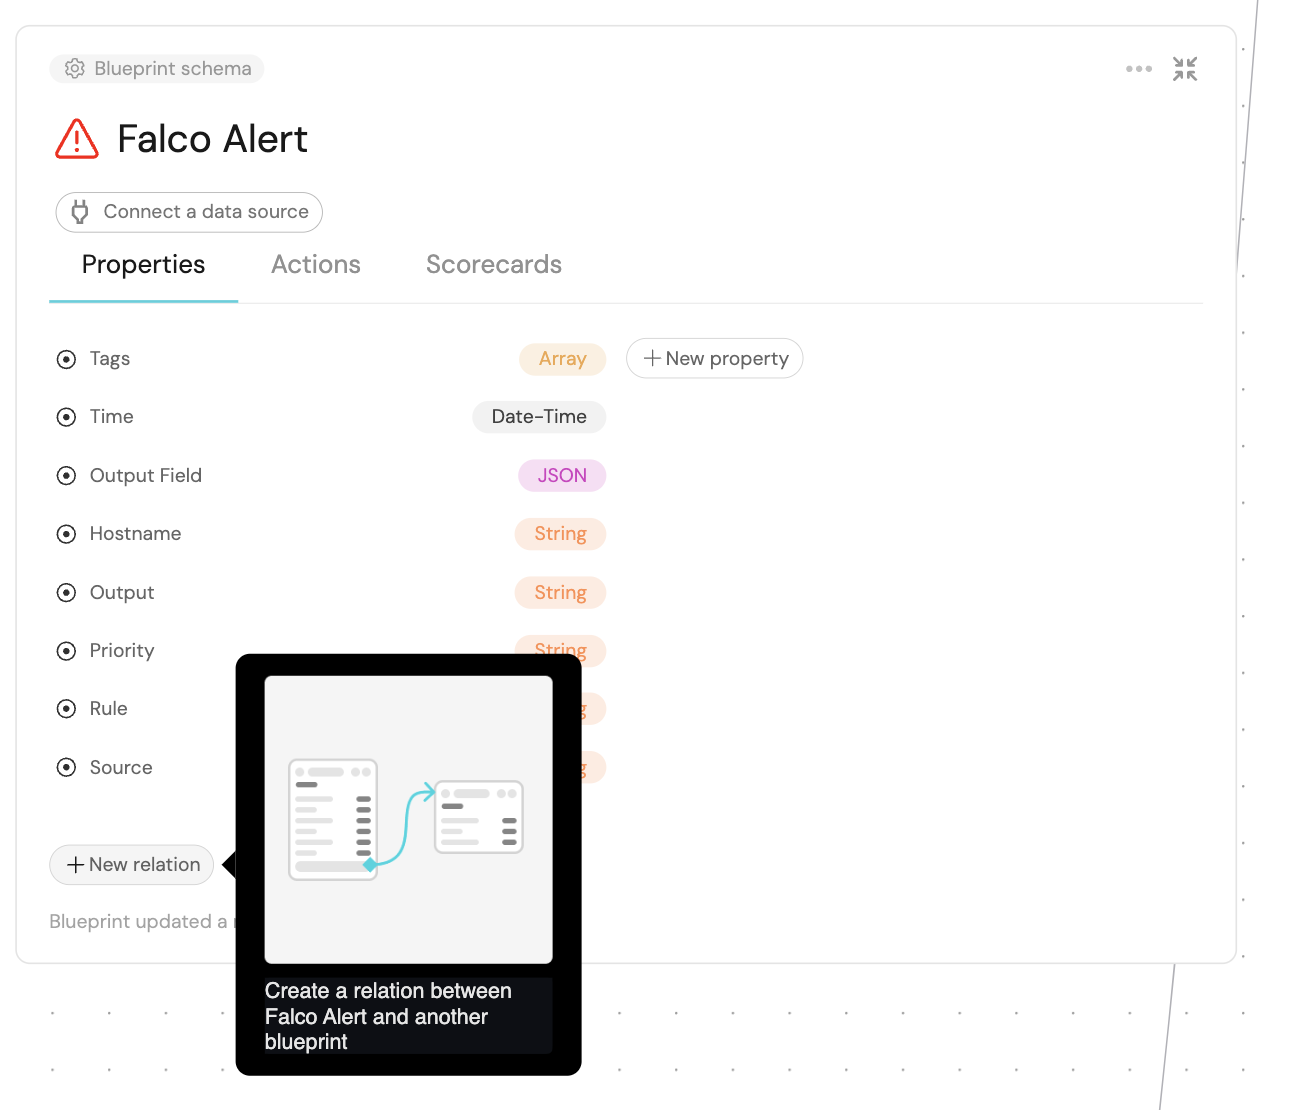
- Fill out the form like this, then click
Create:
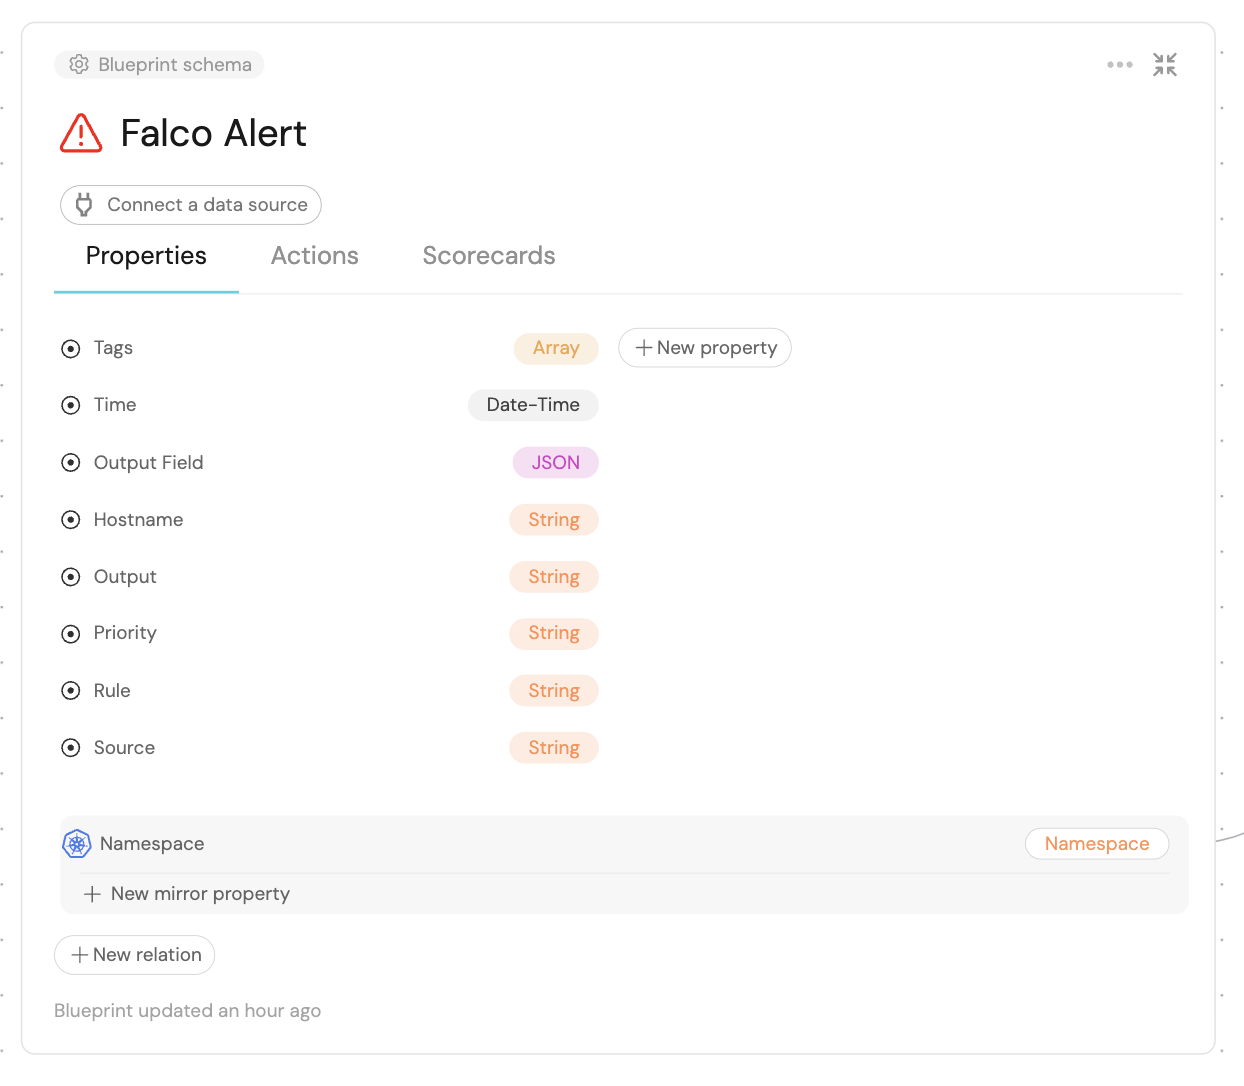
The blueprint should look like so after the creation:
Now that the blueprints are related, we need to assign the relevant Falco to their respective namespaces. This can be done by adding some mapping logic. Go to your data sources page, and click on Falco Alert:

Under the Mapping tab, modify the mapping at the Map the data from the external system into Port section by replacing the content with the following block, and click Save:
JQ mapping (Click to expand)
[
  {
    "blueprint": "falco_alert",
    "filter": "true",
    "entity": {
      "identifier": ".body.hostname + \"-\" + .body.time | tostring",
      "title": ".body.hostname + \"-\" + .body.time | tostring",
      "properties": {
        "priority": ".body.priority",
        "rule": ".body.rule",
        "time": ".body.time",
        "source": ".body.source",
        "tags": ".body.tags",
        "hostname": ".body.hostname",
        "output_field": ".body.output_fields",
        "output": ".body.output",
      },
      "relations": {
         "namespace": ".tags | map(select(startswith(\"port\"))) | map(sub(\"port-\"; \"\"; \"g\")) | .[0]"
      }
    }
  }
]
The JQ below selects all tags that start with the keyword port. It then removes "port-" from each tag, leaving only the part that comes after it. It then selects the first match, which is equivalent to the namespace in Port.
service: .fields.labels | map(select(startswith("port"))) | map(sub("port-"; ""; "g")) | .[0]
What we just did was map the Falco Alert to the relation between it and our Namespaces.
Now, if our Namespace identifier is equal to the Falco Alert tag, the namespace will be automatically linked to it 🎉
Conclusion
By following these steps, you can seamlessly connect a Falco Alert to an existing namespace blueprint in Port using tags.
More relevant guides and examples: