Setup backend
A self-service action's backend is the logic that runs when the action is triggered. The implementation of the backend is done by you, using one of the various backend types that Port supports.
Port uses the same backend types and configurations for both self-service actions and automations, so any backend option available for self-service actions can be used in automations as well.
Define the backend
The action's backend is defined under the Backend tab of the action creation form in Port's UI.
Let's break the definition down to two parts:
Define your backend's type and metadata
In this section we provide information about the backend logic and its location, so that Port can access and run it.
Port uses the same backend types for both self-service actions and automations.
For more information and examples for the available backend types, check out the Backend types page.
Here is an example of a Github workflow backend configuration:
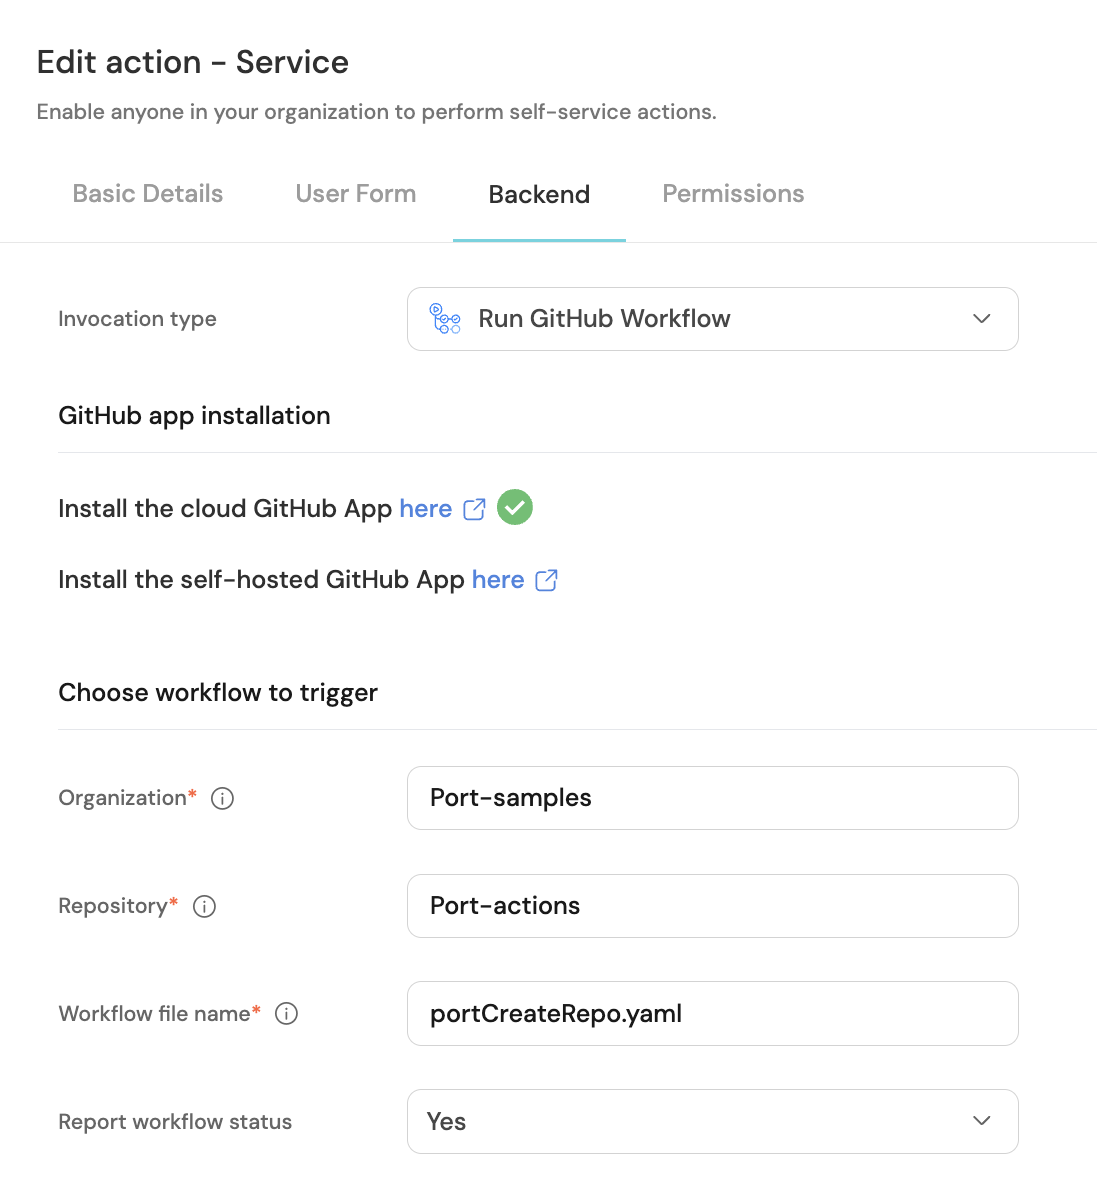
Depending on the backend type you choose, you will need to provide different configuration parameters.
Define the action's payload
When creating a self-service action or automation, you can construct a JSON payload that will be sent to your backend upon every execution. You can use this to send data about the action that you want your backend to have.
Still in the Backend tab, scroll down to the Configure the invocation payload section. This is where we define the action's payload.
The payload is defined using JSON, and accessing your data is done using jq, wrapping each expression with {{ }}.
For example, say we have an action with one user input that is the user's name. The following payload definition will send the name provided by the executor to the backend upon every execution:
{
  "user_name": "{{ .inputs.user_name }}",
  "port_context": {
    "run_id": "{{ .run.id }}"
  }
}
You may have noticed that the example above also sends {{ .run.id }}. This is a unique identifier for each execution of the action, and can be used to interact with the action run in Port from your backend.
Now you might be thinking - how do I know what data is available to me when constructing the payload?
Enter trigger data.
Trigger data
When a self-service action or automation is executed, Port creates an object that contains data about the execution.
This entire object is accessible to you when constructing the payload.
Here is an example of what trigger data could look like for a self-service action that scaffolds a new microservice:
{
  // The action's user inputs
  "inputs": {
    "microservice_name": "string",
    "microservice_description": "string",
    "language": "string",
    "version": "string",
    "core": "string",
    "features": "string"
  },
  "trigger": {
    "by": {
      "orgId": "<Your organization's id>",
      "userId": "<Executing user's id>",
      "user": {
        "email": "<Executing user's email>",
        "firstName": "<Executing user's firstName>",
        "lastName": "<Executing user's lastName>",
        "phoneNumber": "<Executing user's phoneNumber>",
        "picture": "",
        "providers": [],
        "status": "ACTIVE",
        "id": "<Executing user's id>",
        "createdAt": "2024-06-06T05:21:00.565Z",
        "updatedAt": "2024-06-06T05:21:00.565Z"
      }
    },
    "origin": "UI",
    "at": "2024-06-06T05:21:00.565Z",
    "operation": "CREATE"
  },
  "event": null,
  "entity": {},
  "action": {
    "identifier": "Microservice_scaffold_a_microservice",
    "blueprint": "Microservice",
    "encryptedProperties": []
  },
  "run": {
    "id": "<The current run's id>"
  }
}
You can access any value in this structure and add it to the payload. For example, to add the executing user's name to the payload, you can use the following expression:
{
  "executing_user_email": "{{.trigger.by.user.email}}"
}
Use the Test JQ button in the bottom-left corner to test your expressions against your action and ensure you are sending the correct data.
You can use the jq expression {{ . }} when testing to see the entire available object, and then drill down to the specific data you need.
Using secrets in the payload
Sensitive data such as tokens and passwords can be stored using Port secrets.
To use a secret in the payload, you can reference it using {{ .secrets.<secret_name> }}.
For example:
"token": "{{ .secrets.token_name }}"
spreadValue() function
You can use the spreadValue() function to add multiple keys to the root of the payload at once. This function will spread all of the keys under a given object.
A common use case for this function is to add all of the user inputs to the payload:
{
  "{{ spreadValue() }}": "{{ .inputs }}"
}
This will add all of the action's user inputs to the root of the payload, so that they can be accessed directly by your backend.
Using jq expressions in keys
The keys in the payload can also be jq expressions.
For example, the following expression will add the ref key to the payload only if a ref input was provided when executing the action:
{
  "{{if (.inputs | has(\"ref\")) then \"ref\" else null end}}": "{{.inputs.ref}}"
}
Note that if a key in the payload evaluates to null for any reason, the entire expression (key + value) will be omitted from the payload.
JSON structure
In some cases, you may prefer to define the backend configuration using a JSON object.
The backend is defined under the invocationMethod object in the action's JSON structure.
The type field defines the action's backend type, and can have one of the following values: WEBHOOK, GITHUB, GITLAB, KAFKA, UPSERT_ENTITY.
Depending on the backend type you choose, the available fields will be different:
- Webhook
- Github
- Gitlab
- Azure DevOps
- Kafka
- Create/update entity
invocationMethod.type should be set to WEBHOOK.
| Field | Type | Description | Example values |
|---|---|---|---|
agent | boolean | Defines whether to use Port Agent for execution or not. | true or false |
url | string | Defines the webhook URL to which Port will send the action via an HTTP POST request. | https://example.com |
method | string | Defines the HTTP method to be used for the request. | POST, PUT, DELETE, PATCH |
synchronized | boolean | If true, the action will be executed synchronously. | true or false |
headers | object | An object containing the payload headers to be sent to the webhook in each execution, in "key":"value" pairs. | |
body | object | Defines the payload that will be sent to the backend upon execution of the action. An object containing "key":"value" pairs. |
invocationMethod.type should be set to GITHUB.
| Field | Type | Description | Example values |
|---|---|---|---|
org | string | The GitHub organization name. | port-labs |
repo | string | The GitHub repository name. | port-docs |
workflow | string | Defines the GitHub workflow ID to run (You can also pass the workflow file name as a string). | workflow.yml |
reportWorkflowStatus | boolean | A flag to control whether to automatically update the Port run object status (SUCCESS/FAILURE) at the end of the workflow (default: true). | true or false |
workflowInputs | object | Defines the payload that will be sent to the backend upon execution of the action. An object containing "key":"value" pairs. |
invocationMethod.type should be set to GITLAB.
| Field | Type | Description | Example values |
|---|---|---|---|
defaultRef | string | The default ref (branch/tag name) we want the action to use. defaultRef can be overridden dynamically, by adding ref as user input. Can only be used if type is set to GITLAB. | |
projectName | string | The GitLab project name. Can only be used if type is set to GITLAB. | port |
groupName | string | The GitLab group name. Can only be used if type is set to GITLAB. | port-labs |
pipelineVariables | object | Defines the payload that will be sent to the backend upon execution of the action. An object containing "key":"value" pairs. |
invocationMethod.type should be set to AZURE_DEVOPS.
| Field | Type | Description | Example values |
|---|---|---|---|
webhook | string | The name of the webhook resource in the Azure YAML pipeline file. | |
org | string | The Azure DevOps organization in which the pipeline is located. | port-labs |
payload | object | Defines the payload that will be sent to the backend upon execution of the action. An object containing "key":"value" pairs. |
invocationMethod.type should be set to KAFKA.
| Field | Type | Description | Example values |
|---|---|---|---|
payload | object | Defines the payload that will be sent to the backend upon execution of the action. An object containing "key":"value" pairs. |
invocationMethod.type should be set to UPSERT_ENTITY.
| Field | Type | Description | Example values |
|---|---|---|---|
blueprintIdentifier | string | The identifier of the blueprint from which the entity will be created/updated. | service |
mapping | object | Defines the properties of the entity that will be created/updated. | {"name":"newEntityName"} |
Next step
Once the backend is set up, the action is ready to be used.
Optionally, you can configure permissions and/or manual approval for your actions to control who is allowed to execute them.
Execute the action
Self-service actions can be executed from the following locations:
-
The self-service page of your portal.
-
Certain dashboard widgets that can be added to your homepage or catalog.
-
Actions that are tied to a specific blueprint can be executed directly from any entity page that is based on that blueprint.
For example, the following page of an entity of typeservicedisplays a list of actions that can be executed on that entity: