Multi account support
This guide will provide you with the necessary tools for enabling our Ocean AWS Integration to digest multiple account's data.
Our Permissions model
A few key concepts in the AWS's permissions model:
- Policy: A document that defines permissions, specifying what actions are allowed or denied for particular resources and under what conditions.
- Role: An identity with specific permissions and trust policies.
- AssumeRole: An action that allows for a user / service account to impersonate a Role with temporary credentials. Allowing roles to assume-roles for other roles is enabled via
Trust Policies. - Trust Policy: A document attached to a role that specifies which principals (users, groups, or roles) are allowed to assume the role.
- Account: A container that holds all your AWS resources and services, identified uniquely by an AWS account ID.
- Root Account: The primary account created when setting up an AWS environment, the only account that has access to other accounts in the AWS Organization.
- Integration Account: The account where the Port AWS integration will be installed
- Member Account(s): The target accounts which the Port AWS integration will fetch resources from
How are permissions granted?
Very Briefly, a permission to perform a certain action in AWS must be granted from both the entity which performs the action and the entity which is affected from the action. This means, that if I want to add permissions to read from a S3 bucket and I'm using a certain role, I have to give permissions to the role from the S3's permissions policy and to read the S3 bucket from the Role. This is an oversimplification, but it works when trying to understand how you set permissions up from scratch. For more information, check AWS's docs
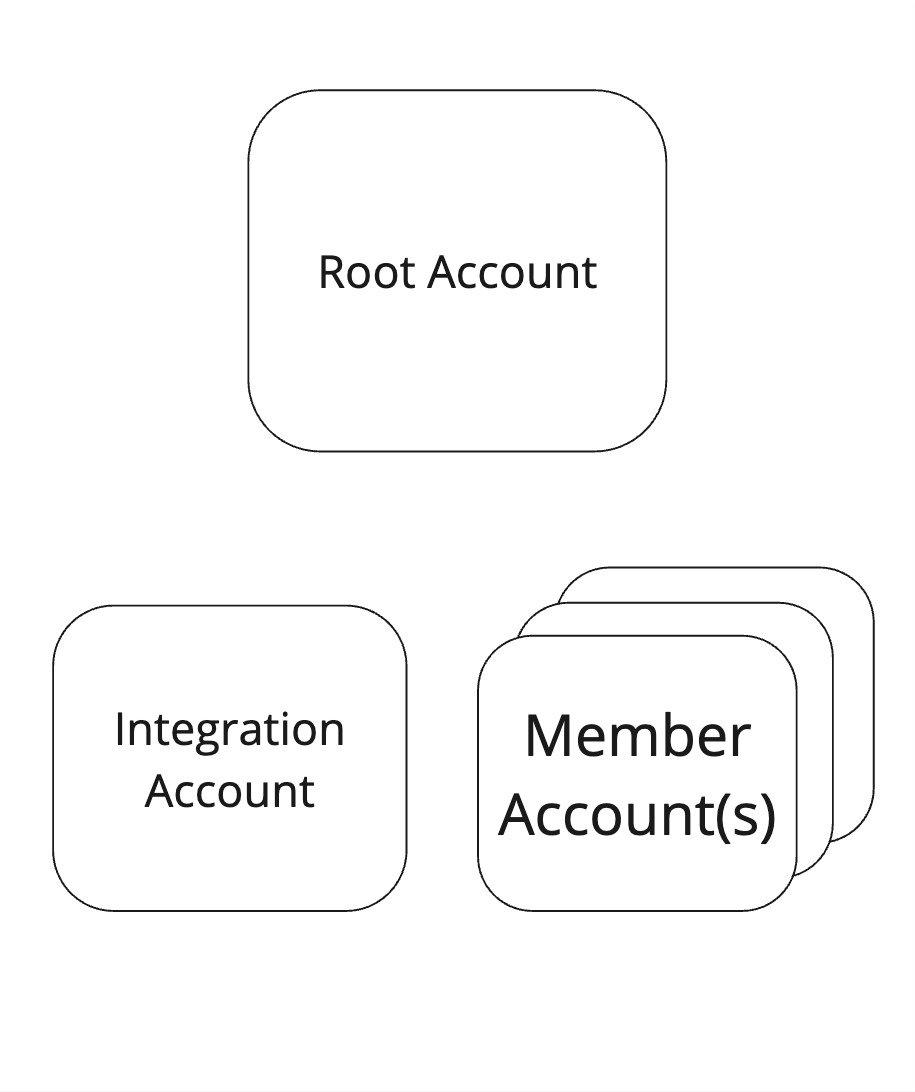
Let's assume you have 2 different accounts:
- Our
integration account, where you deploy the Port AWS integration. - A
Root account.
And the final flow that allows data to be read is where the integration account assumes the Root account (to list information about the organization), and in addition, actually fetches the data from the integration account.
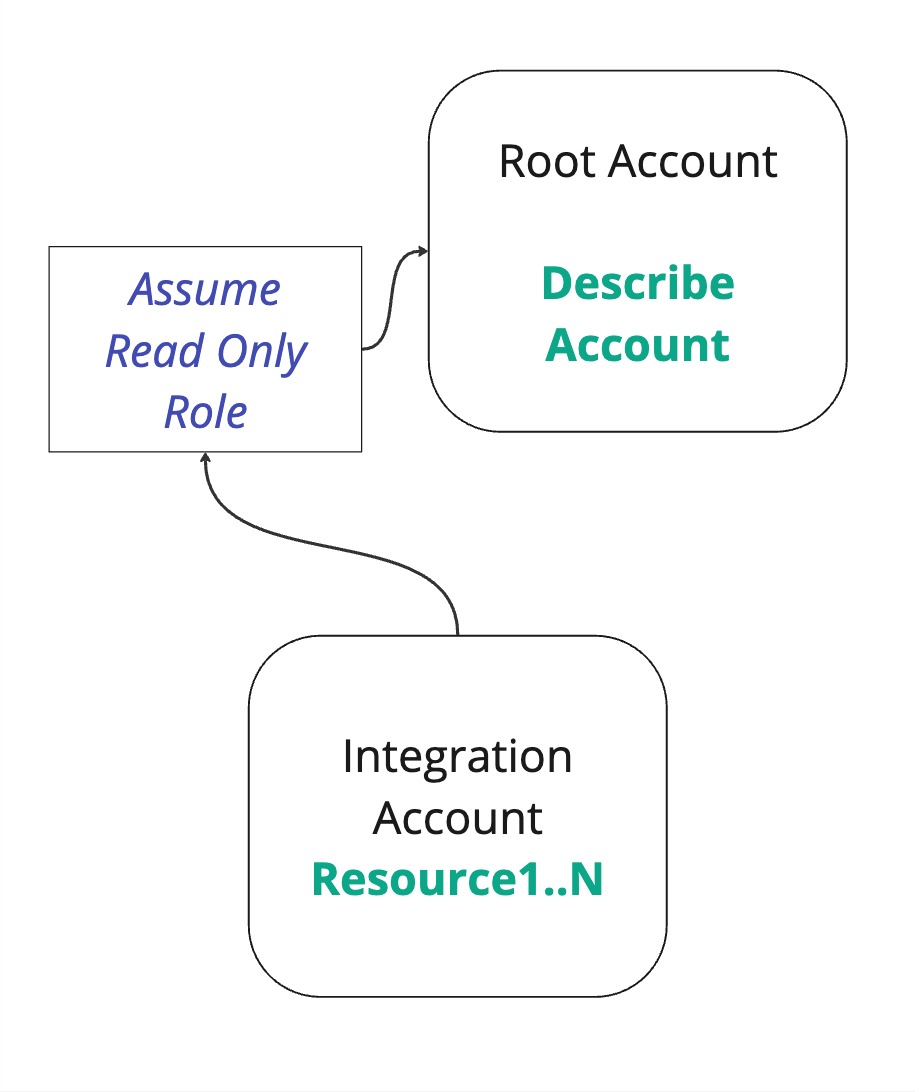
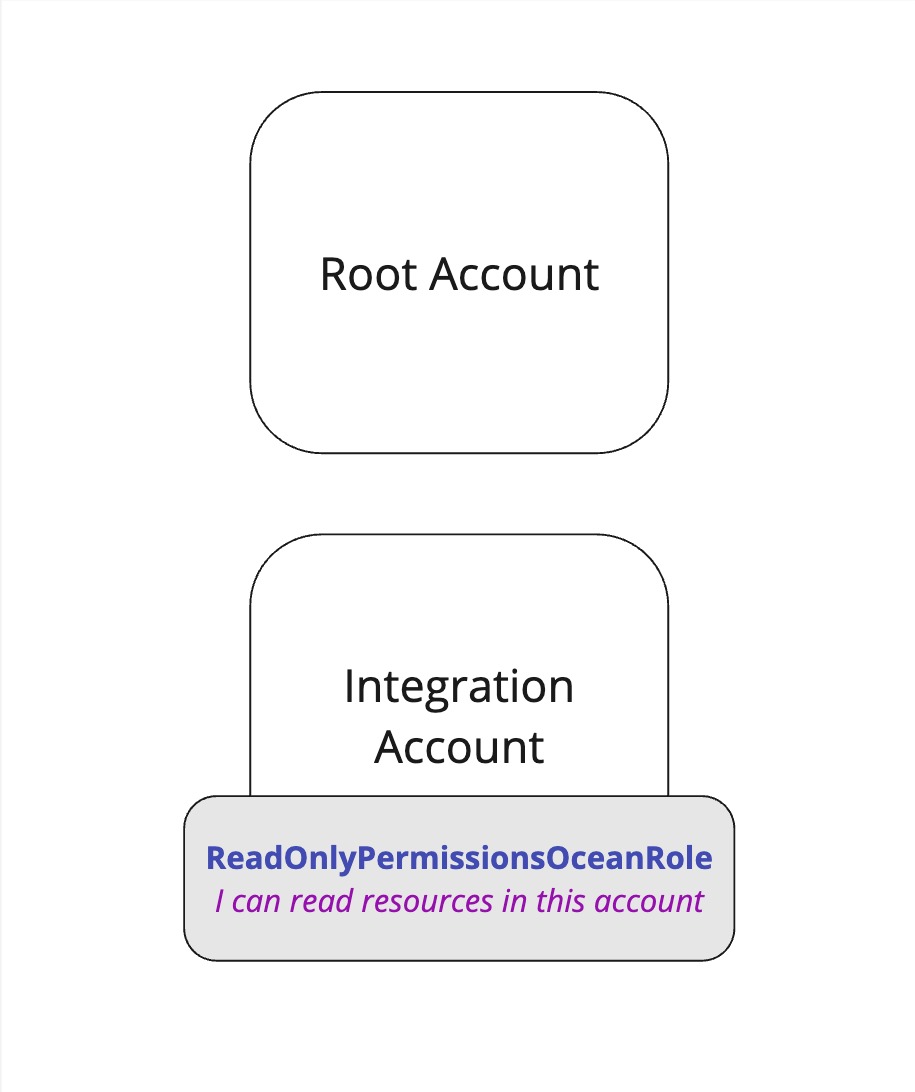
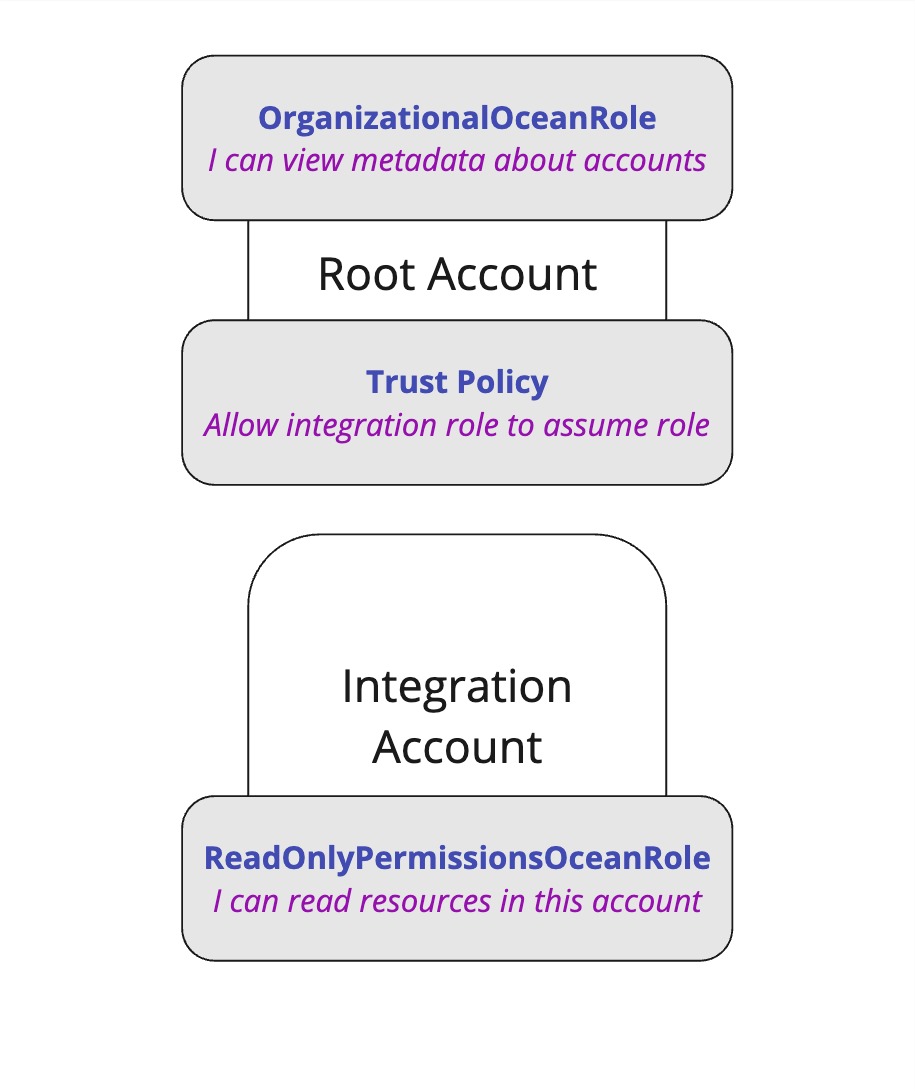
First, we will create a role with necessary permissions (if you're running the terraform installation, this will be done for you). We'll call this role ReadOnlyPermissionsOceanRole, with I can read resources in this account policy.
Then we'll go to the root account and assign permissions to view metadata about other accounts. We'll call this role OrganizationalOceanRole, and grant it permissions to list accounts within the organization.
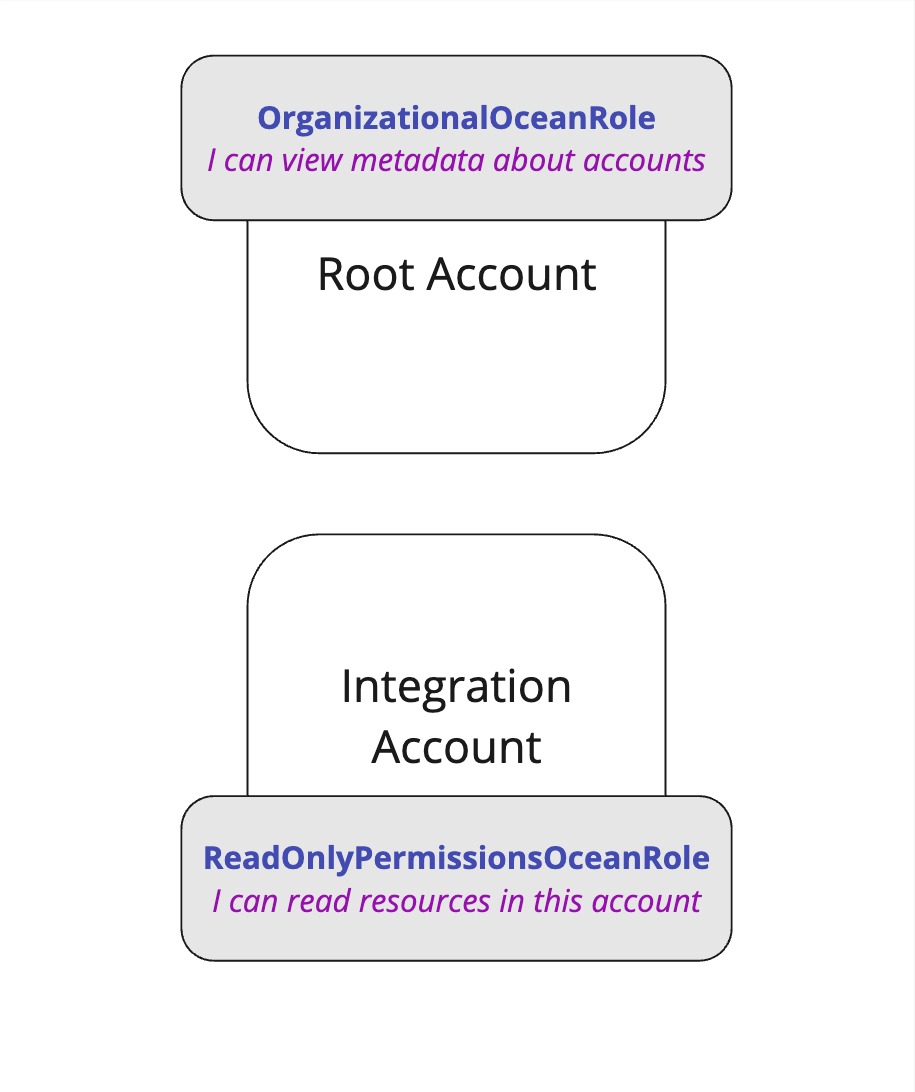
Then, In order for the integration's role to get accounts metadata, We'll need to give our integration role, ReadOnlyPermissionsOceanRole, permissions to assume the role of the root account, OrganizationalOceanRole.
Connecting it all we get the final flow:
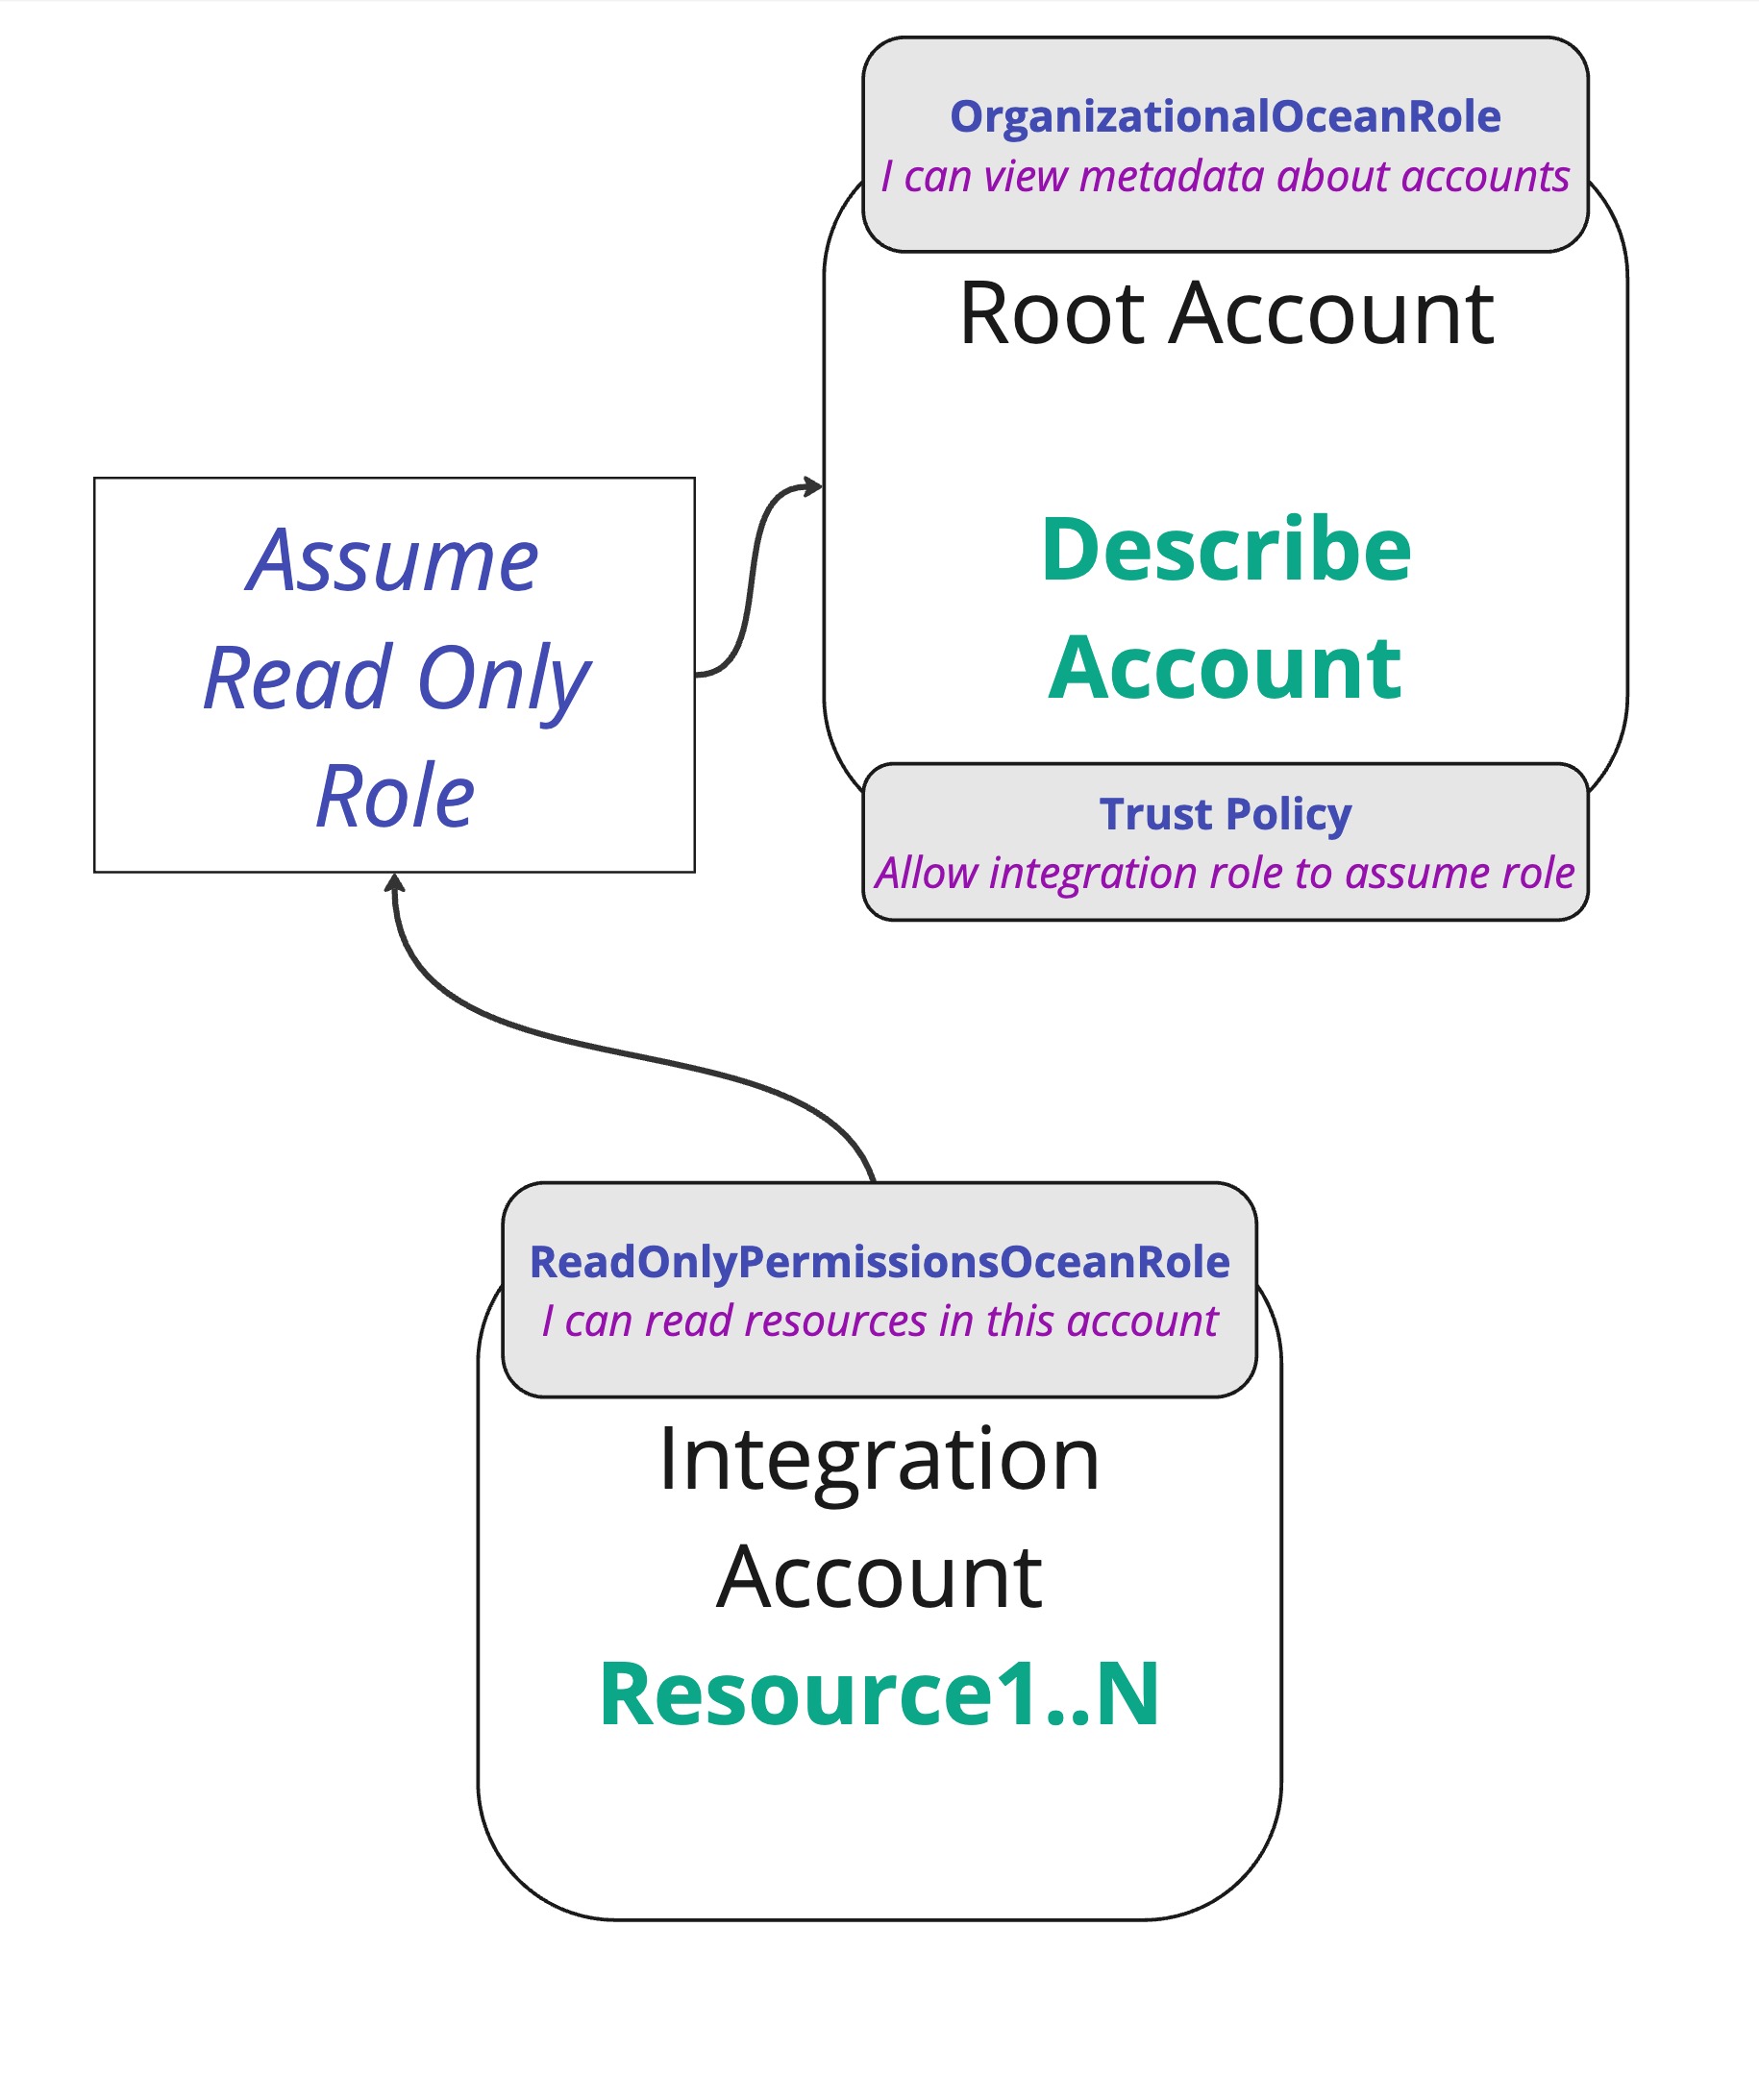
That's the flow you need to understand if you want to install the integration in one account.
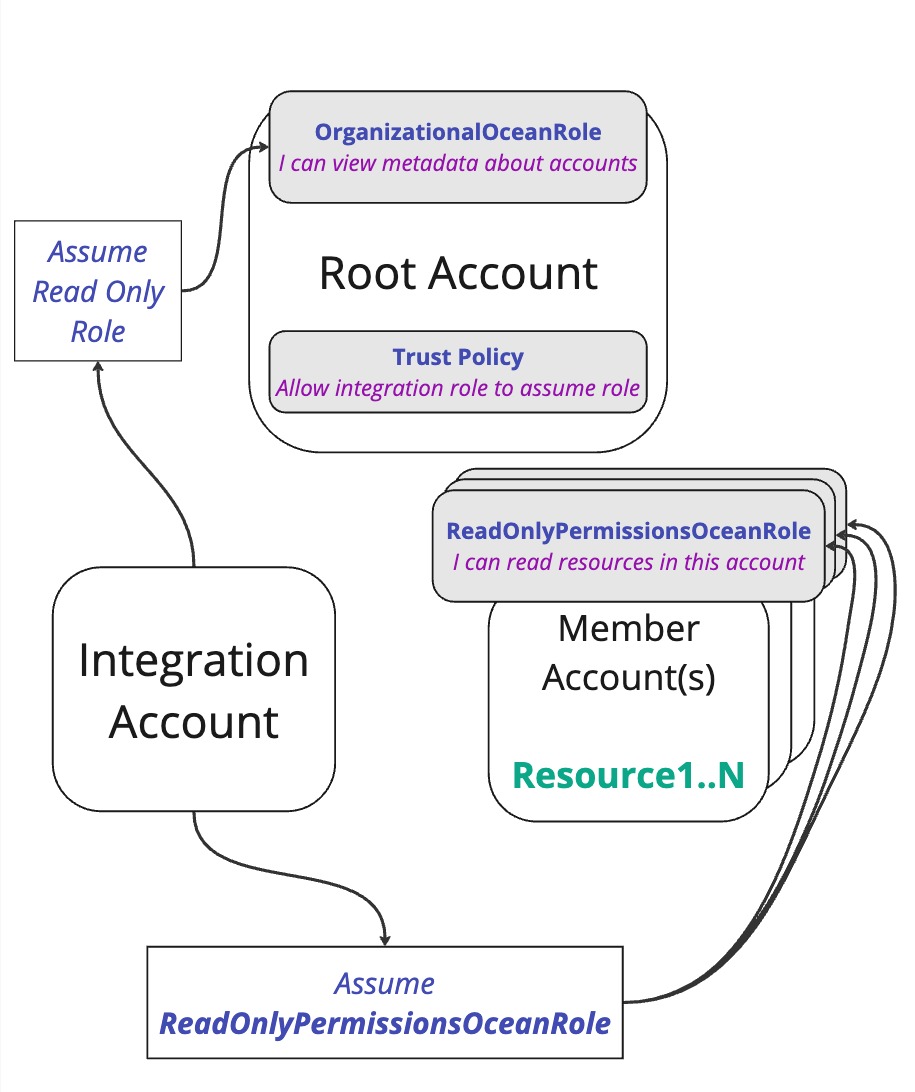
How does multiple accounts work?
If we look back at the flow from the single account, we see that it's basically the same, just with several member accounts that the integration role has the possibility to assumeRole into:
And the final flow is similar:
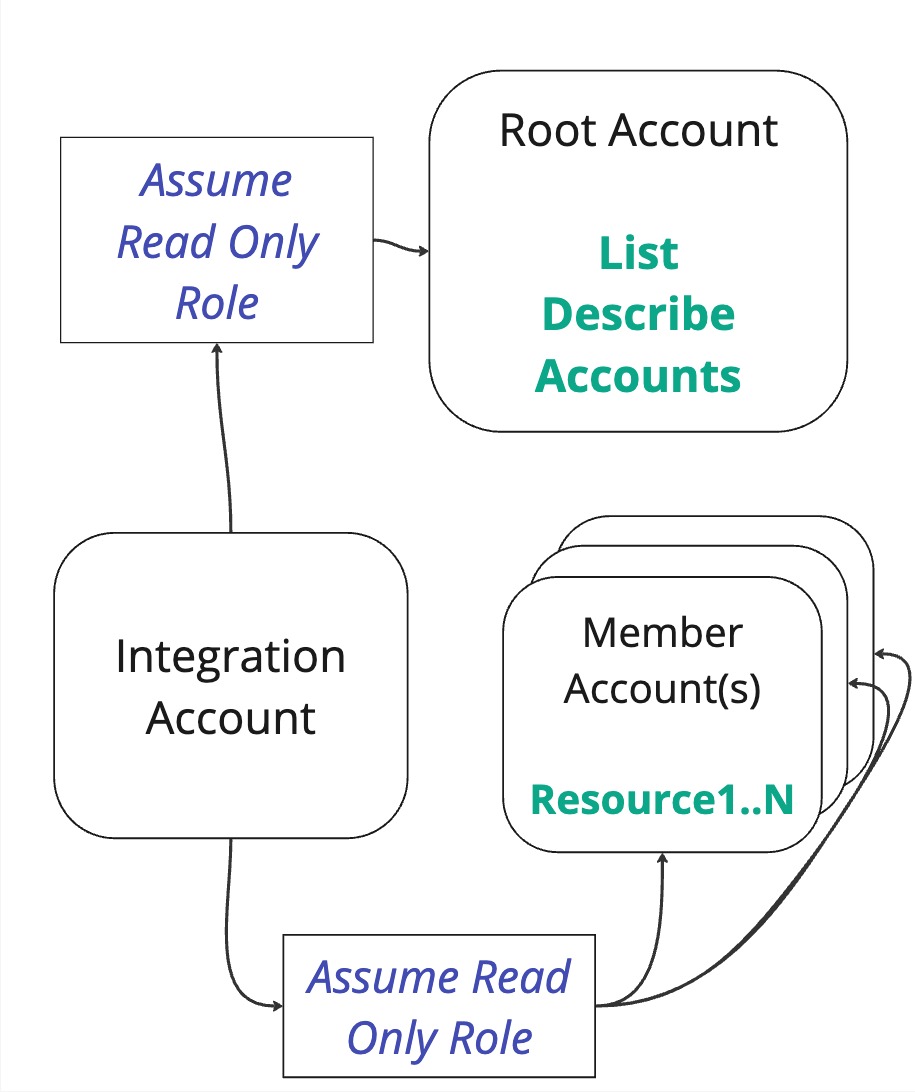
Together with the permissions and trust policies:
Multiple Accounts Setup
Integration Account
The name of this role (not the ARN) is referenced as integration_account in this doc.
If you need to read from the integration account, you'll need to add CloudControl (cloudformation) and the resources permissions. In this example, we refer to the S3 bucket permissions
Permissions
AWS::ReadOnlyAccess
{
    "Version": "2012-10-17",
    "Statement": [
        {
            "Effect": "Allow",
            "Action": "sts:AssumeRole",
            "Resource": [
                "arn:aws:iam::<root_account>:role/<RootRole>",
                "arn:aws:iam::<member_account>:role/<accountReadRoleName>"
            ]
        },
        {
            "Effect": "Allow",
            "Action": "account:ListRegions",
            "Resource": "*"
        }
    ]
}
Member account
The name of this role (not the ARN) is referenced as accountReadRoleName in this doc.
Permissions
AWS::ReadOnlyAccess
Trust relationships
{
    "Version": "2012-10-17",
    "Statement": [
        {
            "Effect": "Allow",
            "Action": "sts:AssumeRole",
            "Resource": "arn:aws:iam::<integration_account>:role/<IntegrationRole>"
        }
    ]
}
Root Account
The name of this role (not the ARN) is referenced as organizationRoleArn in this doc.
Permissions
{
    "Version": "2012-10-17",
    "Statement": [
        {
            "Effect": "Allow",
            "Action": [
                "organizations:Describe*",
                "organizations:List*"
            ],
            "Resource": "*"
        },
        {
            "Effect": "Allow",
            "Action": [
                "account:GetAlternateContact",
                "account:GetContactInformation",
                "account:ListRegions",
                "account:GetRegionOptStatus",
                "account:GetPrimaryEmail"
            ],
            "Resource": "*"
        }
    ]
}
Trust relationships
{
    "Version": "2012-10-17",
    "Statement": [
        {
            "Effect": "Allow",
            "Principal": {
                "AWS": "arn:aws:iam::<integration_account>:role/<IntegrationRole>"
            },
            "Action": "sts:AssumeRole",
        }
    ]
}
Minimum Permissions
To implement the minimum permissions needed for the integration while maintaining security best practices, use this configuration. It ensures that the integration functions effectively without granting excessive access, adhering to the principle of least privilege for enhanced security and control.
This section is designed for users who wish to manage permissions manually to maintain tighter security. It is not intended for users opting for the default integration setup.
The permissions outlined for S3 in this section are provided as an example. It is important to note that when using the CloudControl API, additional underlying permissions for each resource type are necessary to ensure successful integration. This guide uses S3 bucket permissions as a sample, but users should customize their permissions based on the specific resources they plan to import.
Integration Account
Permissions
{
    "Statement": [
        {
            "Sid": "AssumeRolePermissions",
            "Action": "sts:AssumeRole",
            "Effect": "Allow",
            "Resource": [
                "arn:aws:iam::<member_account_id>:role/<role_name>",
                "arn:aws:iam::<root_account_id>:role/<root_account_role_name>"
            ]
        },
        {
            "Sid": "AccountPermissions",
            "Action": "account:ListRegions",
            "Effect": "Allow",
            "Resource": "*"
        },
        {
            "Sid": "STSPermissions",
            "Effect": "Allow",
            "Action": [
                "sts:GetCallerIdentity"
            ],
            "Resource": "*"
        },
        {
            "Sid": "S3Permissions",
            "Effect": "Allow",
            "Action": [
                "s3:Describe*",
                "s3:List*",
                "s3:Get*"
            ],
            "Resource": "*"
        },
        {
            "Sid": "CloudControlAPIPermissions",
            "Effect": "Allow",
            "Action": [
                "cloudformation:GetResource",
                "cloudformation:ListResources"
            ],
            "Resource": "*"
        }
    ],
    "Version": "2012-10-17"
}
Member account
Permissions
{
    "Version": "2012-10-17",
    "Statement": [
        {
            "Sid": "S3Permissions",
            "Effect": "Allow",
            "Action": [
                "s3:Describe*",
                "s3:List*",
                "s3:Get*"
            ],
            "Resource": "*"
        },
        {
            "Sid": "AccountPermissions",
            "Effect": "Allow",
            "Action": [
                "account:ListRegions"
            ],
            "Resource": "*"
        },
        {
            "Sid": "CloudControlAPIPermissions",
            "Effect": "Allow",
            "Action": [
                "cloudformation:GetResource",
                "cloudformation:ListResources"
            ],
            "Resource": "*"
        }
    ]
}
Trust relationships
{
    "Version": "2012-10-17",
    "Statement": [
        {
            "Effect": "Allow",
            "Principal": {
                "AWS": "arn:aws:iam::<integration_account>:role/<IntegrationRole>"
            },
            "Action": "sts:AssumeRole",
        }
    ]
}
Root Account
Permissions
{
    "Version": "2012-10-17",
    "Statement": [
        {
            "Sid": "ListAccountPermissions",
            "Effect": "Allow",
            "Action": [
                "organizations:ListAccounts"
            ],
            "Resource": [
                "*"
            ]
        }
    ]
}
Trust relationships
{
    "Version": "2012-10-17",
    "Statement": [
        {
            "Effect": "Allow",
            "Principal": {
                "AWS": "arn:aws:iam::<integration_account>:role/<IntegrationRole>"
            },
            "Action": "sts:AssumeRole",
        }
    ]
}
Expanding to multiple accounts
In order to keep adding accounts to the integration's scope, permissions must be delivered for and from each of the accounts. For each account you want to have, you should make sure the following applies:
In each non-root account (target member account), the role accountReadRoleName must exist (with the same name and permissions), with accountReadRoleName from the integration account in it's trust policy. See reference
Running the integration
Now, after you set-up permissions properly, You can run your integration with two new integration configurations:
organizationRoleArn- Which represents the root-account's role-assuming delegation roleaccountReadRoleName- Which represents the name of the roles spread in all the accounts we want to assume-role to
These should be provided when installing the integration if you want to enable multiple account support.