Installation
For your first deployment of the Azure exporter, we recommend starting with the Helm/scheduled installation method to perform the initial data sync. Once the initial data sync is complete, you can switch to the Terraform deployment method for real-time data sync.
Installation Methods
- Helm (Scheduled)
- CI/CD (Scheduled)
- Terraform (Real Time)
- On-Prem (Once)
The Azure exporter is deployed using helm on kubernetes.
This way of deployment supports scheduled resyncs of resources from Azure to Port.
Prerequisites
Azure App Registration Setup
To ingest resources from Azure, you will need to create an Azure App Registration and assign it read permissions to the resources you want to ingest.
- Create an Azure App Registration in the Azure portal.
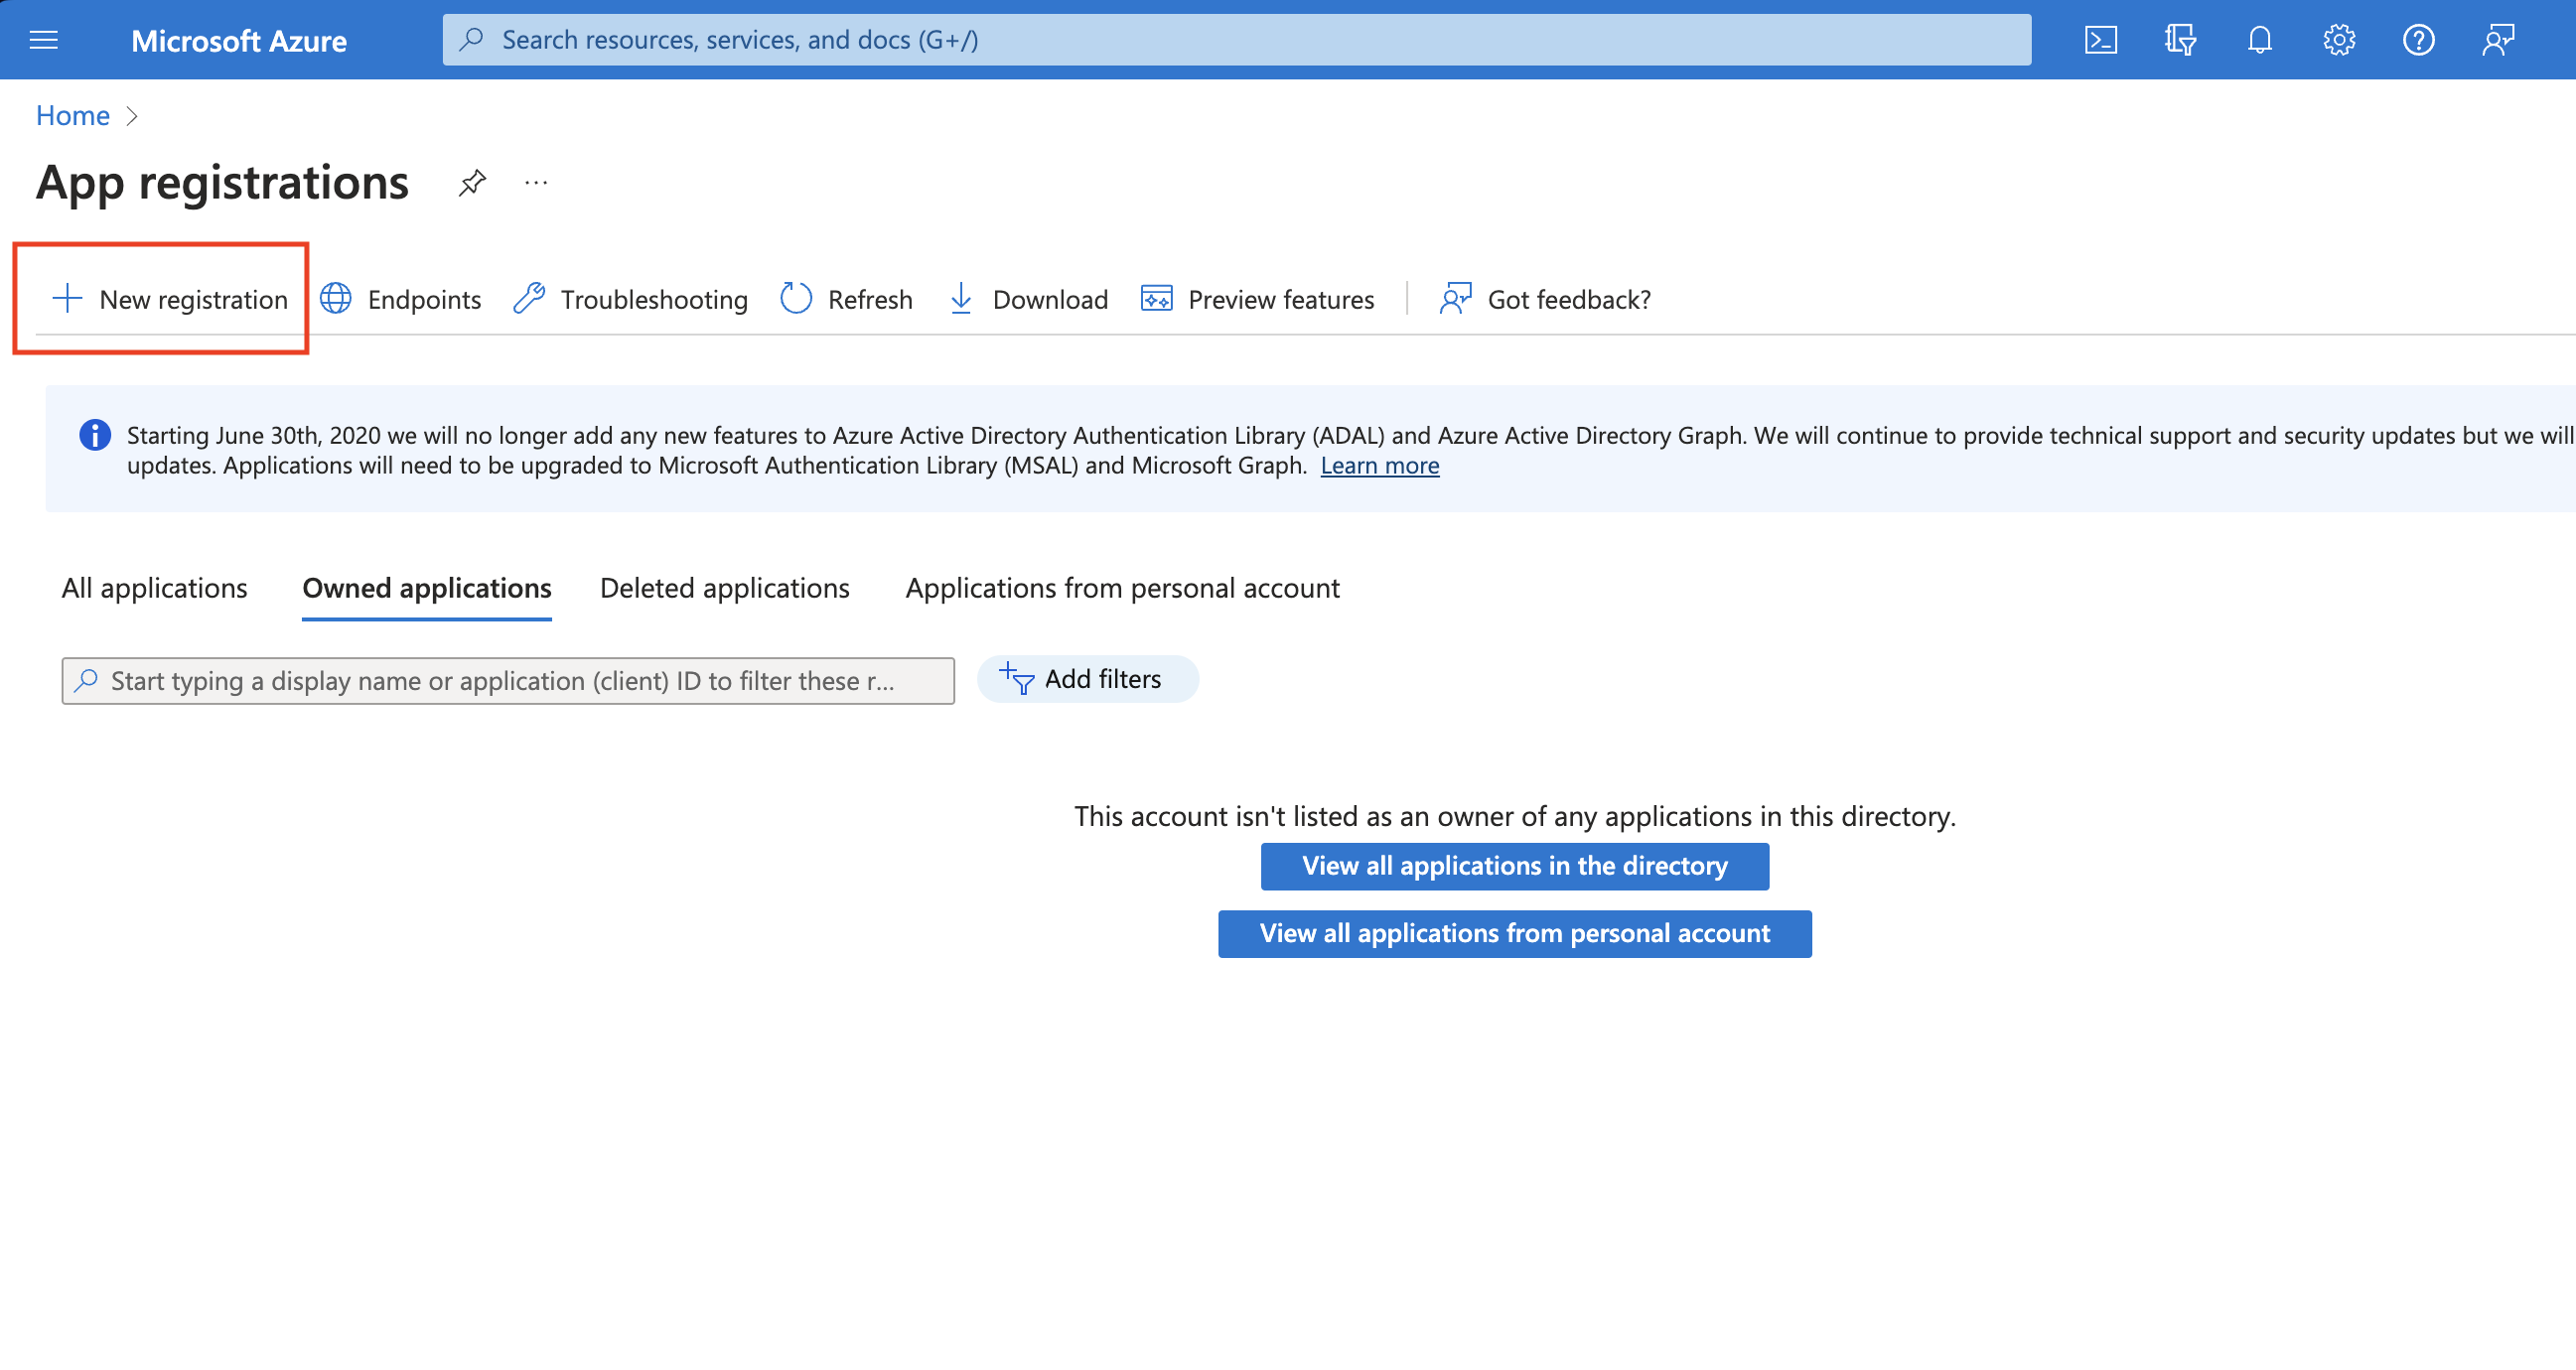

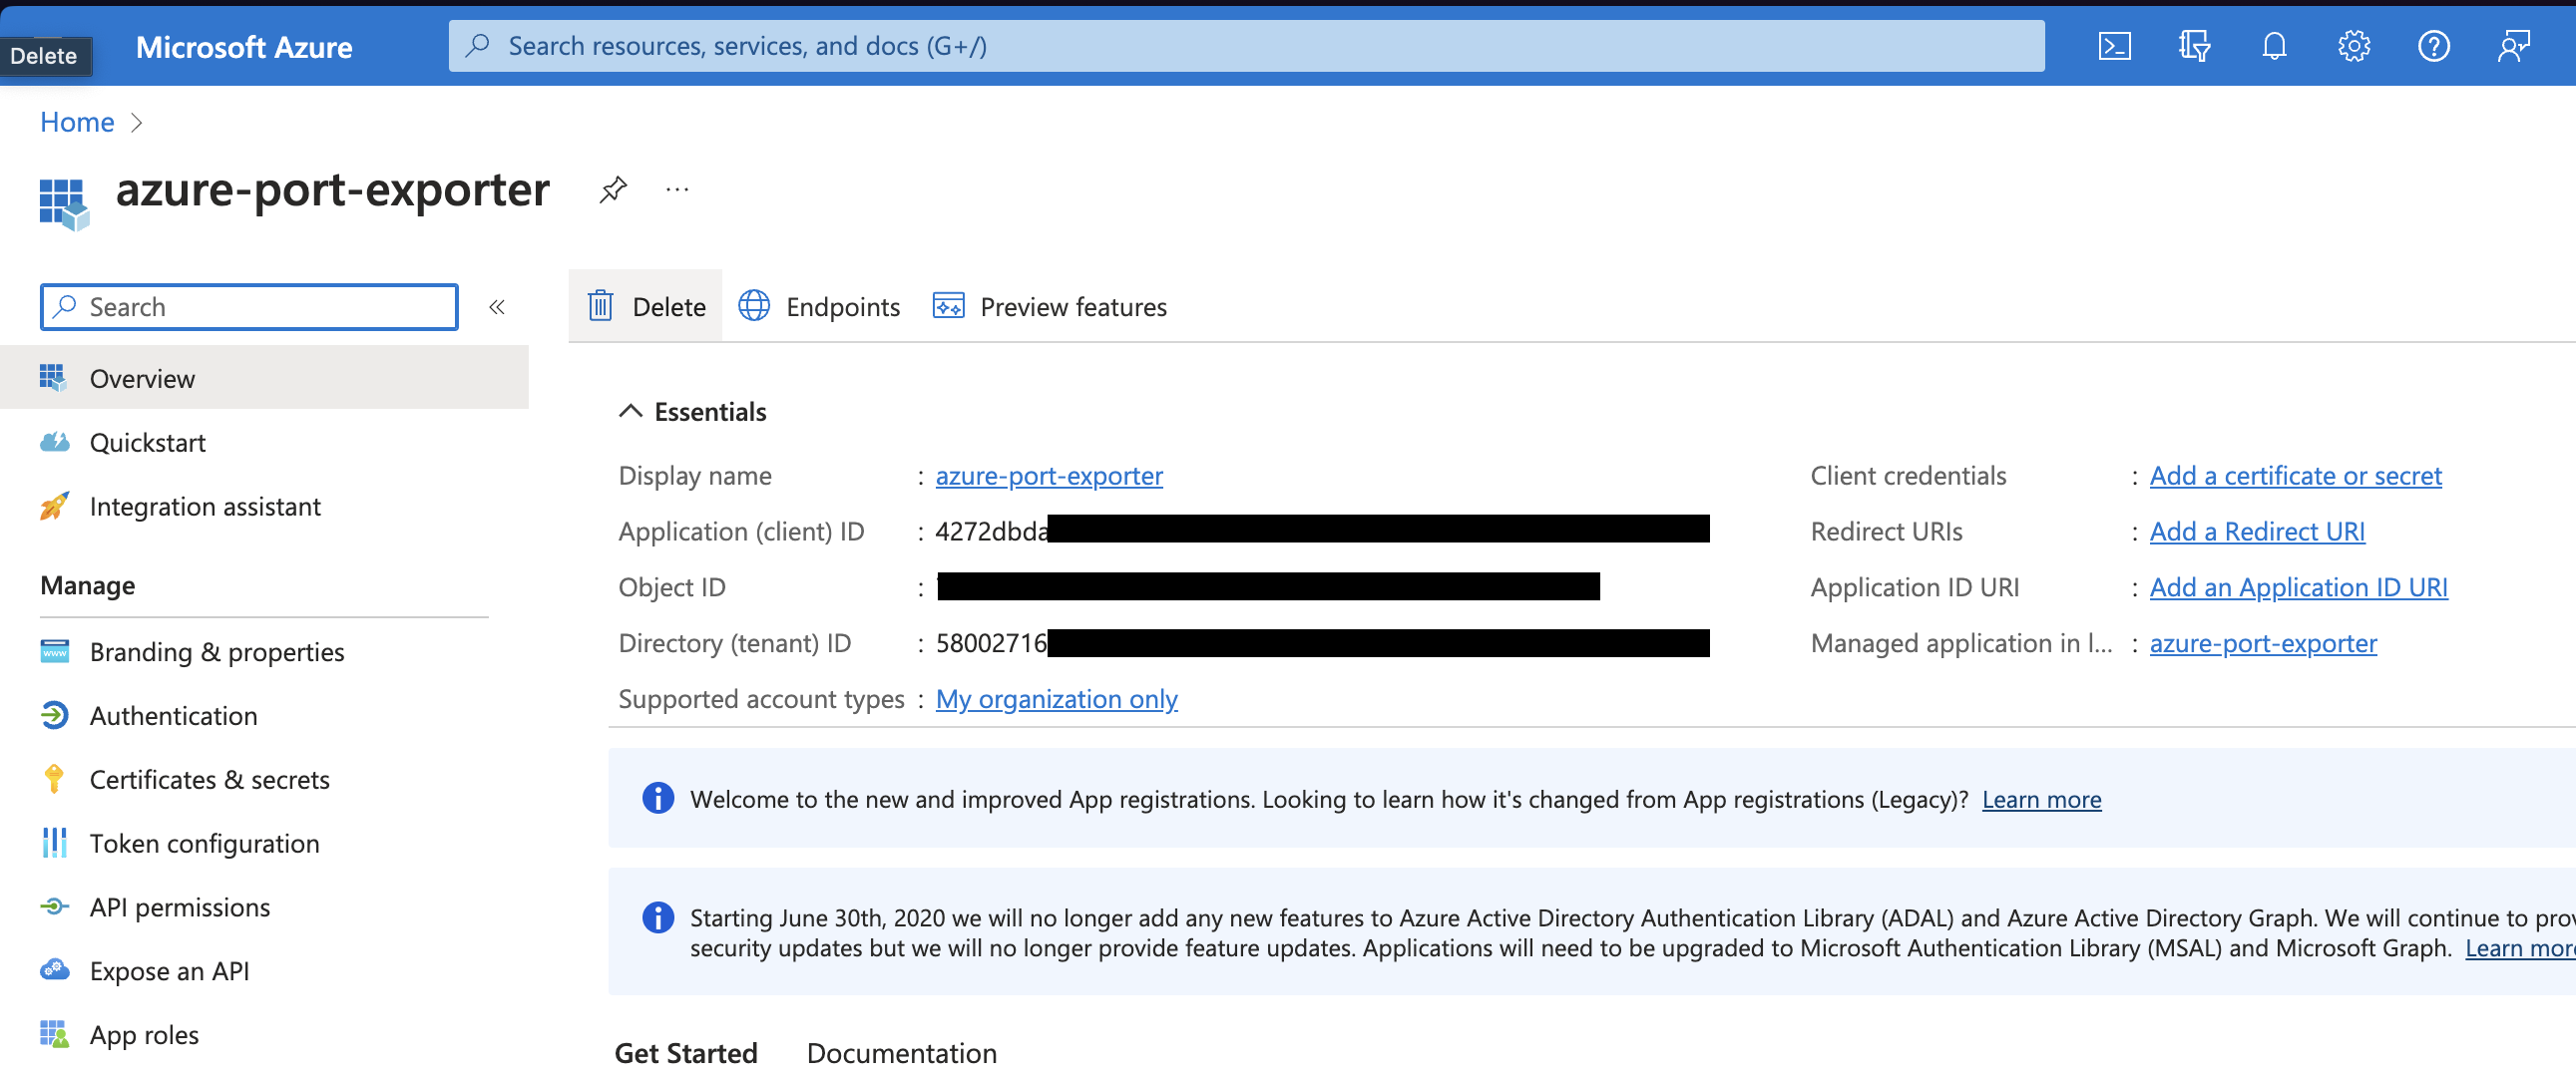
- Copy the
Application (client) IDandDirectory (tenant) IDfrom the App Registration.
- Create a client secret for the App Registration.
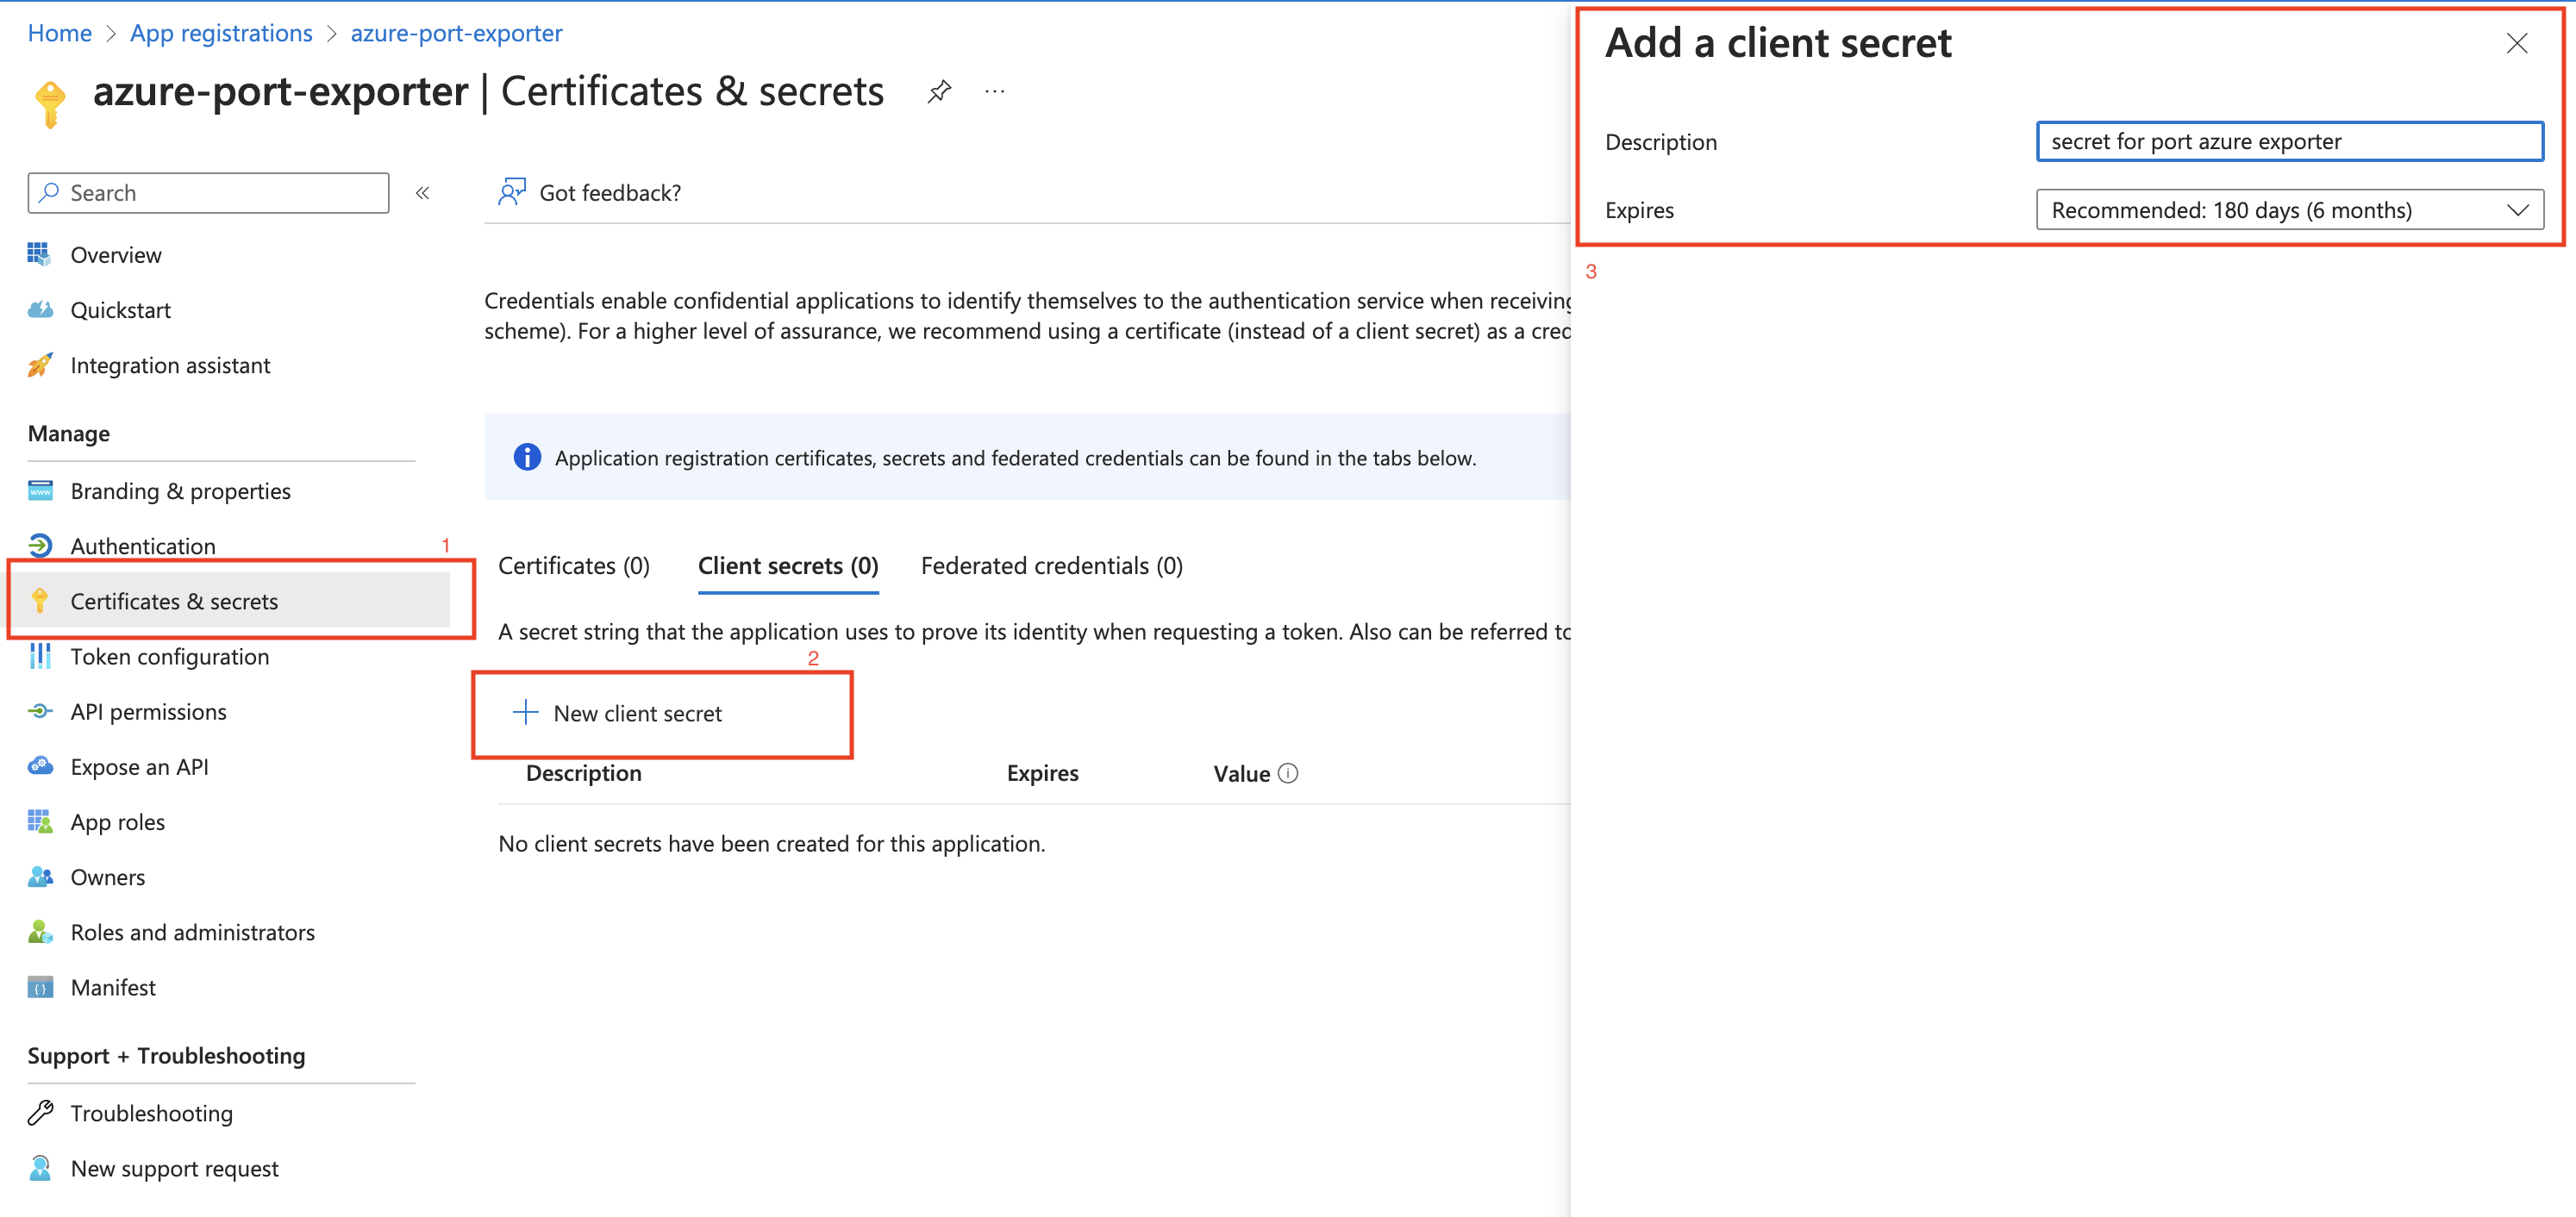
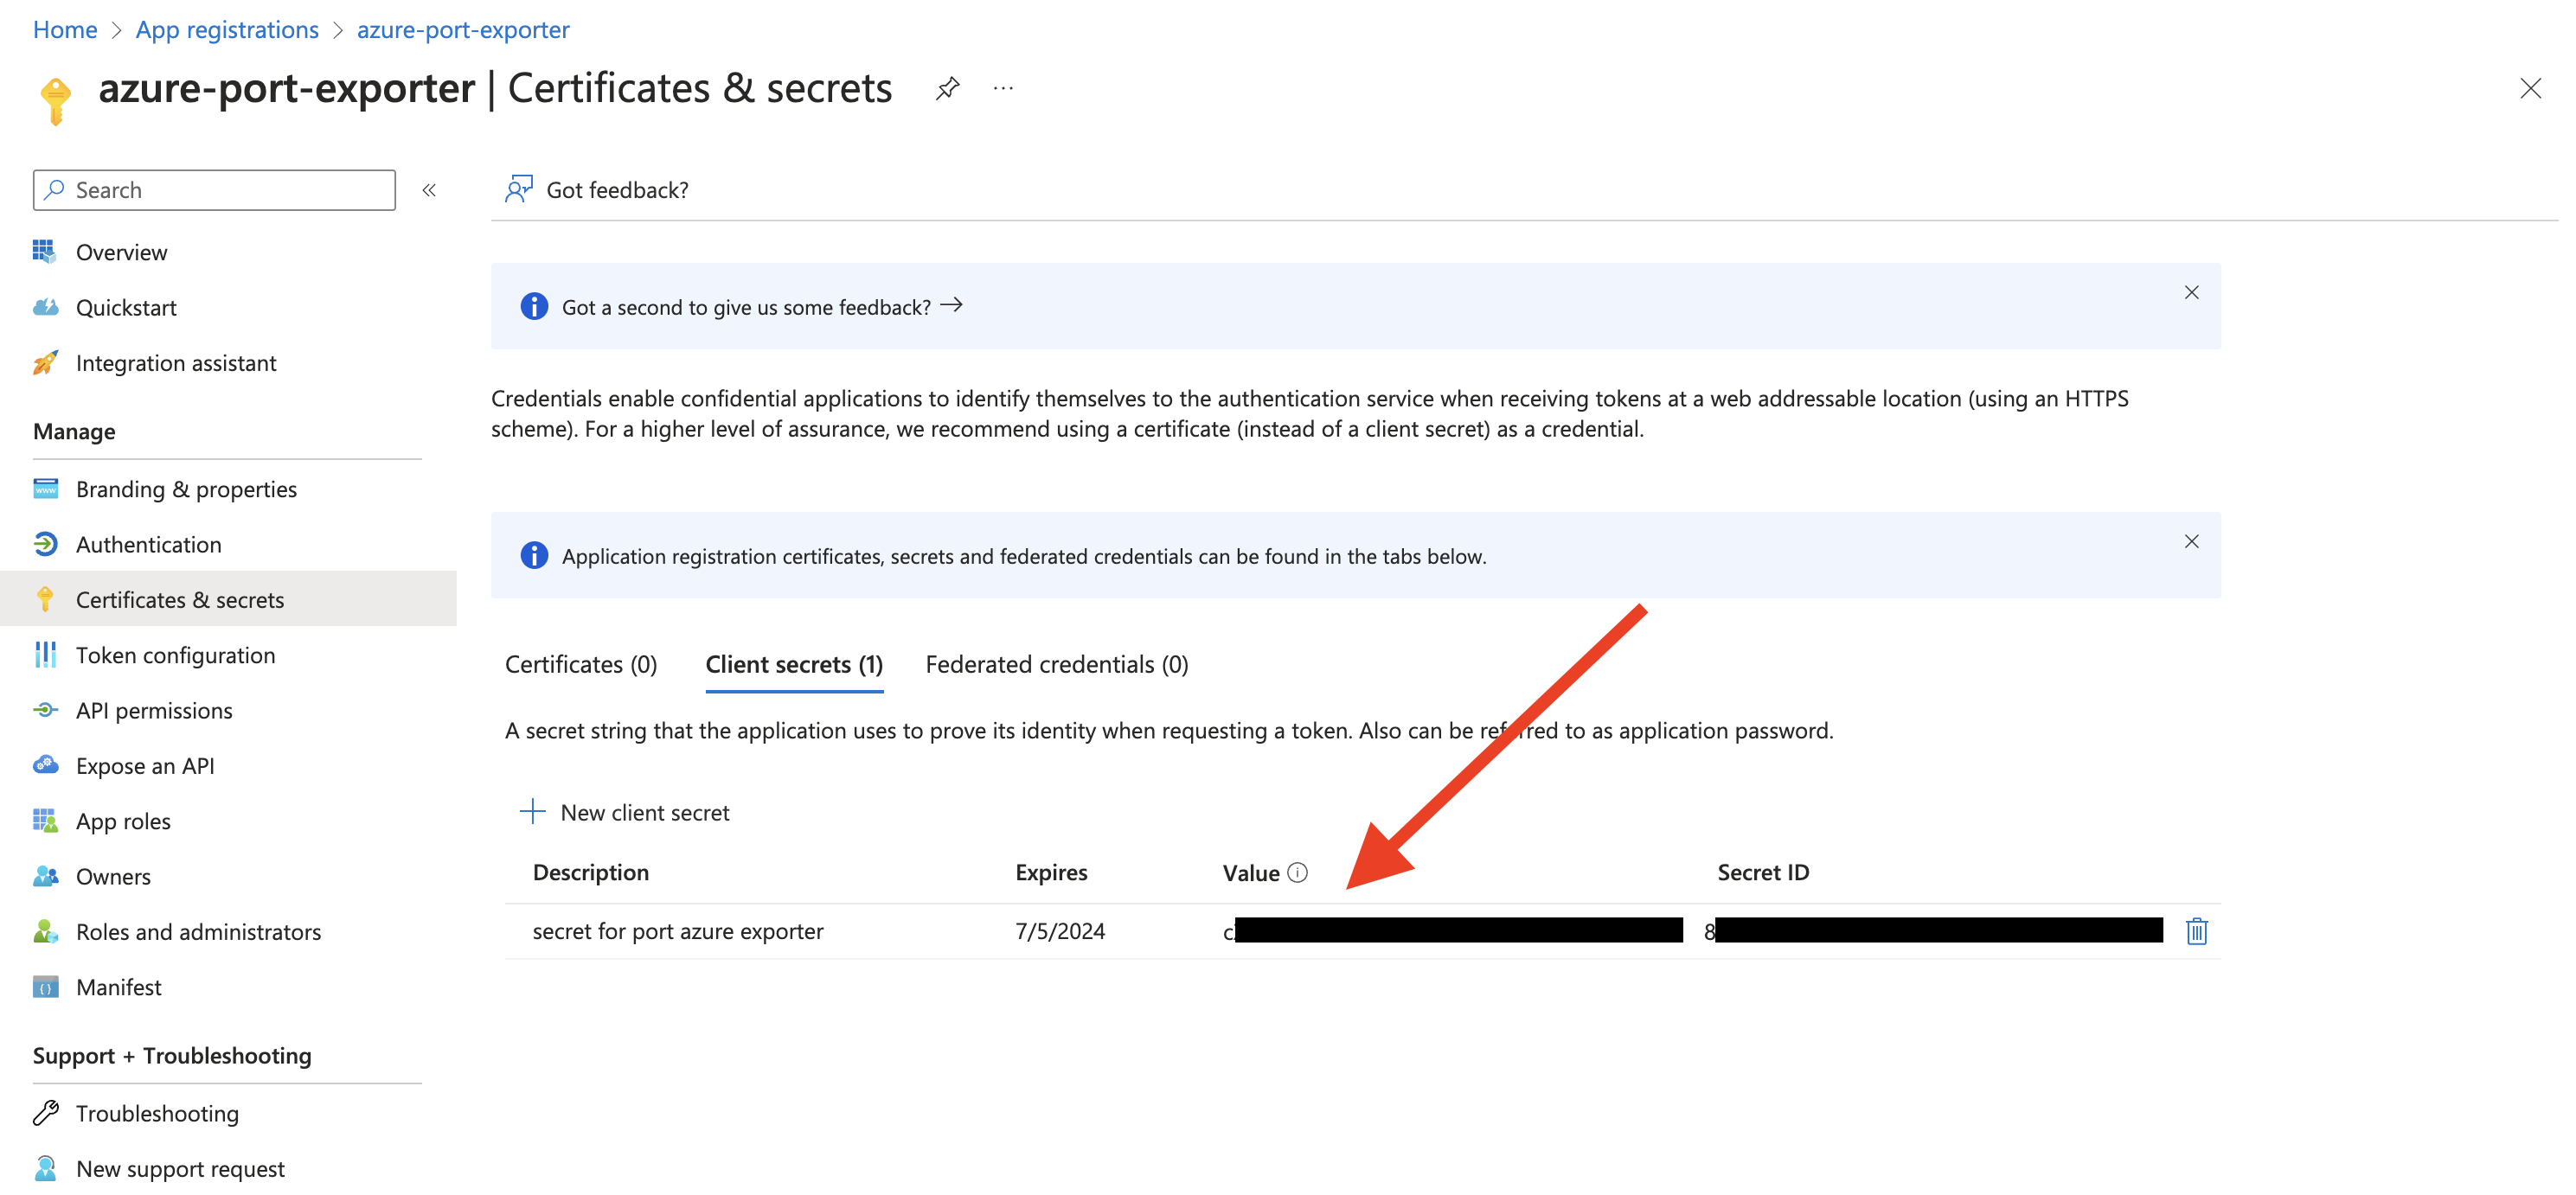
- Copy the
Application (client) Secretfrom the App Registration.
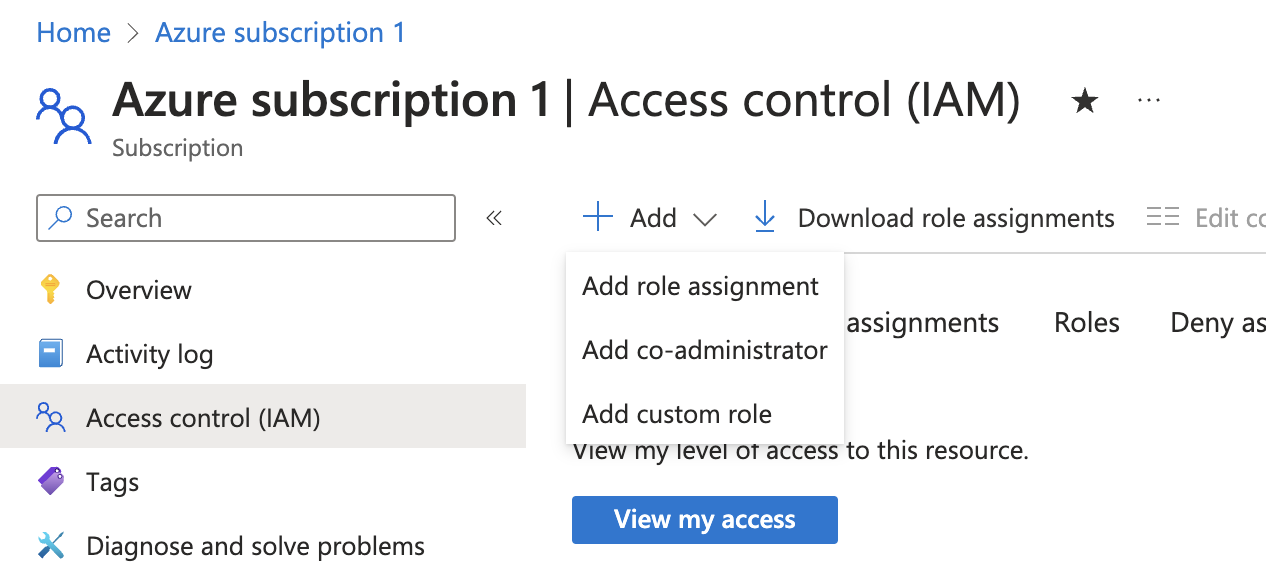
- Create a new role assignment for the App Registration. Go to the
Access control (IAM)section of the subscription you want to ingest resources from.
Click onAdd role assignment.
It is supported to ingest resources from multiple subscriptions, for that you will have to repeat the role assignment for each subscription you want to ingest resources from.
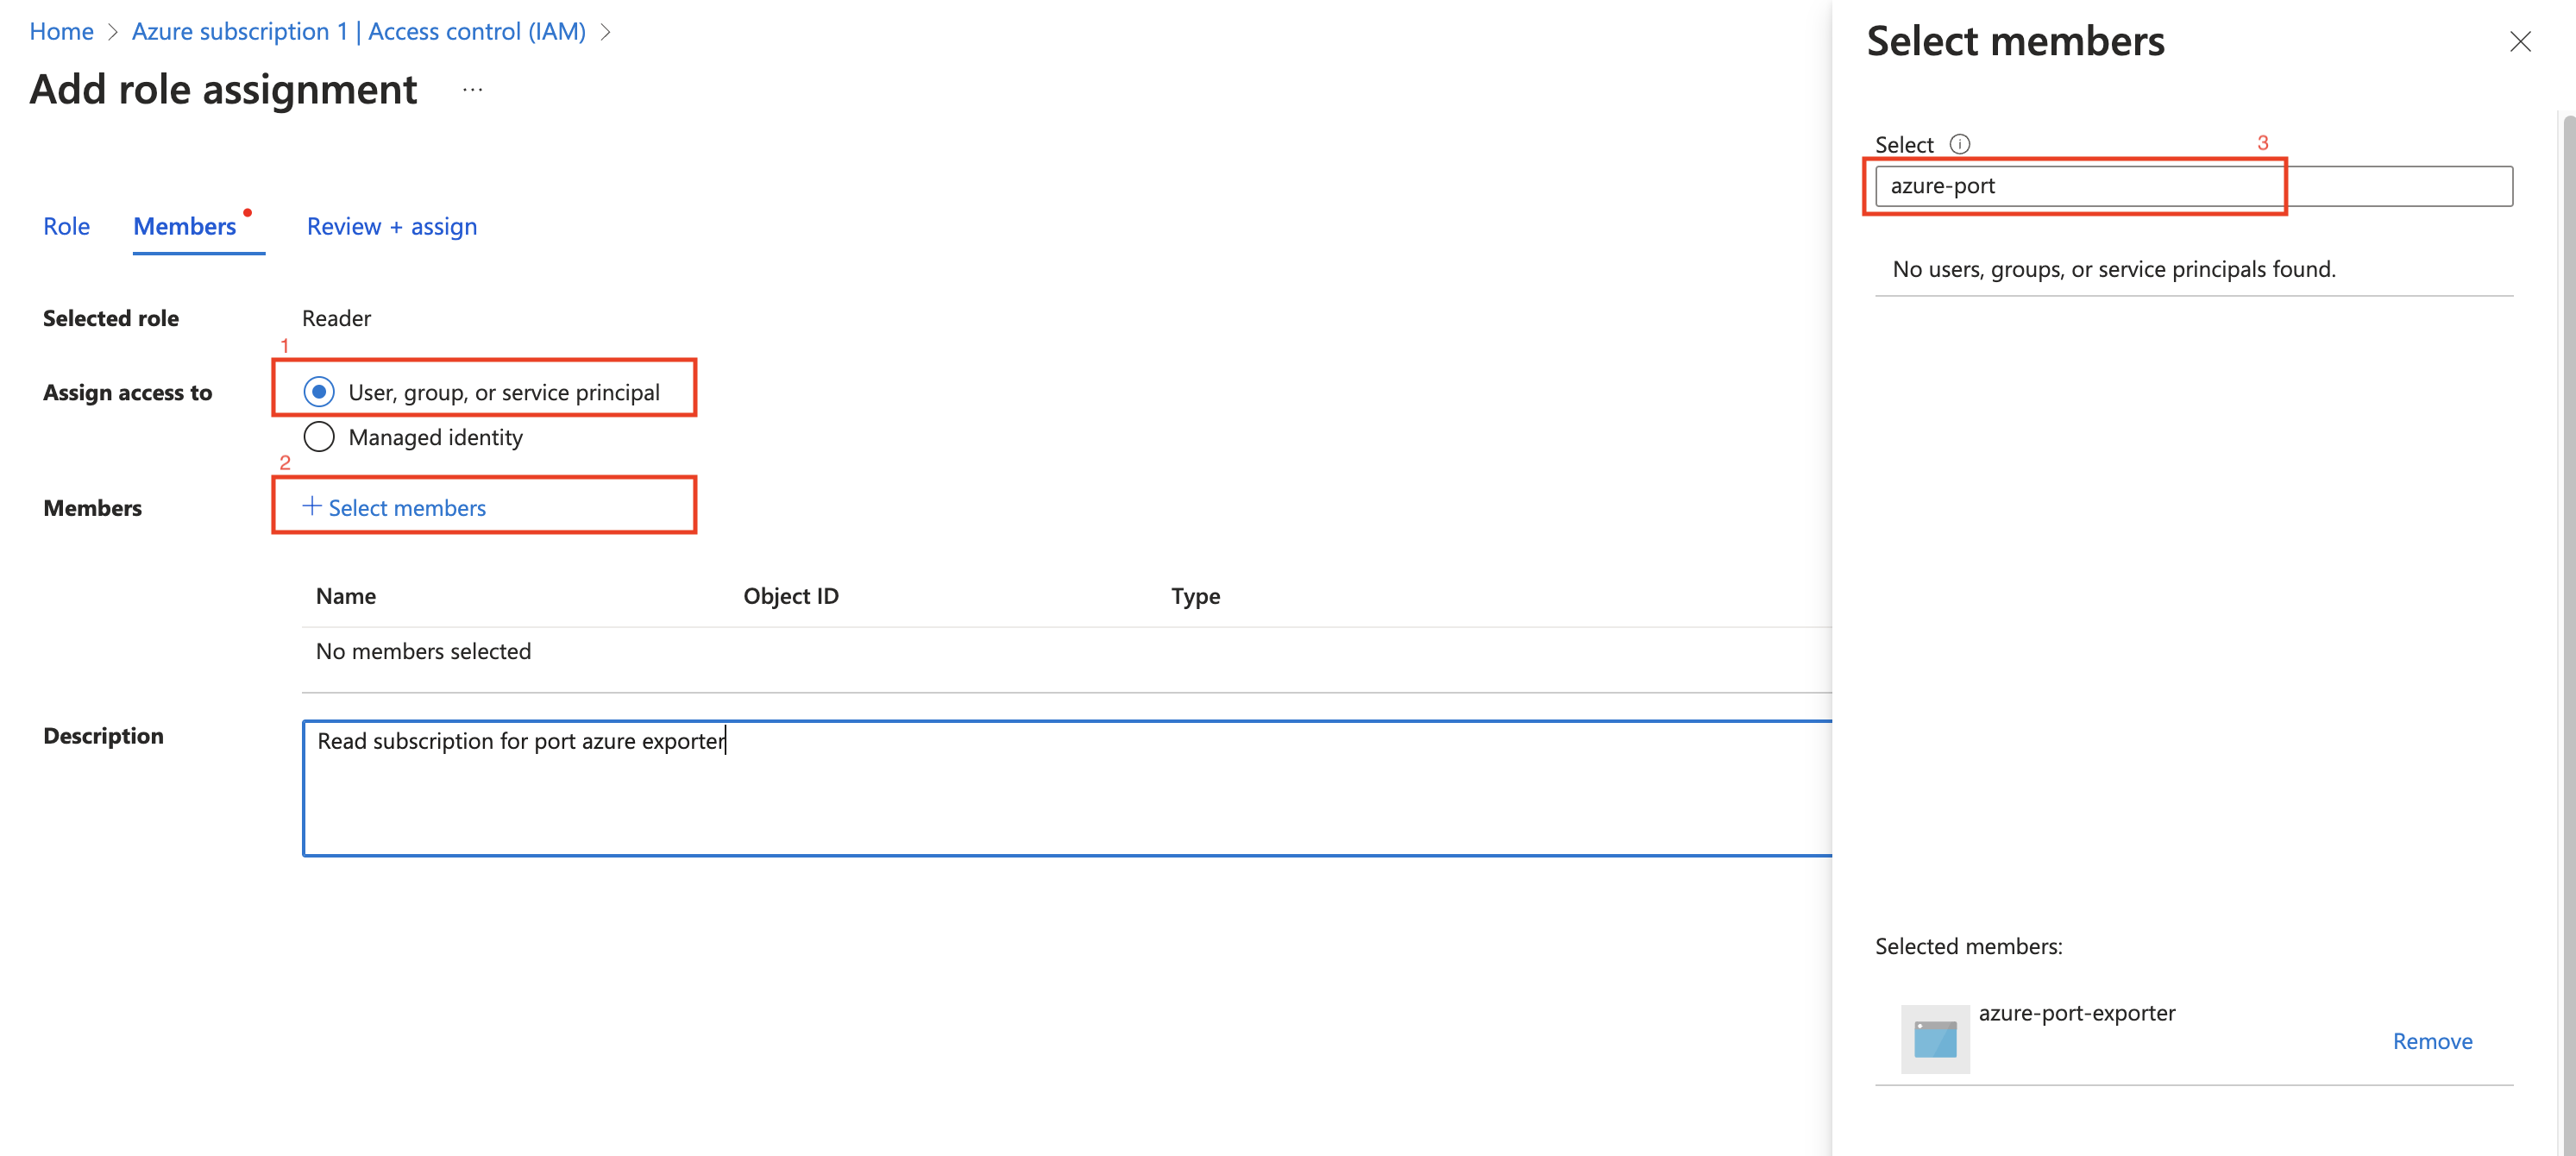
- Assign the
Readerrole to the App Registration.
The Reader role is recommended for querying all resources in your Azure subscription. You can restrict permissions to specific resource groups or types by assigning a different role. If you do this, remember to adjust permissions when adding more resources to the catalog. Basic permissions required for ingesting resources from Azure include:
Microsoft.Resources/subscriptions/read(to list the accessible subscriptions)Microsoft.Resources/subscriptions/resourceGroups/read(to list the accessible resource groups)read/listpermissions to the resources you want to ingest
Installation
Now that you have the Azure App Registration details, you can install the Azure exporter using Helm.
You should have the following information ready:
- Port API credentials, you can check out the Port API documentation.
PORT_CLIENT_IDPORT_CLIENT_SECRET
- Azure Credentials:
AZURE_CLIENT_ID: The Application (client) ID from the Azure App Registration.AZURE_CLIENT_SECRET: The Application (client) Secret from the Azure App Registration.AZURE_TENANT_ID: The Directory (tenant) ID from the Azure App Registration.
helm repo add --force-update port-labs https://port-labs.github.io/helm-charts
helm upgrade --install azure port-labs/port-ocean \
  --set port.clientId="PORT_CLIENT_ID"  \
  --set port.clientSecret="PORT_CLIENT_SECRET"  \
  --set port.baseUrl="https://api.getport.io"  \
  --set initializePortResources=true  \
  --set sendRawDataExamples=true  \
  --set scheduledResyncInterval=1440 \
  --set integration.identifier="azure"  \
  --set integration.type="azure"  \
  --set integration.eventListener.type="POLLING"  \
  --set integration.config.azureClientId="<AZURE_CLIENT_ID>"  \
  --set integration.config.azureClientSecret="<AZURE_CLIENT_SECRET>" \
  --set integration.config.azureTenantId="<AZURE_TENANT_ID>"
The baseUrl, port_region, port.baseUrl, portBaseUrl, port_base_url and OCEAN__PORT__BASE_URL parameters are used to select which instance or Port API will be used.
Port exposes two API instances, one for the EU region of Port, and one for the US region of Port.
- If you use the EU region of Port (https://app.getport.io), your API URL is
https://api.getport.io. - If you use the US region of Port (https://app.us.getport.io), your API URL is
https://api.us.getport.io.
- GitHub Actions
- ArgoCD
The Azure exporter is deployed using Github Actions, which supports scheduled resyncs of resources from Azure to Port.
Azure App Registration Setup
To ingest resources from Azure, you will need to create an Azure App Registration and assign it read permissions to the resources you want to ingest.
- Create an Azure App Registration in the Azure portal.
- Copy the
Application (client) IDandDirectory (tenant) IDfrom the App Registration.
- Create a client secret for the App Registration.
- Copy the
Application (client) Secretfrom the App Registration.
- Create a new role assignment for the App Registration. Go to the
Access control (IAM)section of the subscription you want to ingest resources from.
Click onAdd role assignment.
It is supported to ingest resources from multiple subscriptions, for that you will have to repeat the role assignment for each subscription you want to ingest resources from.
- Assign the
Readerrole to the App Registration.
The Reader role is recommended for querying all resources in your Azure subscription. You can restrict permissions to specific resource groups or types by assigning a different role. If you do this, remember to adjust permissions when adding more resources to the catalog. Basic permissions required for ingesting resources from Azure include:
Microsoft.Resources/subscriptions/read(to list the accessible subscriptions)Microsoft.Resources/subscriptions/resourceGroups/read(to list the accessible resource groups)read/listpermissions to the resources you want to ingest
Installation
Now that you have the Azure App Registration details, you can setup the Azure exporter using Github Actions.
Make sure to configure the following Github Secrets:
- Port API credentials, you can check out the Port API documentation.
PORT_CLIENT_IDPORT_CLIENT_SECRET
- Azure Credentials:
OCEAN__SECRET__AZURE_CLIENT_ID: The Application (client) ID from the Azure App Registration.OCEAN__SECRET__AZURE_CLIENT_SECRET: The Application (client) Secret from the Azure App Registration.OCEAN__SECRET__AZURE_TENANT_ID: The Directory (tenant) ID from the Azure App Registration.
| Parameter | Description | Required |
|---|---|---|
OCEAN__PORT__CLIENT_ID | Your port client id | ✅ |
OCEAN__PORT__CLIENT_SECRET | Your port client secret | ✅ |
OCEAN__PORT__BASE_URL | Your Port API URL - https://api.getport.io for EU, https://api.us.getport.io for US | ✅ |
OCEAN__SECRET__AZURE_CLIENT_ID | Your Azure client ID | ✅ |
OCEAN__SECRET__AZURE_CLIENT_SECRET | Your Azure client secret | ✅ |
OCEAN__SECRET__AZURE_TENANT_ID | Your Azure tenant ID | ✅ |
OCEAN__INITIALIZE_PORT_RESOURCES | Default true, When set to false the integration will not create default blueprints and the port App config Mapping | ❌ |
OCEAN__SEND_RAW_DATA_EXAMPLES | Enable sending raw data examples from the third party API to port for testing and managing the integration mapping. Default is true | ❌ |
OCEAN__INTEGRATION__IDENTIFIER | Change the identifier to describe your integration, if not set will use the default one | ❌ |
Here is an example for azure-integration.yml workflow file:
name: Azure Exporter Workflow

on:
  workflow_dispatch:
  schedule:
    - cron: '0 */4 * * *' # Determines the scheduled interval for this workflow. This example runs every 4 hours.

jobs:
  run-integration:
    runs-on: ubuntu-latest

    steps:
      - name: Run azure Integration
        uses: port-labs/ocean-sail@v1
        with:
          type: azure
          port_client_id: ${{ secrets.PORT_CLIENT_ID }}
          port_client_secret: ${{ secrets.PORT_CLIENT_SECRET }}
					port_base_url: "https://api.getport.io"
					config: |
						azure_client_id: ${{ secrets.OCEAN__SECRET__AZURE_CLIENT_ID }}
						azure_client_secret: ${{ secrets.OCEAN__SECRET__AZURE_CLIENT_SECRET }}
						azure_tenant_id: ${{ secrets.OCEAN__SECRET__AZURE_TENANT_ID }}
Prerequisites
Azure App Registration Setup
To ingest resources from Azure, you will need to create an Azure App Registration and assign it read permissions to the resources you want to ingest.
- Create an Azure App Registration in the Azure portal.
- Copy the
Application (client) IDandDirectory (tenant) IDfrom the App Registration.
- Create a client secret for the App Registration.
- Copy the
Application (client) Secretfrom the App Registration.
- Create a new role assignment for the App Registration. Go to the
Access control (IAM)section of the subscription you want to ingest resources from.
Click onAdd role assignment.
It is supported to ingest resources from multiple subscriptions, for that you will have to repeat the role assignment for each subscription you want to ingest resources from.
- Assign the
Readerrole to the App Registration.
The Reader role is recommended for querying all resources in your Azure subscription. You can restrict permissions to specific resource groups or types by assigning a different role. If you do this, remember to adjust permissions when adding more resources to the catalog. Basic permissions required for ingesting resources from Azure include:
Microsoft.Resources/subscriptions/read(to list the accessible subscriptions)Microsoft.Resources/subscriptions/resourceGroups/read(to list the accessible resource groups)read/listpermissions to the resources you want to ingest
Installation
- Create a
values.yamlfile inargocd/azure-integrationin your git repository with the content:
initializePortResources: true
scheduledResyncInterval: 120
integration:
  identifier: azure-integration
  type: azure
  eventListener:
    type: POLLING
	config:
    azureClientId: <AZURE_CLIENT_ID>
		azureClientSecret: <AZURE_CLIENT_SECRET>
		azureTenantId: <AZURE_TENANT_ID>
- Install the
azure-integrationArgoCD Application by creating the followingazure-integration.yamlmanifest:
Remember to replace the placeholders for YOUR_PORT_CLIENT_ID YOUR_PORT_CLIENT_SECRET and YOUR_GIT_REPO_URL.
Multiple sources ArgoCD documentation can be found here.
apiVersion: argoproj.io/v1alpha1
kind: Application
metadata:
  name: my-ocean-azure-integration
  namespace: argocd
spec:
  destination:
    namespace: mmy-ocean-azure-integration
    server: https://kubernetes.default.svc
  project: default
  sources:
  - repoURL: 'https://port-labs.github.io/helm-charts/'
    chart: port-ocean
    targetRevision: 0.1.14
    helm:
      valueFiles:
      - $values/argocd/my-ocean-azure-integration/values.yaml
      parameters:
        - name: port.clientId
          value: YOUR_PORT_CLIENT_ID
        - name: port.clientSecret
          value: YOUR_PORT_CLIENT_SECRET
        - name: port.baseUrl
          value: https://api.getport.io
  - repoURL: YOUR_GIT_REPO_URL
    targetRevision: main
    ref: values
  syncPolicy:
    automated:
      prune: true
      selfHeal: true
    syncOptions:
    - CreateNamespace=true
The baseUrl, port_region, port.baseUrl, portBaseUrl, port_base_url and OCEAN__PORT__BASE_URL parameters are used to select which instance or Port API will be used.
Port exposes two API instances, one for the EU region of Port, and one for the US region of Port.
- If you use the EU region of Port (https://app.getport.io), your API URL is
https://api.getport.io. - If you use the US region of Port (https://app.us.getport.io), your API URL is
https://api.us.getport.io.
- Apply the
azure-integration.yamlmanifest to your Kubernetes cluster.
kubectl apply -f azure-integration.yaml
The azure exporter is deployed using Terraform on Azure Container App. It uses our Terraform Ocean Integration Factory module to deploy the exporter.
This way of deployment supports real-time data sync from Azure to Port.
The Azure exporter is initially configured to collect Azure resources from the subscription where it's deployed. However, it can be adjusted to ingest resources from multiple subscriptions. To learn how to configure the Azure exporter for this purpose, check out the instructions in the Multiple subscriptions setup section.
Multiple ways to deploy the Azure exporter could be found in the Azure Integration example README
Azure infrastructure used by the Azure exporter
The Azure exporter uses the following Azure infrastructure:
- Azure Container App;
- Azure Event Grid (Used for real-time data sync to Port):
- Azure Event Grid System Topic of type
Microsoft.Resources.Subscriptions; - Azure Event Grid Subscription;
- Azure Event Grid System Topic of type
Due to a limitation in Azure only one Event Grid system topic of type Microsoft.Resources.Subscriptions can be
created per subscription, so if you already have one you'll need to pass it to the integration
using event_grid_system_topic_name=<your-event-grid-system-topic-name>.
In case a system topic already exists and is not provided to the deployment of the integration, the integration will due to not being able to create a new one.
Prerequisites
- Terraform >= 1.9.1
- Azure CLI >= 2.26.0
- Permissions
Permissions
In order to successfully deploy the Azure exporter, it's crucial to ensure that the user who deploys the integration in the Azure subscription has the appropriate access permissions. One of the following permission assignments are required:
-
Option 1: the user can have the
OwnerAzure role assigned to him for the subscription that the integration will be deployed on. This role provides comprehensive control and access rights; -
Option 2: for a more limited approach, the user should possess the minimum necessary permissions required to carry out the integration deployment. These permissions will grant the user access to specific resources and actions essential for the task without granting full
Ownerprivileges. The following steps will guide you through the process of creating a custom role and assigning it to the user along with other required roles:-
Create a custom role with the following permissions:
Custom Resource Definition
{
	"id": "<ROLE_DEFINITION_ID>",
	"properties": {
		"roleName": "Azure Exporter Deployment",
		"description": "",
		"assignableScopes": ["/subscriptions/<SUBSCRIPTION_ID>"],
		"permissions": [
			{
				"actions": [
					"Microsoft.ManagedIdentity/userAssignedIdentities/read",
					"Microsoft.ManagedIdentity/userAssignedIdentities/write",
					"Microsoft.ManagedIdentity/userAssignedIdentities/assign/action",
					"Microsoft.ManagedIdentity/userAssignedIdentities/listAssociatedResources/action",
					"Microsoft.Authorization/roleDefinitions/read",
					"Microsoft.Authorization/roleDefinitions/write",
					"Microsoft.Authorization/roleAssignments/write",
					"Microsoft.Authorization/roleAssignments/read",
					"Microsoft.Resources/subscriptions/resourceGroups/write",
					"Microsoft.OperationalInsights/workspaces/tables/write",
					"Microsoft.Resources/deployments/read",
					"Microsoft.Resources/deployments/write",
					"Microsoft.OperationalInsights/workspaces/read",
					"Microsoft.OperationalInsights/workspaces/write",
					"microsoft.app/containerapps/write",
					"microsoft.app/managedenvironments/read",
					"microsoft.app/managedenvironments/write",
					"Microsoft.Resources/subscriptions/resourceGroups/read",
					"Microsoft.OperationalInsights/workspaces/sharedkeys/action",
					"microsoft.app/managedenvironments/join/action",
					"microsoft.app/containerapps/listsecrets/action",
					"microsoft.app/containerapps/delete",
					"microsoft.app/containerapps/stop/action",
					"microsoft.app/containerapps/start/action",
					"microsoft.app/containerapps/authconfigs/write",
					"microsoft.app/containerapps/authconfigs/delete",
					"microsoft.app/containerapps/revisions/restart/action",
					"microsoft.app/containerapps/revisions/activate/action",
					"microsoft.app/containerapps/revisions/deactivate/action",
					"microsoft.app/containerapps/sourcecontrols/write",
					"microsoft.app/containerapps/sourcecontrols/delete",
					"microsoft.app/managedenvironments/delete",
					"Microsoft.Authorization/roleAssignments/delete",
					"Microsoft.Authorization/roleDefinitions/delete",
					"Microsoft.OperationalInsights/workspaces/delete",
					"Microsoft.ManagedIdentity/userAssignedIdentities/delete",
					"Microsoft.Resources/subscriptions/resourceGroups/delete"
				],
				"notActions": [],
				"dataActions": [],
				"notDataActions": []
			}
		]
	}
} -
Assign the following roles to the user on the subscription that will be used to deploy
-
-
Login to Port and browse to the builder page
-
Go to your data sources page, and click on your Azure integration.
-
Edit and copy the installation command.
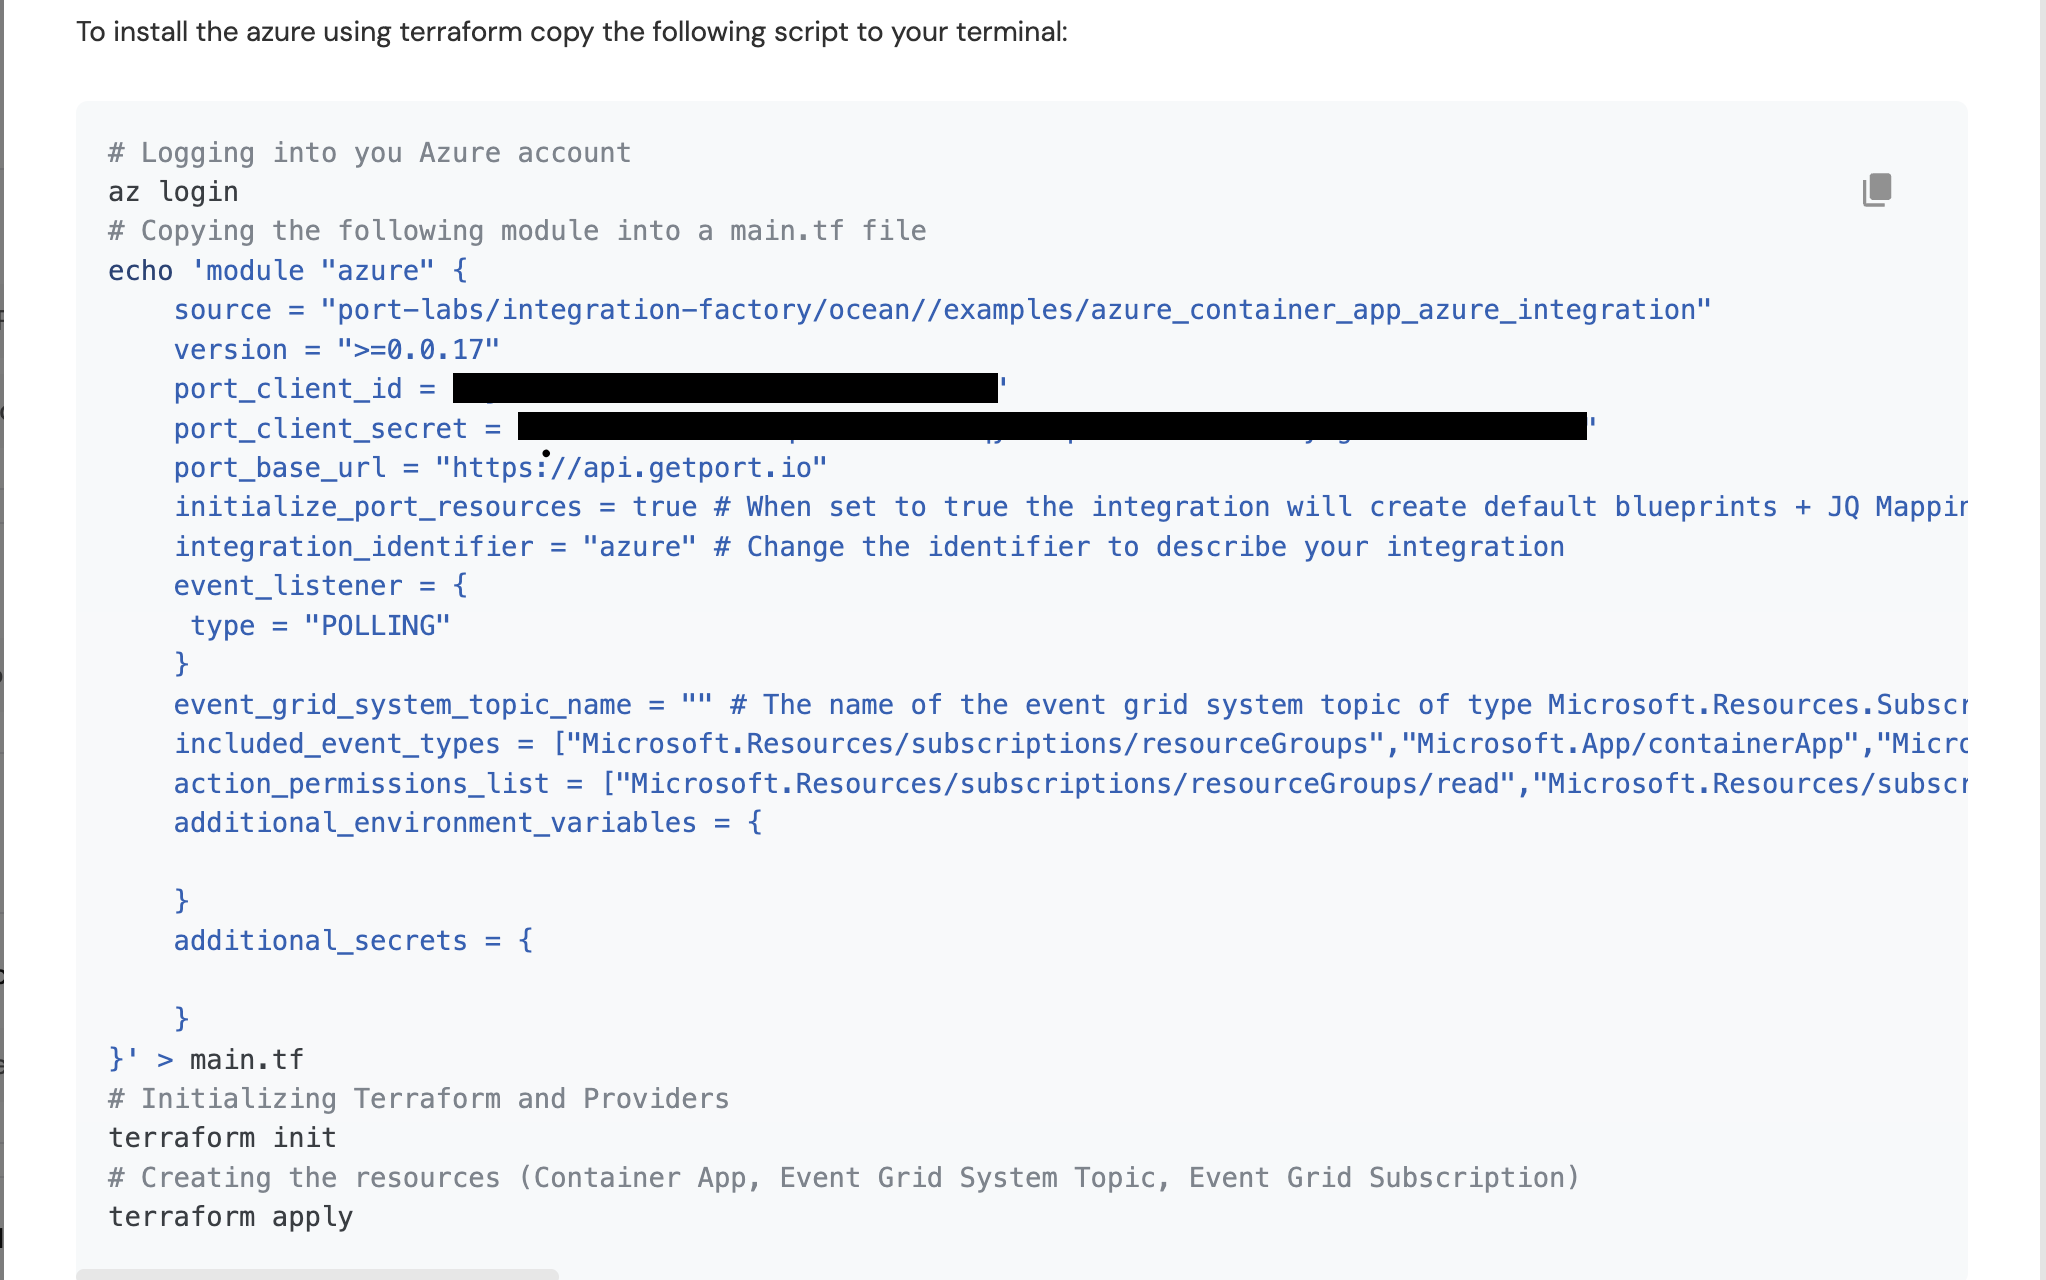
Installation CommandThe installation command includes placeholders that allow you to customize the integration's configuration. For example, you can update the command and specify the
event_grid_system_topic_nameparameter if you already have one.- Specify the
event_grid_system_topic_nameparameter if you already have an Event Grid system topic of typeMicrosoft.Resources.Subscriptionsin your subscription; - Specify the
event_grid_event_filter_listparameter if you want to listen to more events; - Specify the
action_permissions_listparameter if you want the integration to have more permissions.
Actions PermissionsTo find more actions that could be assigned to the exporter, you can use the Azure Resource provider operation reference and look for the resources that you want to export to Port.
- Specify the
-
Run the command in your terminal to deploy the Azure exporter.
Prerequisites
Azure App Registration Setup
To ingest resources from Azure, you will need to create an Azure App Registration and assign it read permissions to the resources you want to ingest.
- Create an Azure App Registration in the Azure portal.
- Copy the
Application (client) IDandDirectory (tenant) IDfrom the App Registration.
- Create a client secret for the App Registration.
- Copy the
Application (client) Secretfrom the App Registration.
- Create a new role assignment for the App Registration. Go to the
Access control (IAM)section of the subscription you want to ingest resources from.
Click onAdd role assignment.
It is supported to ingest resources from multiple subscriptions, for that you will have to repeat the role assignment for each subscription you want to ingest resources from.
- Assign the
Readerrole to the App Registration.
The Reader role is recommended for querying all resources in your Azure subscription. You can restrict permissions to specific resource groups or types by assigning a different role. If you do this, remember to adjust permissions when adding more resources to the catalog. Basic permissions required for ingesting resources from Azure include:
Microsoft.Resources/subscriptions/read(to list the accessible subscriptions)Microsoft.Resources/subscriptions/resourceGroups/read(to list the accessible resource groups)read/listpermissions to the resources you want to ingest
Installation
Now that you have the Azure App Registration details, you can install the Azure exporter using Docker.
You should have the following information ready:
- Port API credentials, you can check out the Port API documentation.
PORT_CLIENT_IDPORT_CLIENT_SECRET
- Azure Credentials:
AZURE_CLIENT_ID: The Application (client) ID from the Azure App Registration.AZURE_CLIENT_SECRET: The Application (client) Secret from the Azure App Registration.AZURE_TENANT_ID: The Directory (tenant) ID from the Azure App Registration.
Environment Variables
| Variable | Description |
|---|---|
OCEAN__PORT__CLIENT_ID | Your Port client ID. |
OCEAN__PORT__CLIENT_SECRET | Your Port client secret. |
OCEAN__PORT__BASE_URL | Your Port API URL - https://api.getport.io for EU, https://api.us.getport.io for US |
OCEAN__INTEGRATION__CONFIG__AZURE_CLIENT_ID | The client ID of the Azure App Registration. |
OCEAN__INTEGRATION__CONFIG__AZURE_CLIENT_SECRET | The client secret of the Azure App Registration. |
OCEAN__INTEGRATION__CONFIG__AZURE_TENANT_ID | The tenant ID of the Azure App Registration. |
OCEAN__EVENT_LISTENER | The event listener object. |
OCEAN__INTEGRATION__IDENTIFIER | The identifier of the integration. |
OCEAN__INTEGRATION__TYPE | should be set to azure. |
OCEAN__INITIALIZE_PORT_RESOURCES | Default true, When set to true the integration will create default blueprints and the port App config Mapping. Read more about initializePortResources |
OCEAN__SEND_RAW_DATA_EXAMPLES | Enable sending raw data examples from the third party API to port for testing and managing the integration mapping. Default is true |
For example:
docker run -i --rm --platform=linux/amd64 \
  -e OCEAN__PORT__CLIENT_ID="$PORT_CLIENT_ID" \
  -e OCEAN__PORT__CLIENT_SECRET="$PORT_CLIENT_SECRET" \
  -e OCEAN__PORT__BASE_URL="https://api.getport.io" \
  -e OCEAN__INITIALIZE_PORT_RESOURCES=true \
  -e OCEAN__SEND_RAW_DATA_EXAMPLES=true \
  -e OCEAN__EVENT_LISTENER='{"type": "ONCE"}' \
  -e OCEAN__INTEGRATION__CONFIG__AZURE_CLIENT_ID=AZURE_CLIENT_ID \
  -e OCEAN__INTEGRATION__CONFIG__AZURE_CLIENT_SECRET=$AZURE_CLIENT_SECRET \
  -e OCEAN__INTEGRATION__CONFIG__AZURE_TENANT_ID=$AZURE_TENANT_ID \
ghcr.io/port-labs/port-ocean-azure:latest
FAQ: Multiple Subscriptions Support
How do I configure the Azure exporter to ingest resources from multiple subscriptions?
To configure the Azure exporter to ingest resources from other subscriptions, follow these steps:
-
Navigate to the Subscription:
- Go to the Azure portal and select the subscription you want to ingest resources from.
-
Assign Permissions:
- In the subscription's
Access control (IAM)section, go to the Role assignment tab. - Choose the appropriate role for the managed identity responsible for the integration.
- Assign this role to the managed identity associated with the integration.
- In the subscription's
-
Repeat the Process:
- Repeat the above steps for each subscription you wish to include.
How do I set up real-time data ingestion from multiple subscriptions?
For real-time data ingestion, you will need to set up an Event Grid System Topic and an Event Grid Subscription in each subscription you want to ingest resources from. The system topic should be of type Microsoft.Resources.Subscriptions.
If you are using the terraform deployment method, refer to the Azure Integration example for more information.
Next Steps
- Refer to the Resource Templates page for templates on how to map Azure resources to Port.