Red Hat Openshift
Red Hat Openshift is a versatile platform for scalable application development, modernization, and deployment over Kubernetes, offering a complete service set for app delivery on your preferred infrastructure.
Using Port's Kubernetes Exporter, you can keep track of important Openshift resources across your different clusters and export the data to Port. You will use built in metadata from your Openshift resources and CRDs to create entities in Port and keep track of their state.
Get to know the basics of our Kubernetes exporter here!
Mapping Red Hat Openshift - Goals
While Red Hat Openshift provides great visibility when it comes to your Openshift (Kubernetes) environments, there are still some questions that remain about how your Openshift environment connects and interacts with the rest of your infrastructure, for example:
- Which cloud provider is the cluster running in?
- Which VPC is the cluster running in?
- Who is on-call for a given cluster?
- What are all the endpoints provided by all different Openshift clusters in a cloud region?
Importing your Openshift resources to Port makes it easy to create multiple tailored views for different use cases. For example, you can create a view that shows you how your Openshift cluster interacts with the rest of your infrastructure, or you can create a high-level view that allows management to understand the business value provided by your Openshift installations.
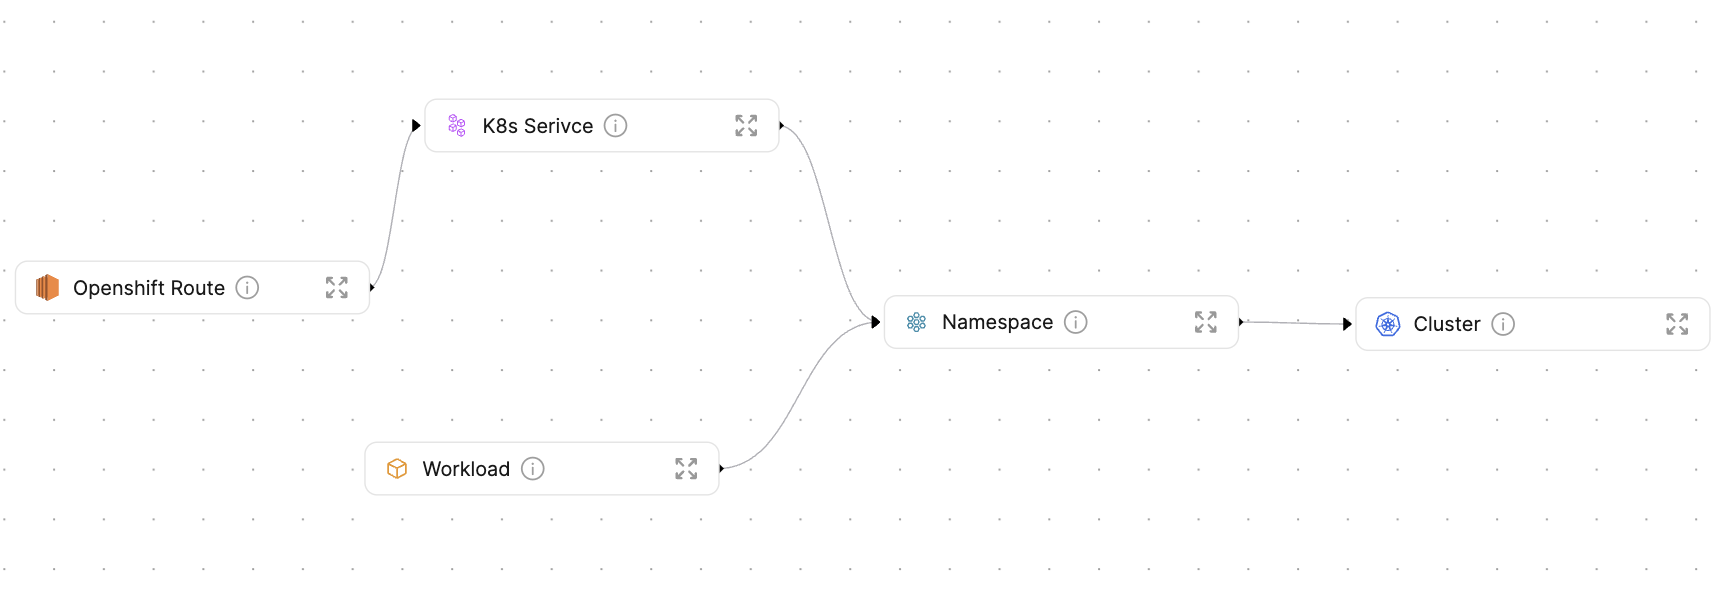
In this example you will map your Openshift clusters, their workloads and the Openshift routes which are exposed by your different clusters.
Get to know the basics of our Kubernetes exporter here!
Prerequisites
- This guide assumes you have completed the visualize your services' k8s runtime guide
- Helm must be installed to use the chart. Please refer to Helm's documentation to get started
- The
jqcommand must installed - The
yqcommand must installed - The
kubectlcommand must be installed - Have your Port credentials ready.
In this use-case, you will use a custom bash script which will assist you in the process of installing Port's K8s exporter.
The script will install the helm chart to the Kubernetes cluster which is currently in kubectl context. To view the context name of the cluster the exporter will be installed on, run:
kubectl config current-context
Setting up blueprints & resource mapping
The following section will guide you through the process of setting up your blueprints and resource mapping using the installation script. You can read more about the installation script here.
Creating blueprints
The installation script provides a convenient way to create your blueprints. Using the CUSTOM_BP_PATH environment variable, you can fetch a pre-defined blueprints.json to create your blueprints. For this use-case, you will use this file to define your blueprints. Do this by running:
export CUSTOM_BP_PATH="https://github.com/port-labs/template-assets/blob/main/kubernetes/blueprints/openshift-blueprints.json"
This blueprints.json file defines the following blueprints:
- Cluster
- Namespace
- Workload
- Service
- Openshift Route
-
Workloadis an abstraction of Kubernetes objects which create and manage pods. By creating this blueprint, you can avoid creating a dedicated blueprint per Workload type, all of which will likely look pretty similar. Here is the list of kubernetes objectsWorkloadwill represent:- Deployment
- StatefulSet
- DaemonSet
-
Openshift Routeis one of the most important Openshift resources, giving developers the capability to connect to their services, while the entire network layer is managed by the Openshift API, and providing a simple DNS record for accessibility.
Below are the Openshift blueprint schemas used in the exporter:
Service blueprint (click to expand)
{
  "identifier": "k8sService",
  "title": "K8s Service",
  "description": "This blueprint represents a k8s Service",
  "icon": "Microservice",
  "schema": {
    "properties": {
      "creationTimestamp": {
        "type": "string",
        "title": "Created",
        "format": "date-time",
        "description": "When the Namespace was created",
        "icon": "DefaultProperty"
      },
      "labels": {
        "type": "object",
        "title": "Labels",
        "description": "Labels of the Pod",
        "icon": "DefaultProperty"
      },
      "type": {
        "type": "string",
        "title": "Service Type",
        "description": "Service Type",
        "icon": "DefaultProperty"
      },
      "selectors": {
        "icon": "DefaultProperty",
        "type": "object",
        "title": "Service Selectors",
        "description": "Pod selectors for the service"
      }
    },
    "required": []
  },
  "mirrorProperties": {},
  "calculationProperties": {},
  "relations": {
    "pods": {
      "title": "Pods",
      "target": "pod",
      "required": false,
      "many": true
    },
    "namespace": {
      "title": "Namespace",
      "target": "namespace",
      "required": false,
      "many": false
    }
  }
}
Openshift route blueprint (click to expand)
{
  "identifier": "openshiftRoute",
  "title": "Openshift Route",
  "description": "This blueprint represents an Openshift route",
  "icon": "EC2",
  "schema": {
    "properties": {
      "hostName": {
        "icon": "DefaultProperty",
        "title": "Hostname",
        "type": "string",
        "format": "url"
      },
      "spec": {
        "title": "Spec",
        "type": "object"
      }
    },
    "required": []
  },
  "mirrorProperties": {},
  "calculationProperties": {},
  "relations": {
    "service": {
      "title": "Service",
      "target": "k8sService",
      "required": false,
      "many": true
    }
  }
}
Exporting custom resource mapping
Using the CONFIG_YAML_URL parameter, you can define a custom resource configuration to use when installing the exporter.
In this use-case you will be using this configuration file. To achieve this, run:
export CONFIG_YAML_URL="https://raw.githubusercontent.com/port-labs/template-assets/main/kubernetes/full-configs/openshift_usecase.yaml"
Below is the mapping for the Openshift resources:
Service mapping (click to expand)
- kind: v1/services
  selector:
    query: .metadata.namespace | startswith("kube") or startswith("openshift") | not
  port:
    entity:
      mappings:
        - identifier: .metadata.name + "-" + .metadata.namespace + "-" + env.CLUSTER_NAME
          title: .metadata.name
          icon: '"Service"'
          blueprint: '"k8sService"'
          properties:
            creationTimestamp: .metadata.creationTimestamp
            labels: .metadata.labels
            type: .spec.type
            selectors: .spec.selector // null

- kind: discovery.k8s.io/v1/endpointslices
  selector:
    query: (.metadata.namespace | startswith("kube") or startswith("openshift") | not) and (([.endpoints[].targetRef.name]) as $ref | if $ref != [null] then true else false end)
  port:
    entity:
      mappings:
        - identifier: .metadata.labels."kubernetes.io/service-name" + "-" + .metadata.namespace + "-" + env.CLUSTER_NAME
          blueprint: '"k8sService"'
          relations:
            pods: .metadata.namespace as $namespace | ([.endpoints[].targetRef.name + "-" + .metadata.namespace + "-" + env.CLUSTER_NAME])
Openshift route mapping (click to expand)
- kind: route.openshift.io/v1/routes
  selector:
    query: .metadata.namespace | startswith("kube") or startswith("openshift") | not
  port:
    entity:
      mappings:
        - identifier: .metadata.name + "-" + .metadata.namespace + "-" + env.CLUSTER_NAME
          title: .metadata.name + "-" + .metadata.namespace + "-" + env.CLUSTER_NAME
          blueprint: '"openshiftRoute"'
          properties:
            hostname: .spec.host
            spec: .spec
          relations:
            service: .metadata.namespace as $namespace | [(.spec.alternateBackends[]?.name )]  as $alt_backends | ($alt_backends + [.spec.to.name]) | map(. + "-" + $namespace + "-" + env.CLUSTER_NAME)
You can now browse to your Port environment to see that your blueprints have been created, and your Kubernetes resources, including Openshift routes are being reported to Port using the freshly installed k8s exporter.